
Table of contents:
The easiest way to create a new IoT device using the 2Smart Cloud platform is to use a step-by-step wizard. However, for experienced developers and those who do not want to be limited to the scope of the wizard, an alternative option is suitable, which is more flexible. Using the example of a Wi-Fi relay, we will show how to create a new IoT device in 2Smart Cloud without using a wizard.
If you begin your experience with the platform through this article, we recommend going through the wizard’s instructions, which contain essential details excluded in the text below. Let’s move on to how to build an IoT device using the 2Smart Platform.
4 stages of using the 2Smart Cloud platform to build a new IoT device
Stage 1. Prototype assembling and registration on the platform
So, let’s make the internet of things hardware.
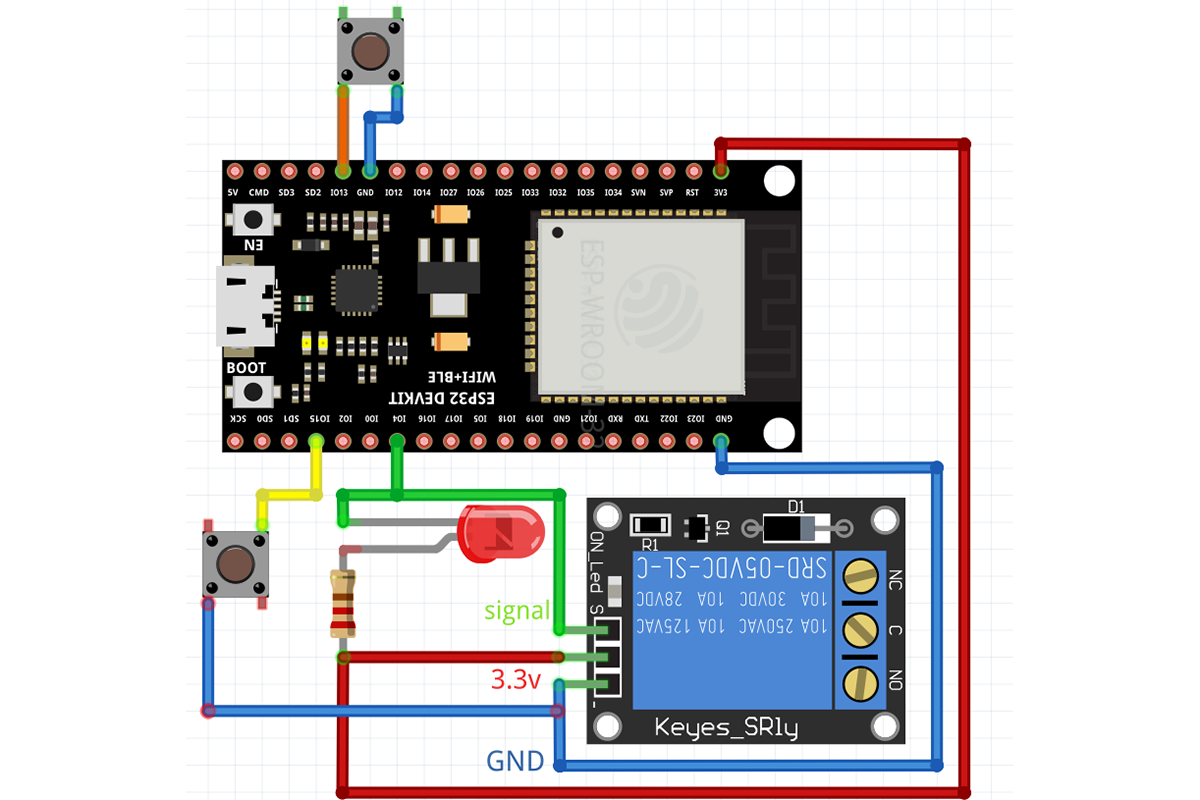
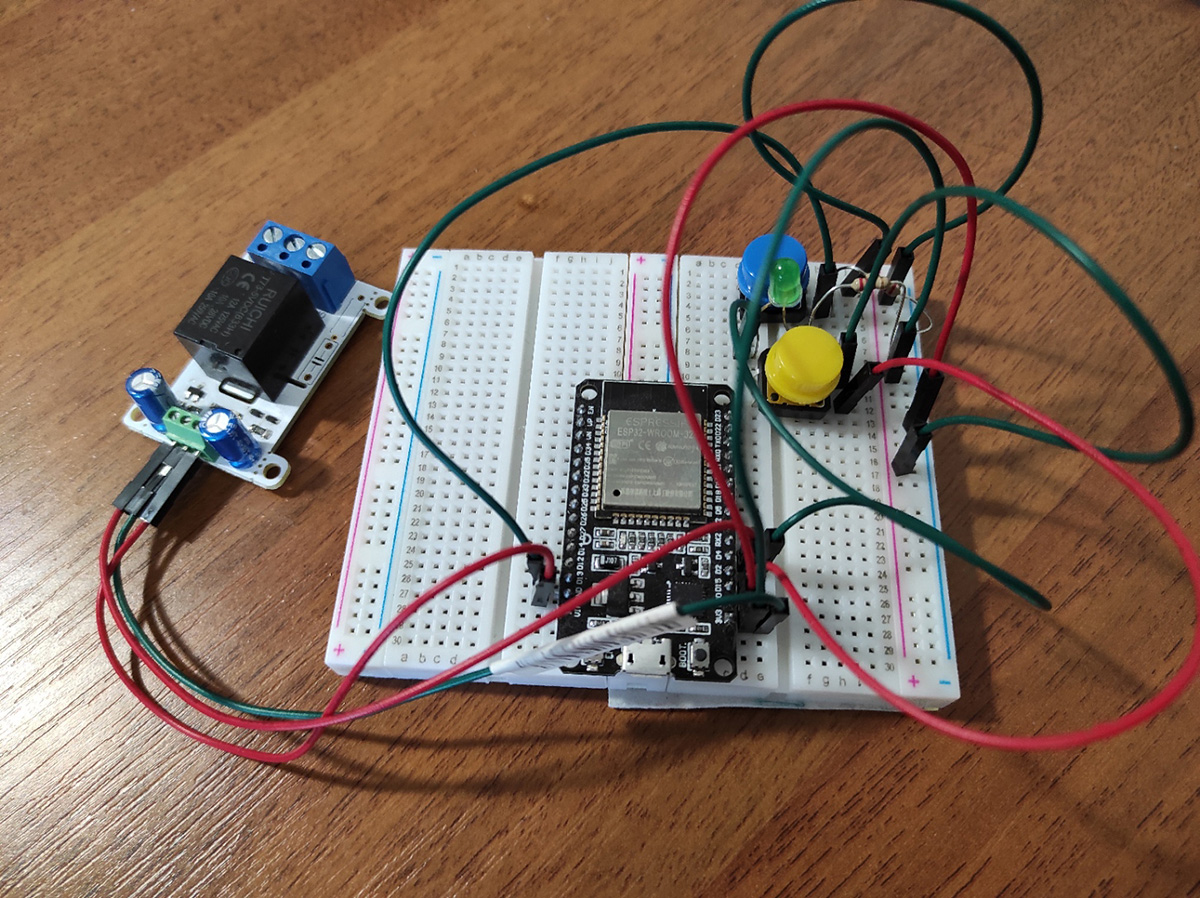
The assembling of a smart Wi-Fi relay prototype is described in detail in the previous article. We will use the same scheme to describe the features of creating a new IoT device on a platform without a wizard.
It is also assumed that you have already registered on the platform and tried its functionality in demo mode.
Stage 2. Writing firmware
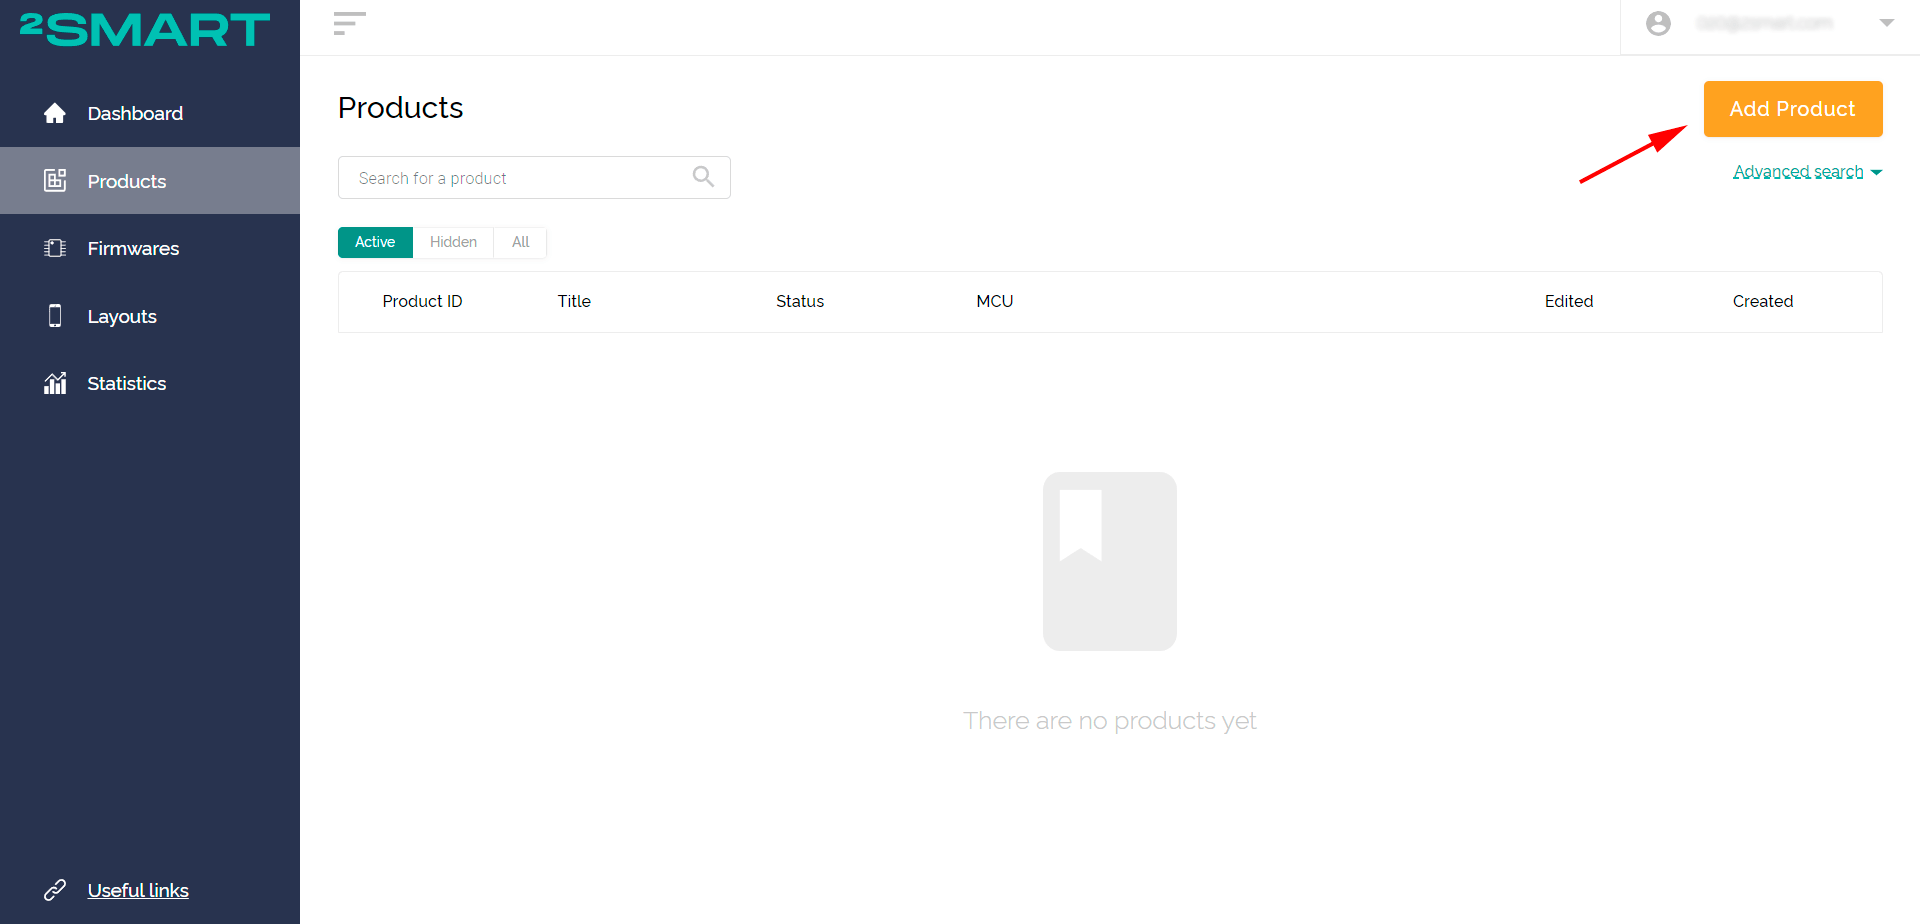
- To create a new IoT device on the platform without a step-by-step wizard, open the page “Products” and click “Add Product”.
Note: The same button on the main account page launches the wizard!
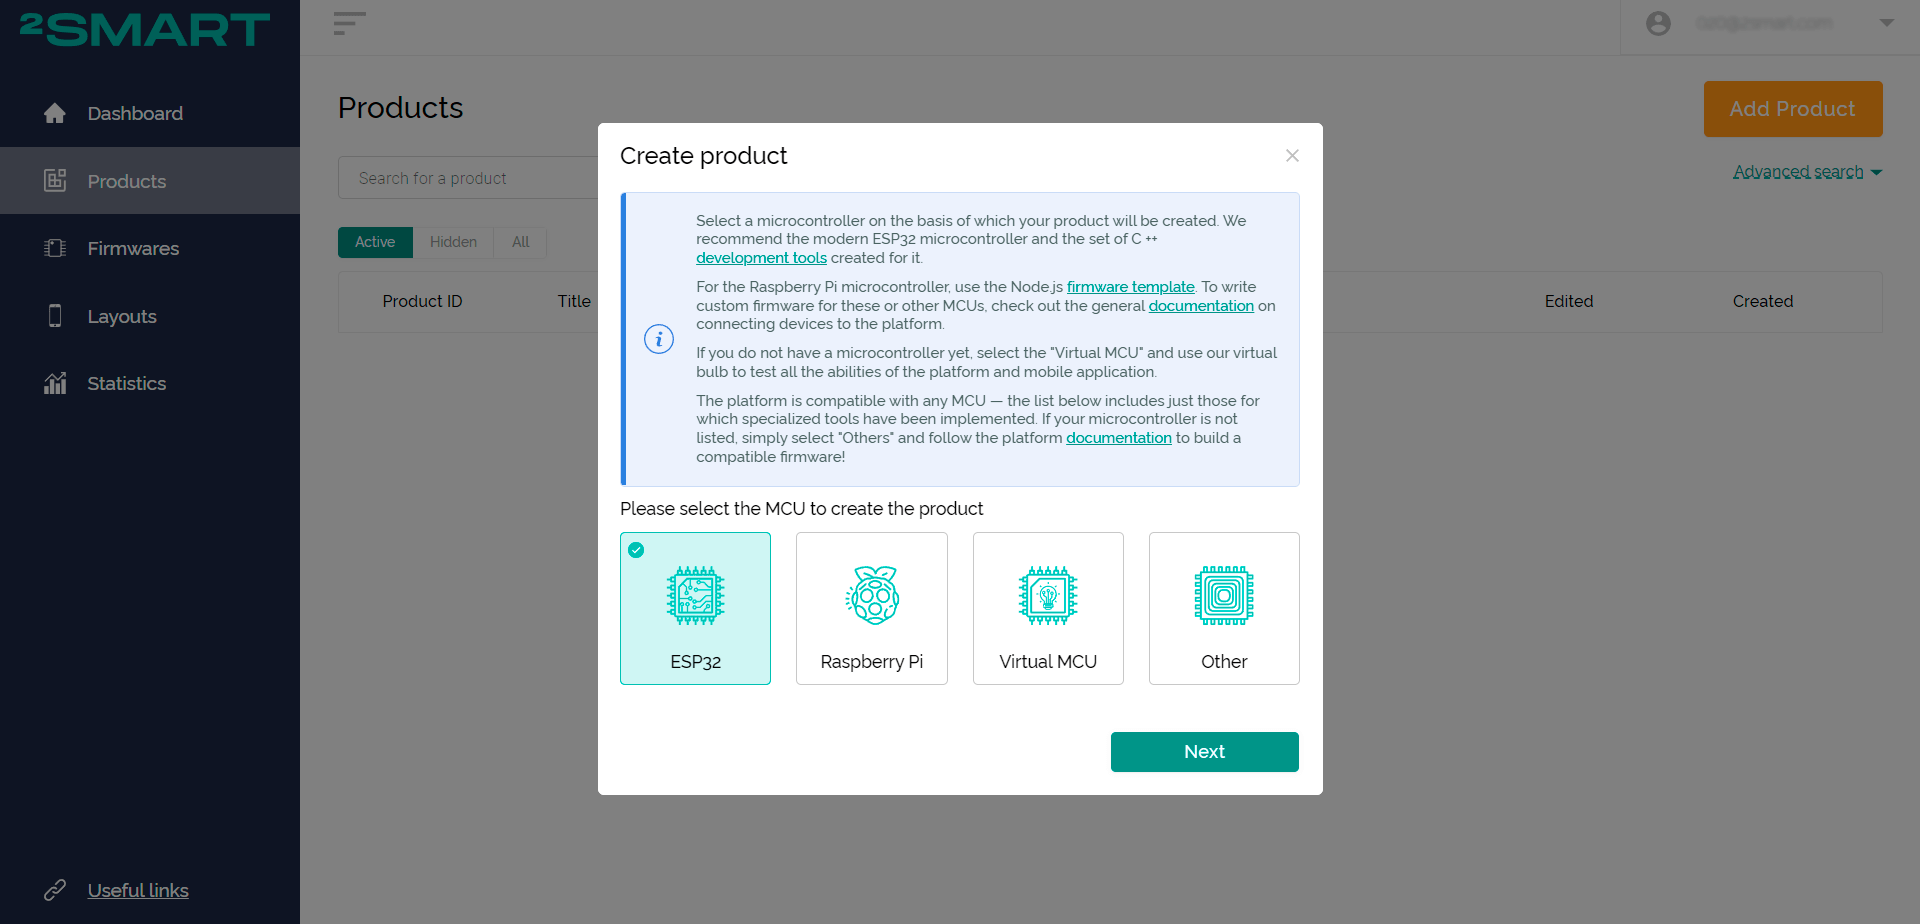
- Select the microcontroller that the smart device is based on. In our example, it is the ESP32. Click “Next”.
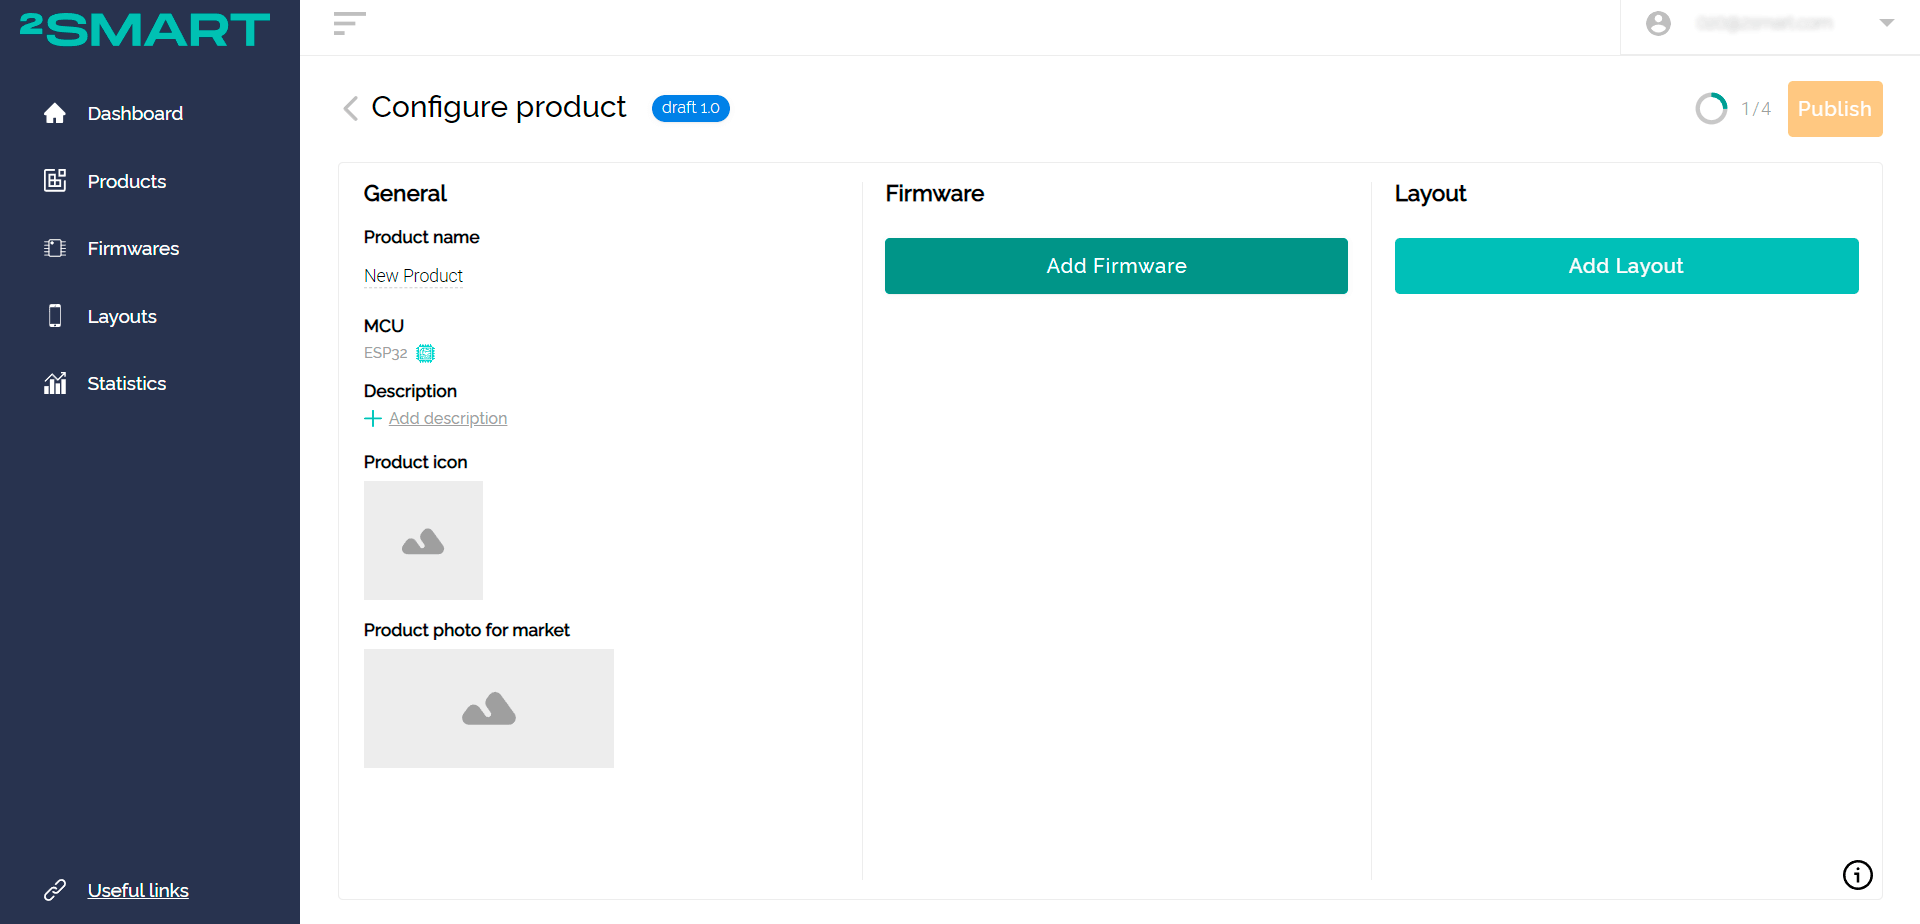
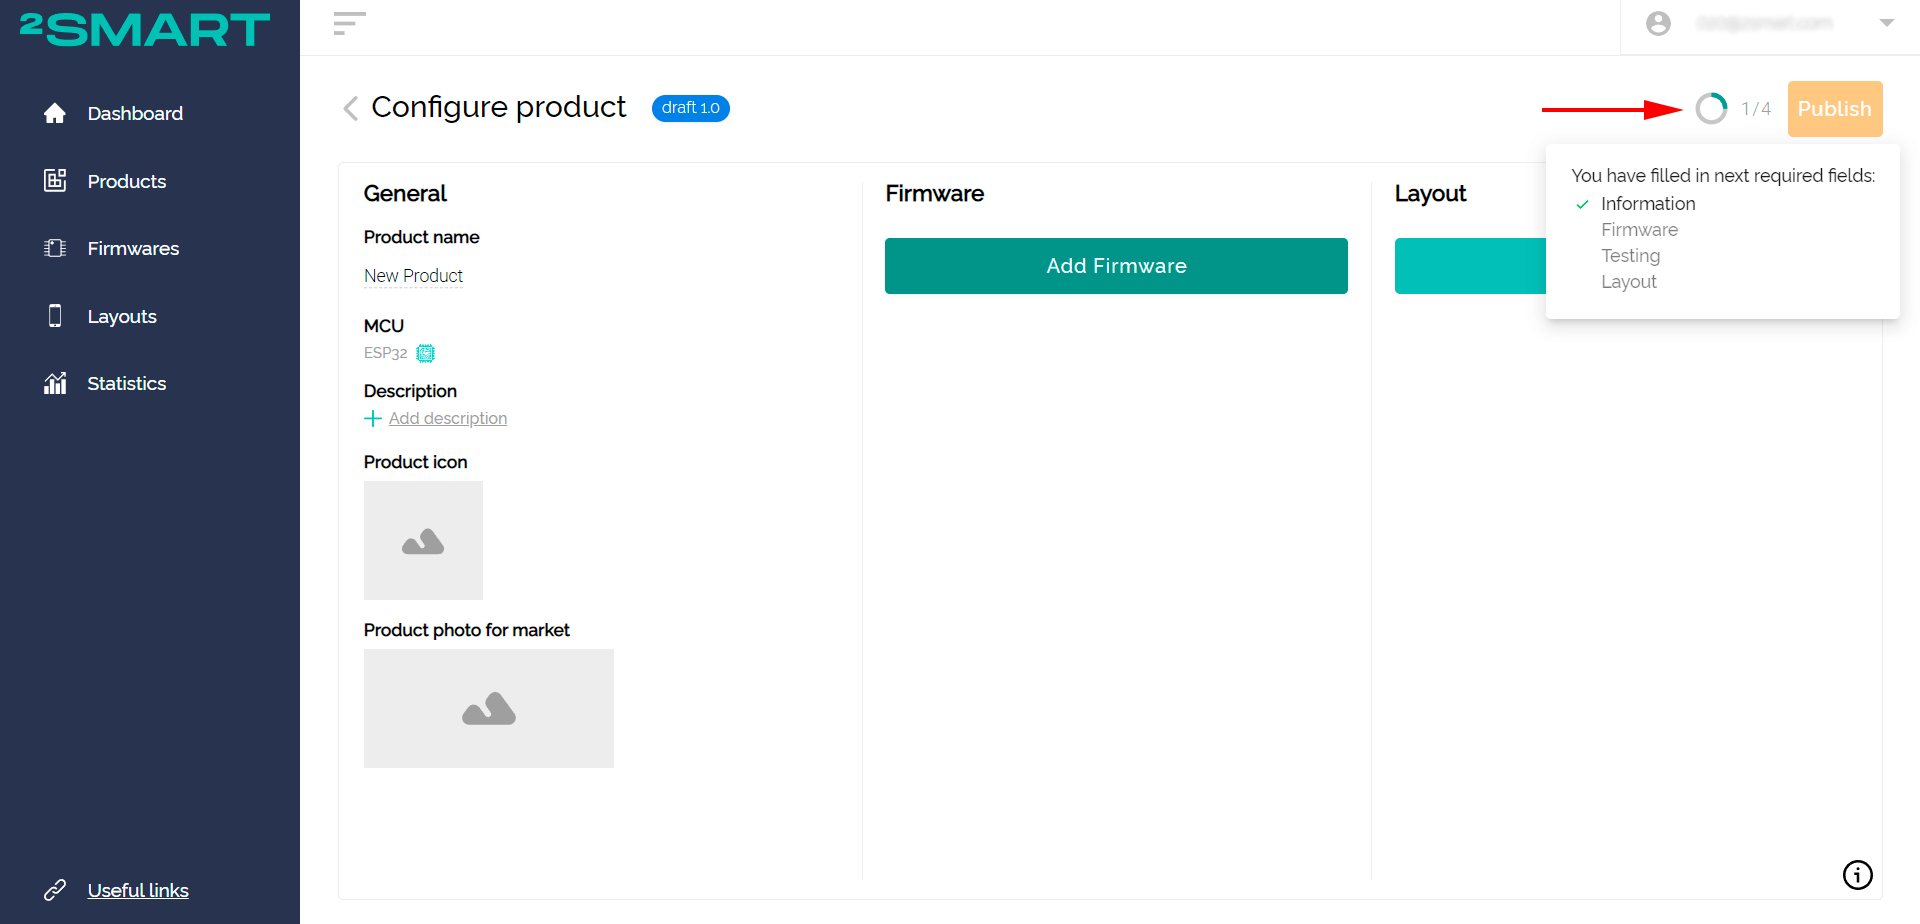
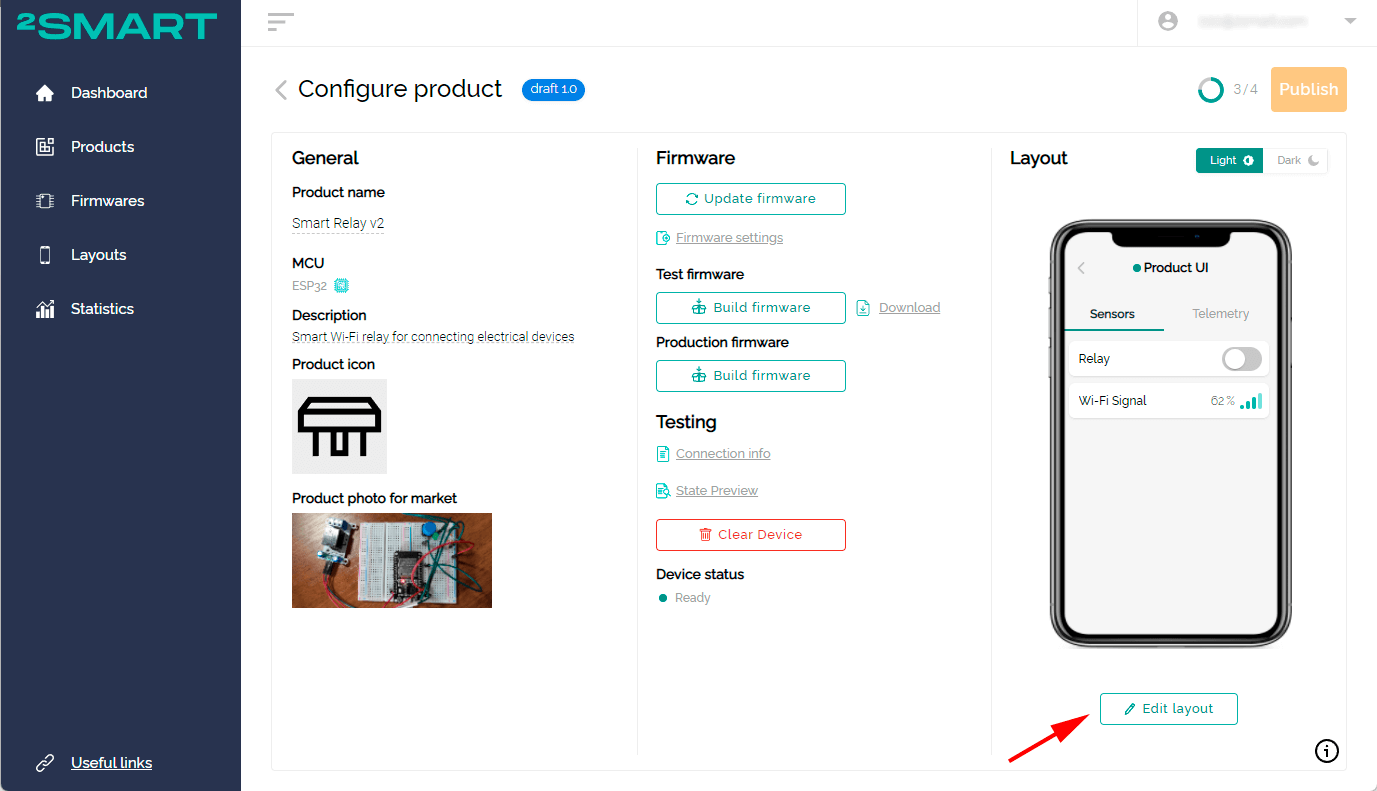
- Once the product settings window appears, you can specify a description of the device, create firmware, and configure the interface of the mobile application. Unlike the wizard, the sequence of these steps on this screen may differ.
- Pay attention to the tooltip indicating your progress in creating a new device. With its help, you will see which steps to build an IoT device have already been passed and which still have to be completed before the device can be published on the 2Smart Cloud platform.
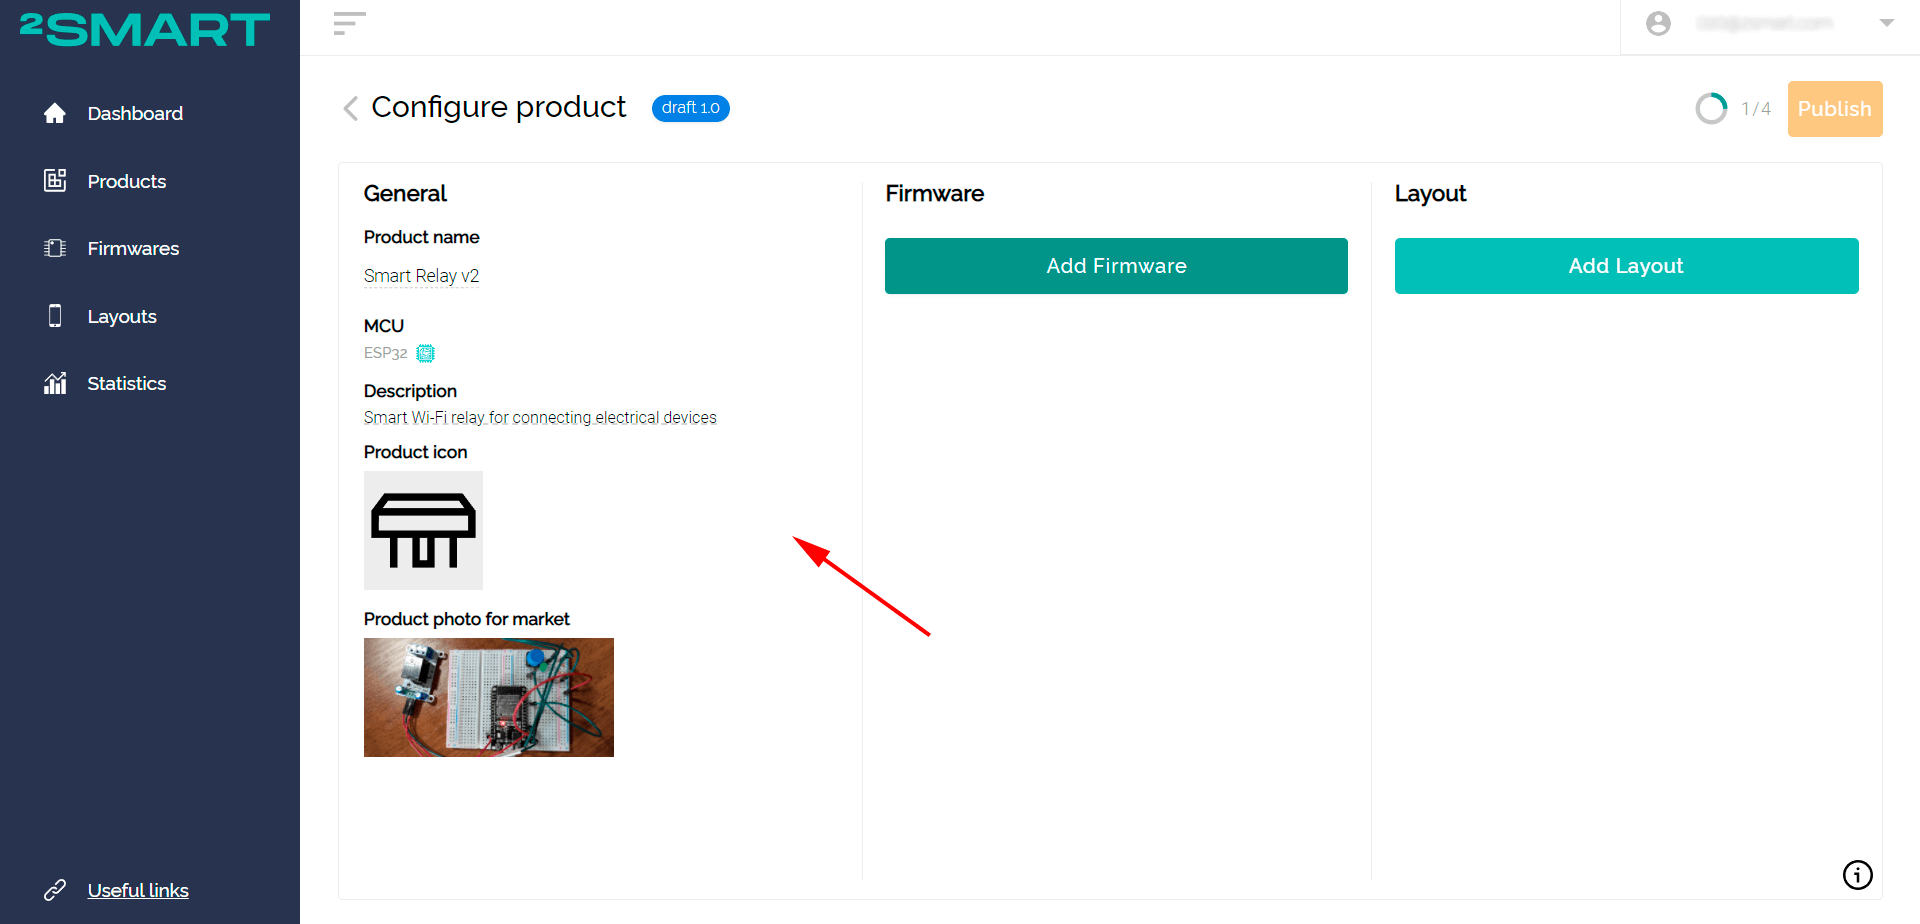
- In the “General” column, enter the device’s name and description, then upload an icon and a photo.
- “Product name” is the name under which the product will be displayed in 2Smart Cloud Market and by which users will search for the device.
- “Description” is a small text about the product displayed on its card in the market.
- “Product icon” is a graphic image that accompanies the name in the market.
- “Product photo” is displayed on the card in the marketplace, accompanying the text description.
You can postpone this step if you wish. You can edit this data at any time. Remember to return to this step before publishing the product.
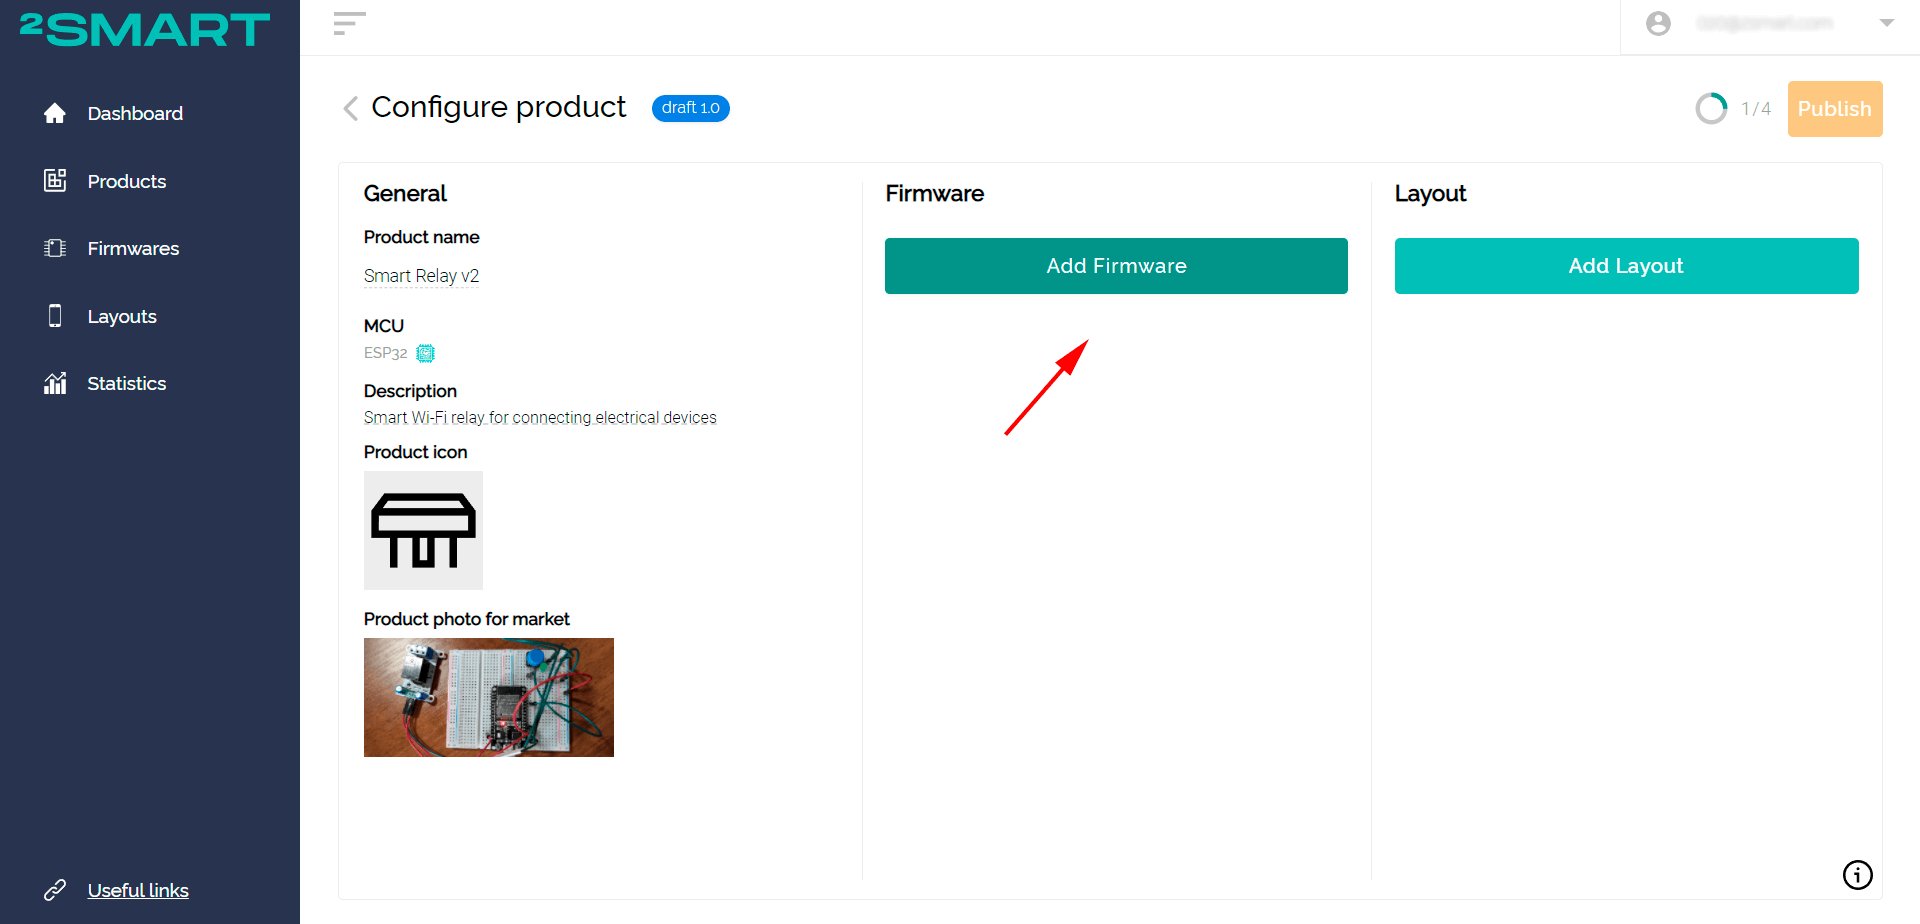
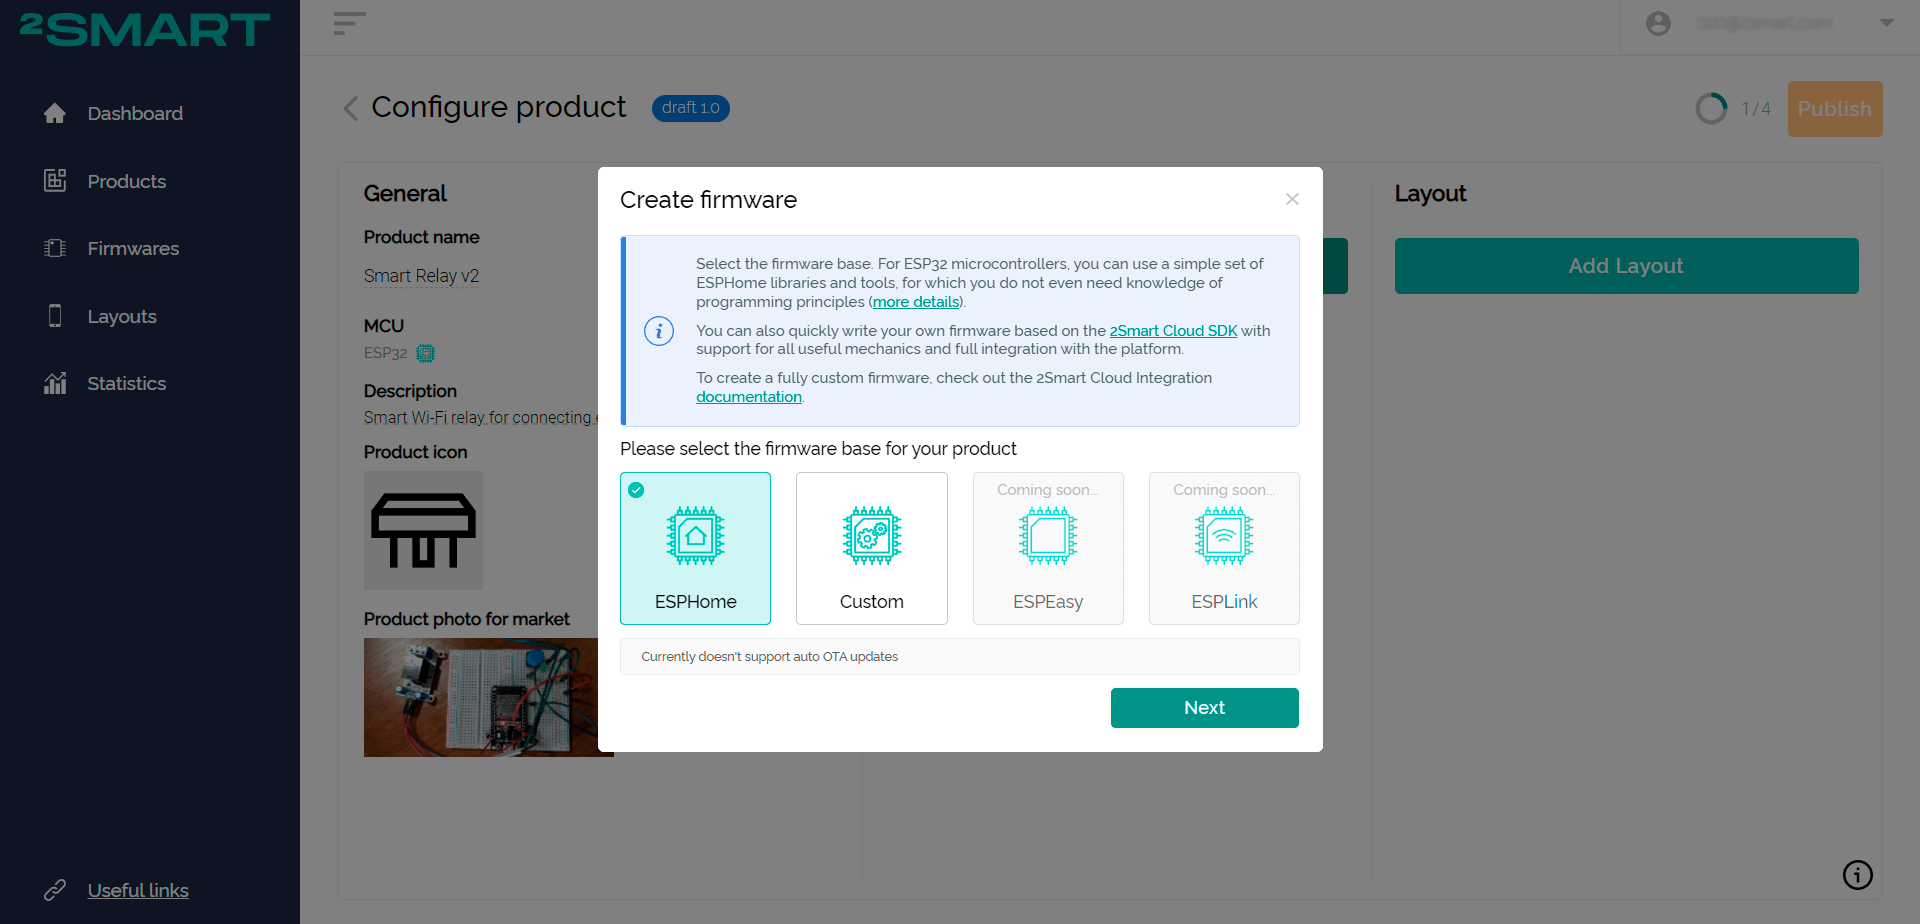
- Proceed with the creation of the firmware. Click the “Add Firmware” button in the “Firmware” column and select one of the available options for your microcontroller.
- Select the firmware base. For ESP32 microcontrollers, these are ESPHome or Custom options. Read more about the difference between them in this article.
After selecting the suitable firmware base (in our example, ESPHome is used), click “Next”.
Copy the code of the Wi-Fi relay firmware, created based on ESPHome, into a new window (detailed comments on the code for building internet of things devices are in the previous instruction).
# Switchers for relay and wi-fi led indicator
switch:
- platform: gpio
id: l2
name: relay
pin:
number: GPIO4
inverted: True
- platform: gpio
id: Wifiled
name: ledWifi
pin:
number: GPIO2
# Physical button for relay switching
binary_sensor:
- platform: gpio
pin:
number: GPIO13
mode: INPUT_PULLUP
inverted: True
name: sensor_button
on_press:
then:
- switch.toggle: l2
# Physical button for reset creds for production devices (only for 2Smart Cloud version of EspHome)
- platform: reset_sensor
pin:
number: GPIO15
mode: INPUT_PULLUP
inverted: true
name: Reset button
filters:
- delayed_on: 2s
interval:
- interval: 10s
then:
if:
condition:
wifi.connected:
then:
- switch.turn_on: Wifiled
else:
- switch.turn_off: Wifiled
# Standart sensor for wi-fi signal
sensor:
- platform: wifi_signal
name: "WiFi Signal Sensor"
update_interval: 10s
# Standart sensors for wi-fi settings
text_sensor:
- platform: wifi_info
ip_address:
name: ESP IP Address
ssid:
name: ESP Connected SSID
bssid:
name: ESP Connected BSSID
mac_address:
name: ESP Mac Wifi Address
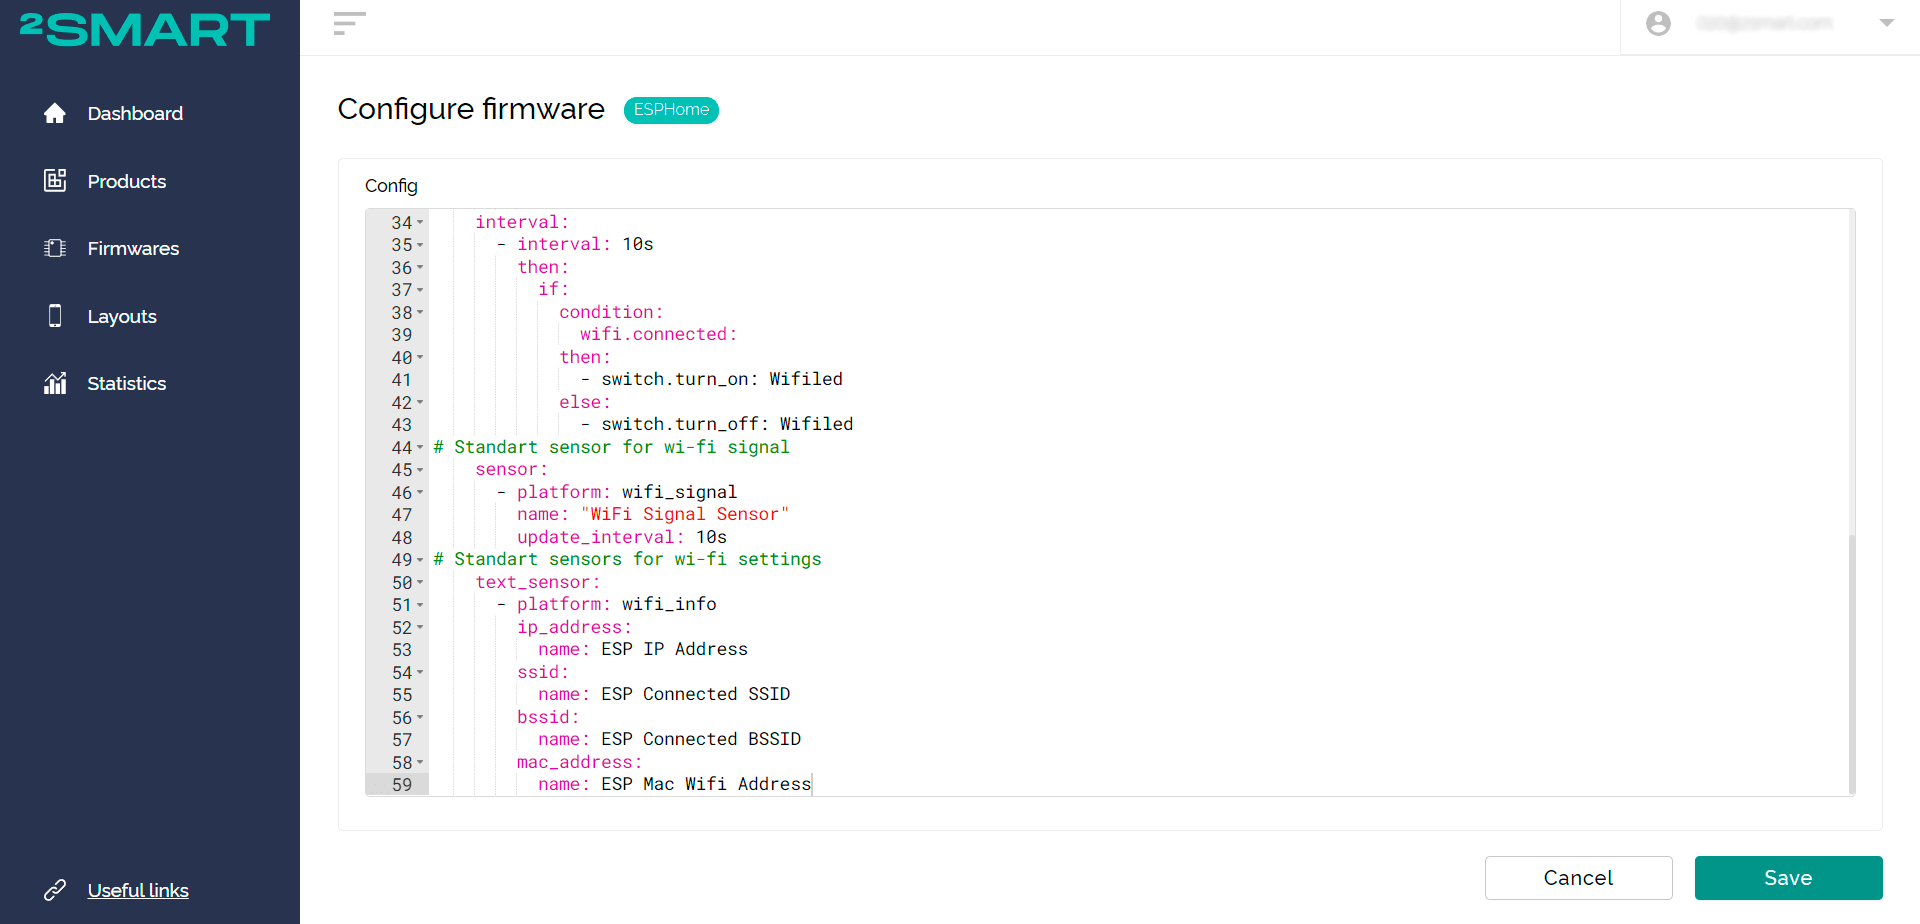
After configuring the code, click “Save”.
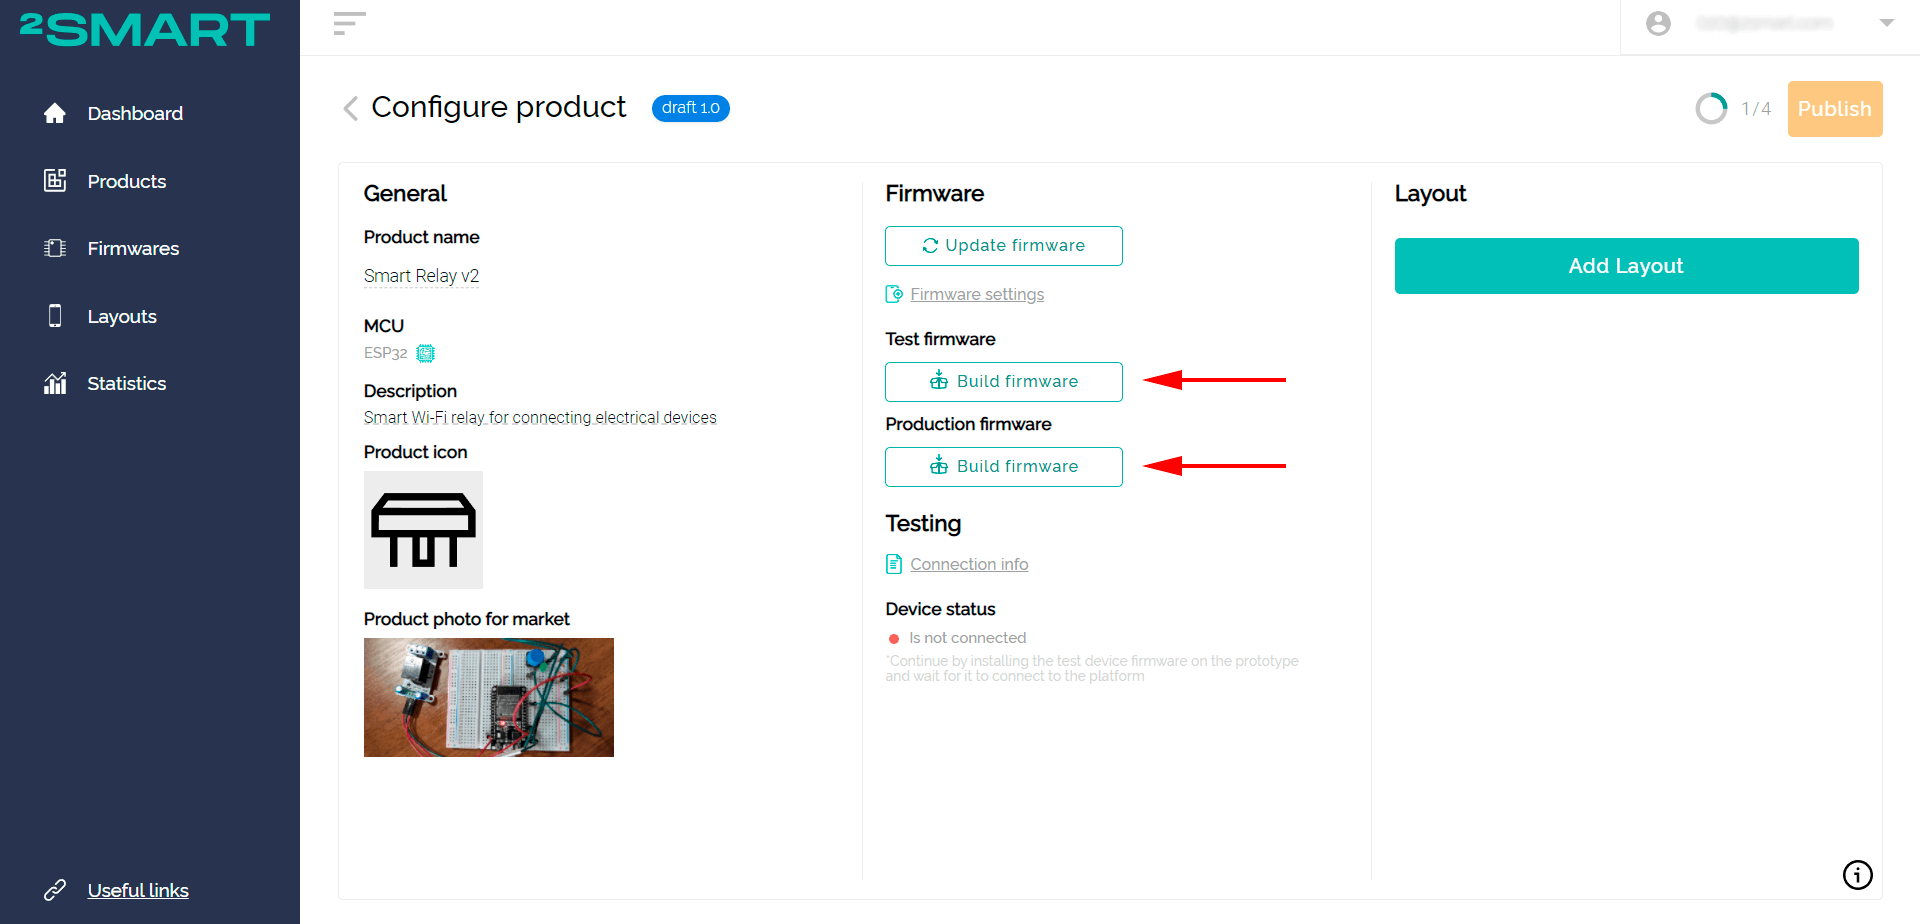
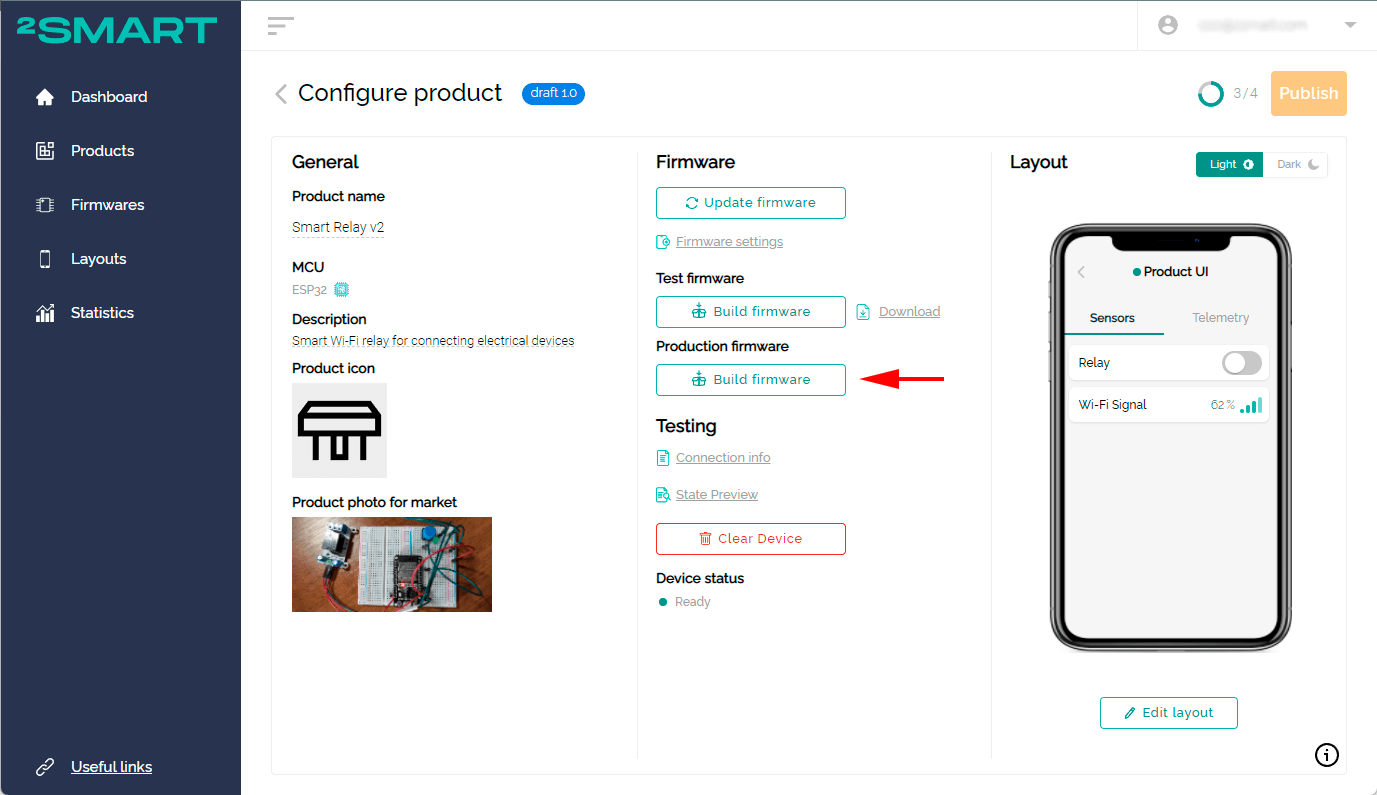
- After you added the firmware code, two new “Build firmware” buttons appeared on the product setup screen for Test and Production firmware.
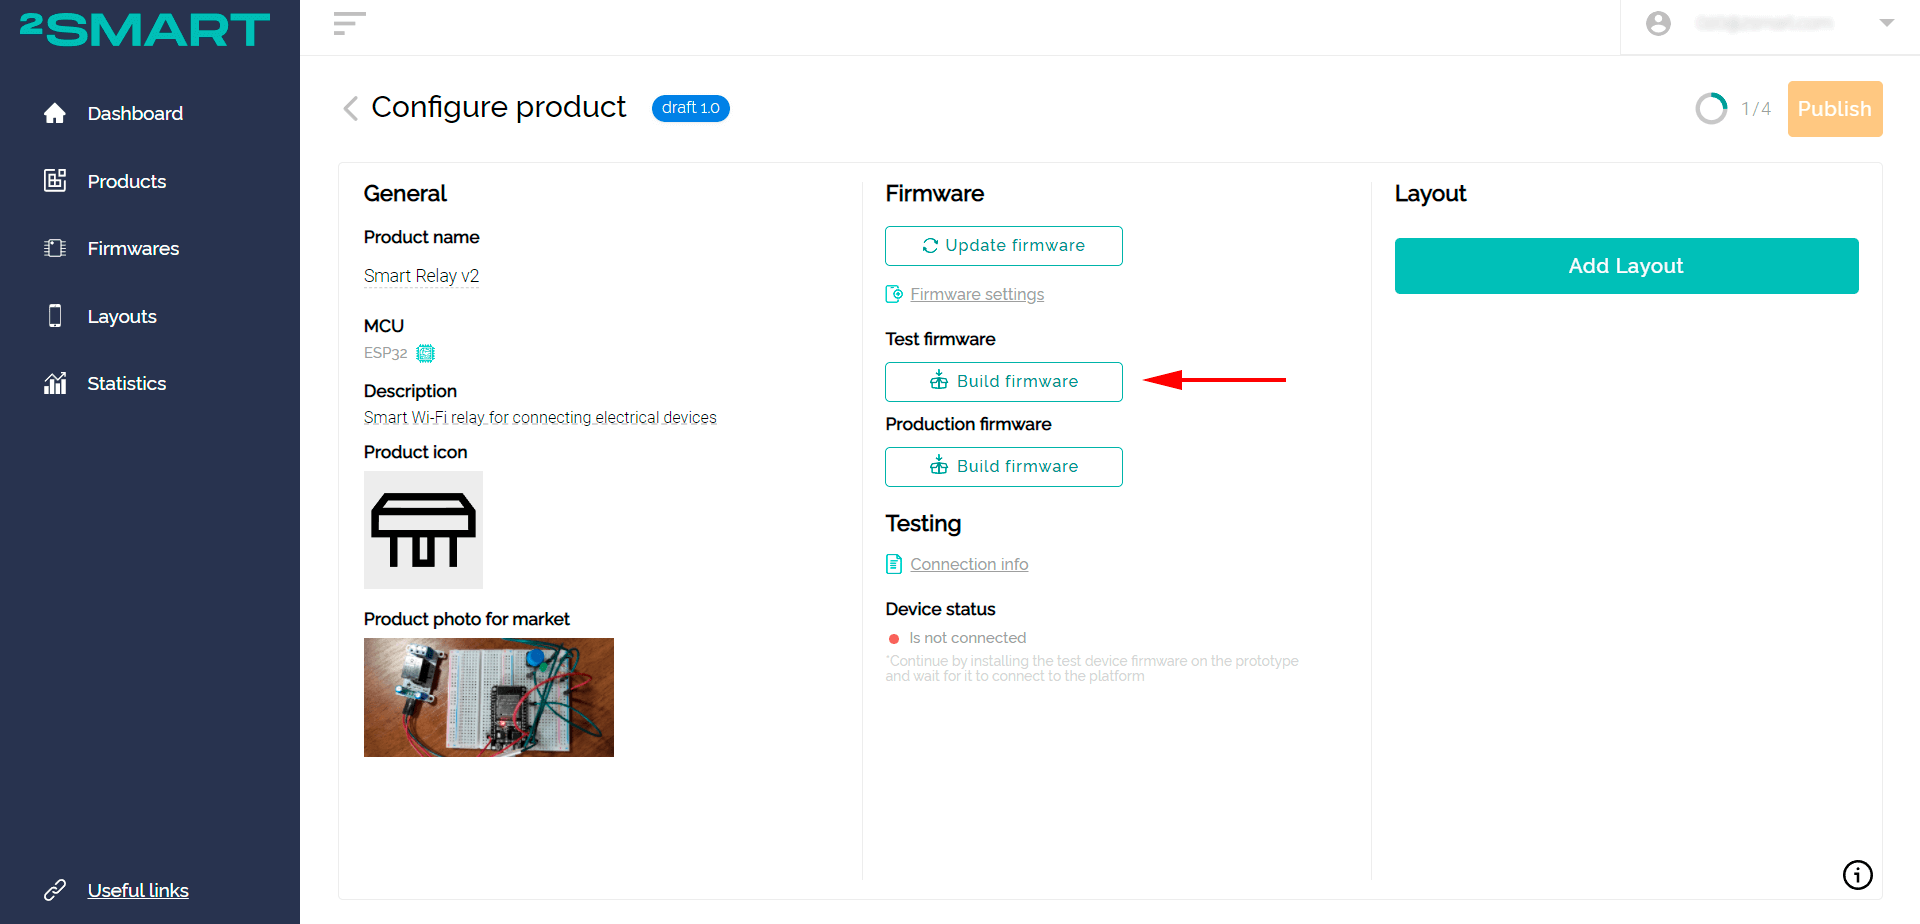
The Test option is the firmware for testing the prototype. The Production option is the final version of the firmware, installed on devices for end-users.Read more about the difference between them in the previous article. - Press the first “Build firmware” button to build the archive with the Test firmware.
- Specify the credentials of your Wi-Fi network and click “Save”.
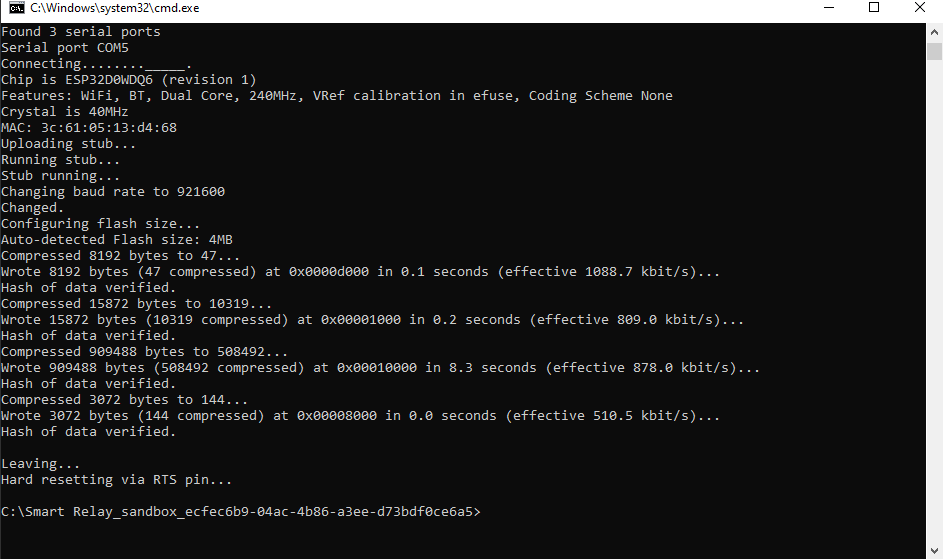
Please note! Devices based on the ESP32 microcontroller support only Wi-Fi networks with a frequency range of 2.4 GHz! - After completing the build process, click on the “Download” link.
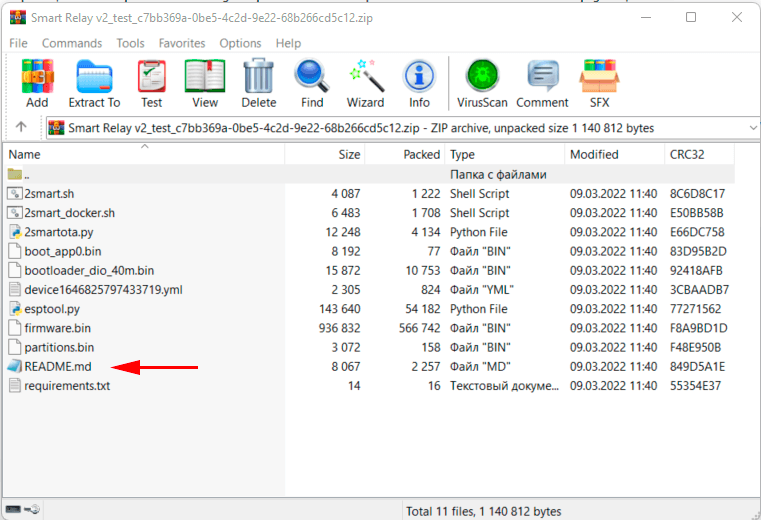
- Inside the downloaded archive, there will be a “readme.md” file describing the firmware installation process. Flash your device according to the instructions.Flashing is available for Mac OS, Linux, and Windows devices.
Attention! If the firmware is already written to the microcontroller, remove it by following the instructions in the ‘readme.md’ file or as described in the documentation.

- After the firmware installation, go back to your account on the platform. The device’s status will change to “Ready”, and the status indicator will turn green. This means that the platform has successfully detected the device.
Sometimes, to detect a device by the system, you need to disconnect the IoT device from the power supply and connect it again. - Pay attention to all items in the “Firmware” column once the device is connected:


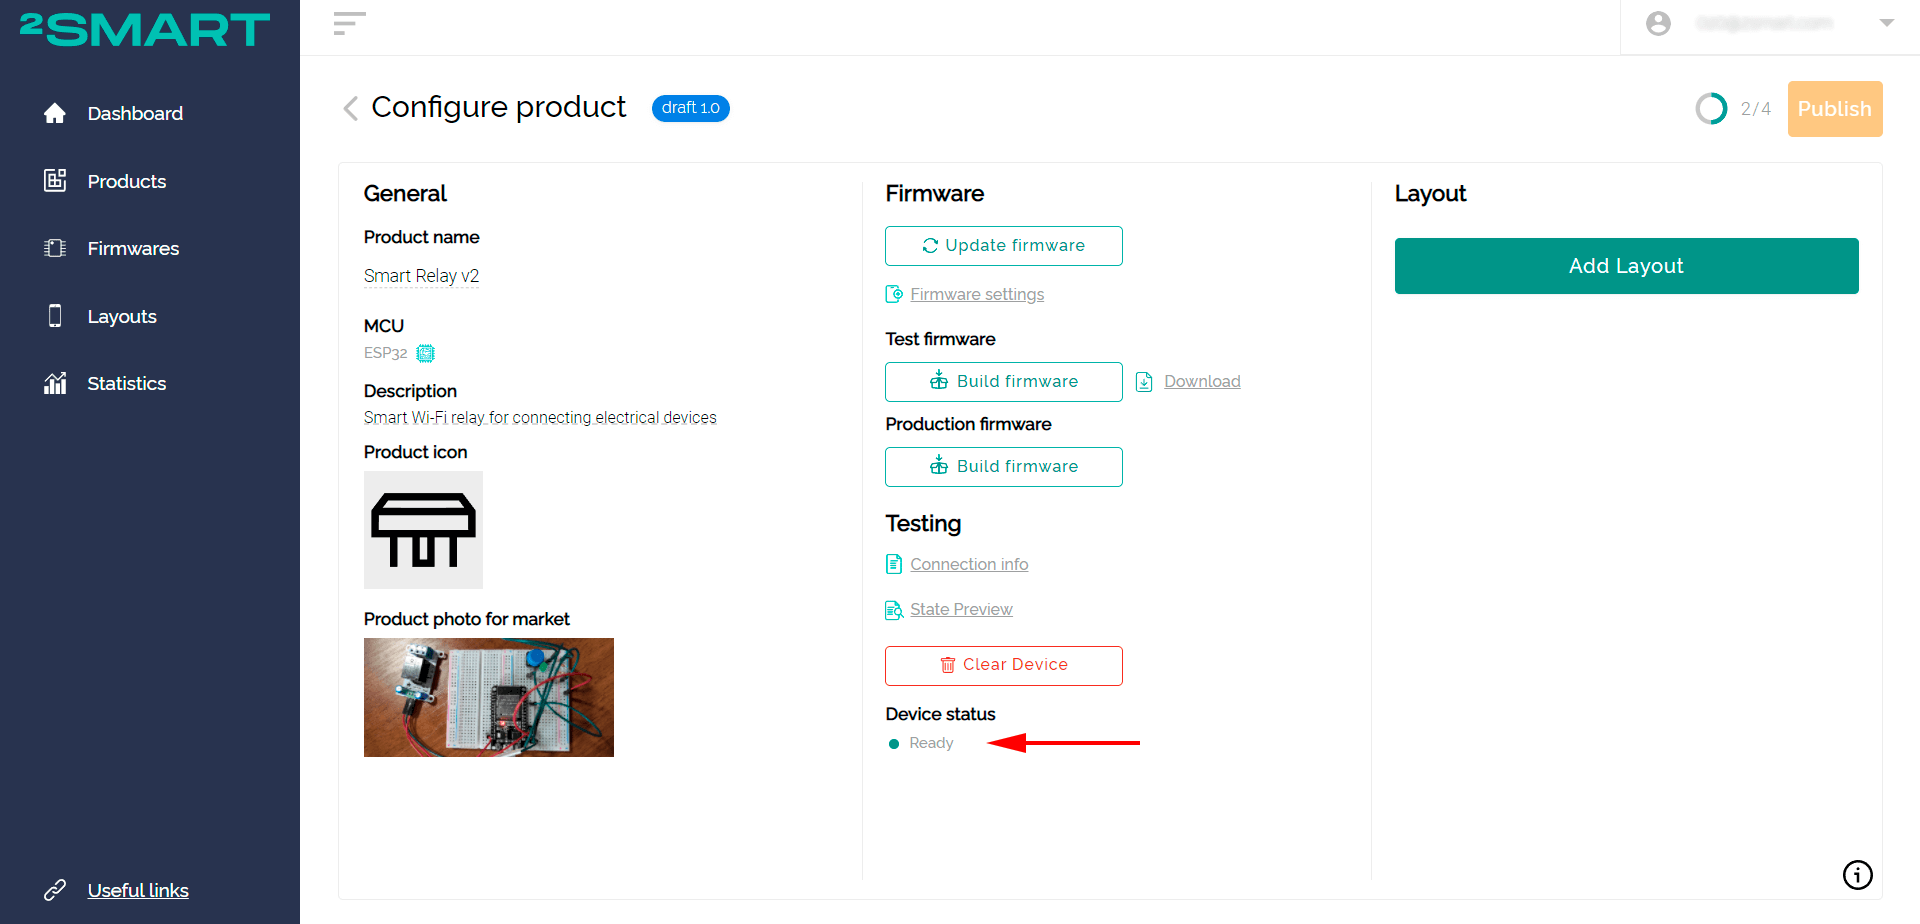
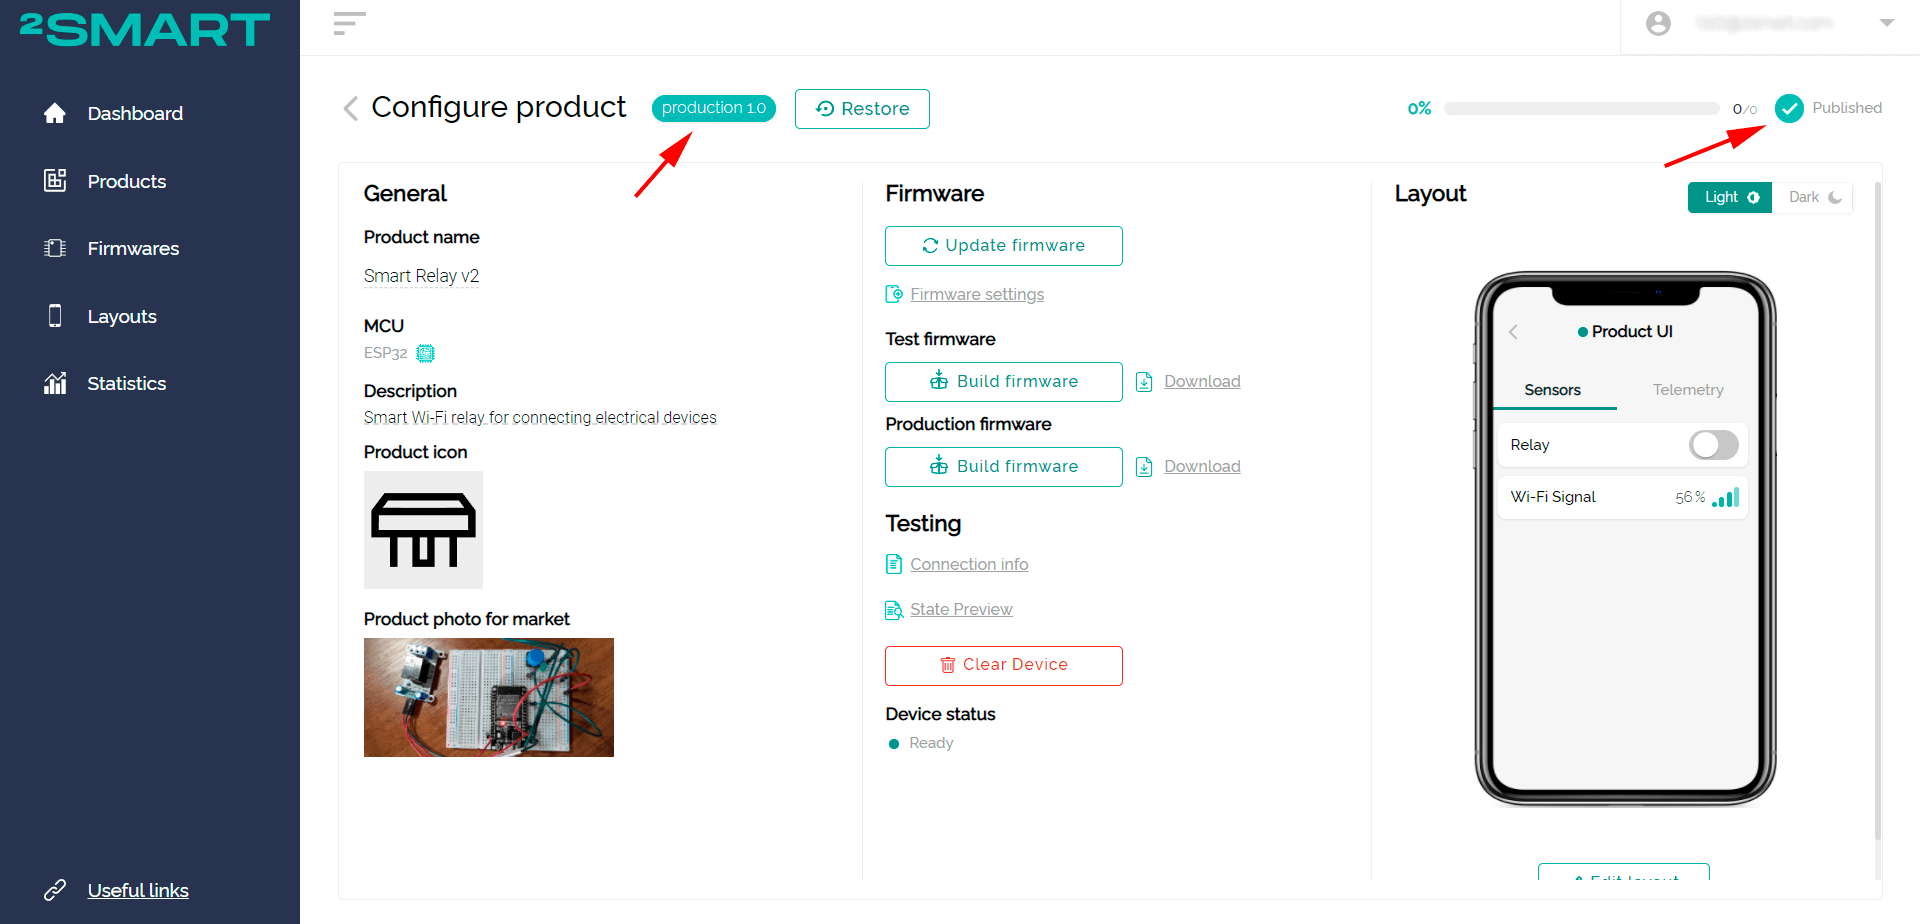
- “Update firmware”. Use the link to make changes to the firmware code. After editing, don’t forget to build new Test and Production firmware versions.
- “Firmware settings”. The developer can enter their text instructions for users instead of the one used in 2Smart Cloud by default.
- “Pairing support”. The switch in the “Firmware settings” window that responsible for the possibility of adding a device by 2Smart Cloud application users using the standard method. If enabled, the device can be added to the application using the pairing function. If disabled, the user can find the product in the catalog but not start the pairing.
When might it be necessary to disable the option? The possibility exists for developers who have created special firmware that does not support the standard pairing. In this case, users can be offered instructions on connecting the device in other ways, for example, using the device’s built-in interface. - “Connection info”. Technical information for the product with the ability to quickly copy each of the configuration parameters. You can find out more about all the parameters in the platform documentation.
- “Preview State”. Current data of all sensors of the test device connected to the platform.
- “Clear device”. The button, when clicked, the information about the status of the test device is removed from the platform. This feature may be required when developing and debugging the product’s firmware.
- “Device status”. The indicator of the device’s connection with the test firmware and its current status. Allows you to ensure that the device is connected, flashed with the current firmware version, and is functioning correctly.
Feel like you need help building your own IoT device? Contact us now!
Let’s collaborate
We’re empower your business with our technology expertise
Stage 3. Configuring the mobile application interface
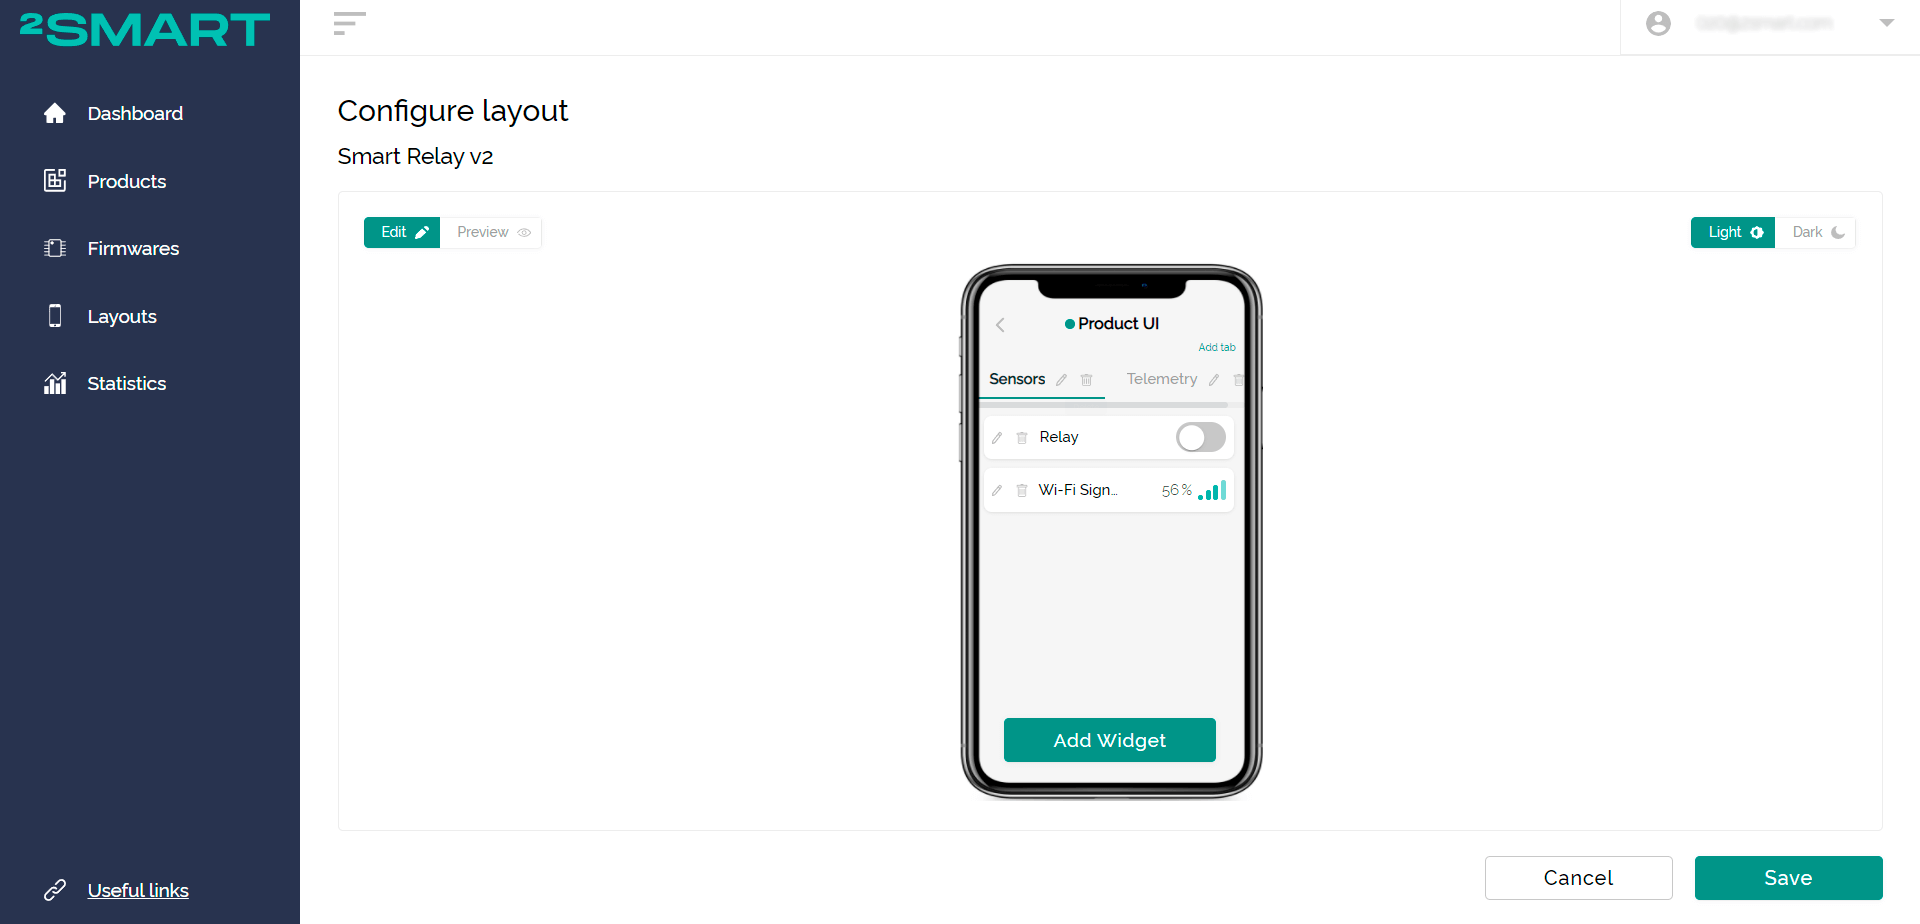
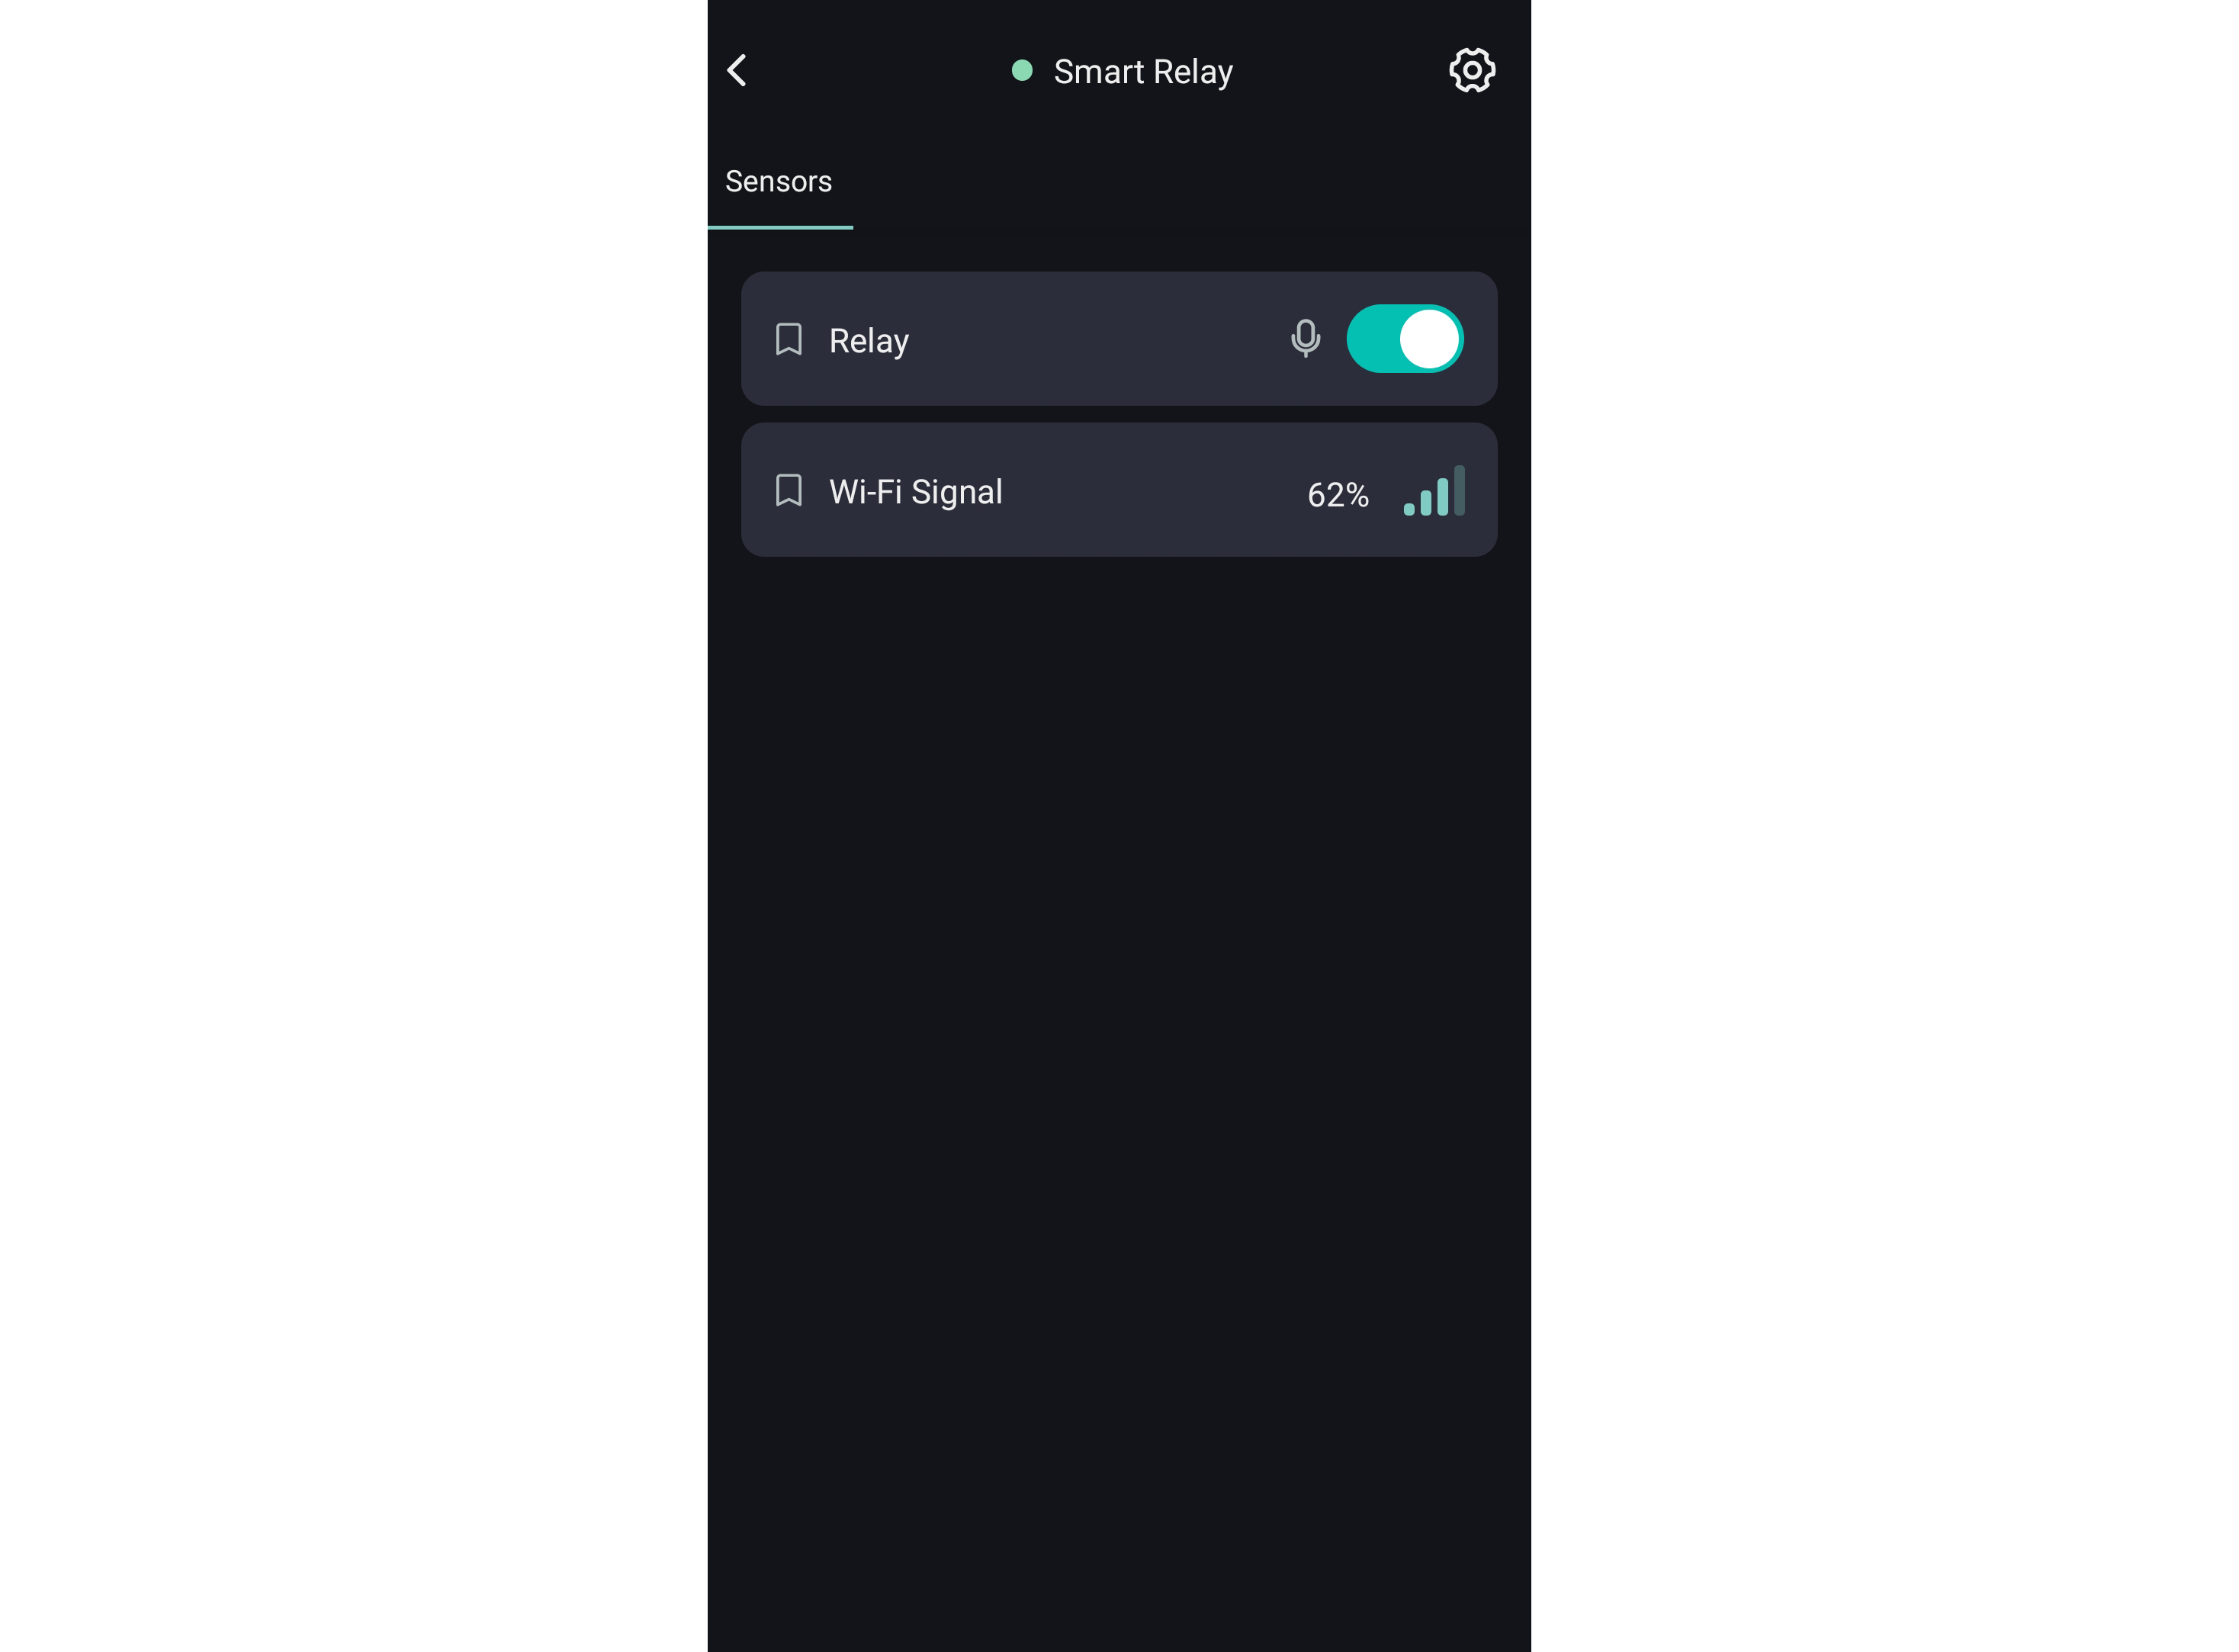
- When the system has detected a device with test firmware, you can configure the mobile app interface to control the device from your smartphone. The “Add layout” button is now active; click it.
- The Mobile App Interface Master on the product page is the same as the one used in the wizard.
You can control the device already while editing the application interface. The device instantly responds to switching the relay widget on the mobile application emulator screen. And on the contrary, when you press the relay toggle button on the board in the interface of the mobile application emulator, the widget’s state will change instantly. - Click “Save” when the application interface settings are complete. You can return to editing at any time. Use the “Edit layout” link.

- Now you can test the control of your device from your smartphone. Download the app (iOS | Android), and log in with the same credentials as the platform. Your prototype is already on the Device screen. Manage it from the app – similar to testing the device when adding one with a wizard log in with the same credentials as the platform. Your prototype is already on the Device screen. Manage it from the app – similar to testing the device when adding one with a wizard.

Stage 4. Building the final Production firmware and controlling the device from a smartphone
Use Production firmware for devices that will be sold to end-users. We recommend leaving one prototype device with test Test firmware to quickly test new features or change the mobile app’s interface.
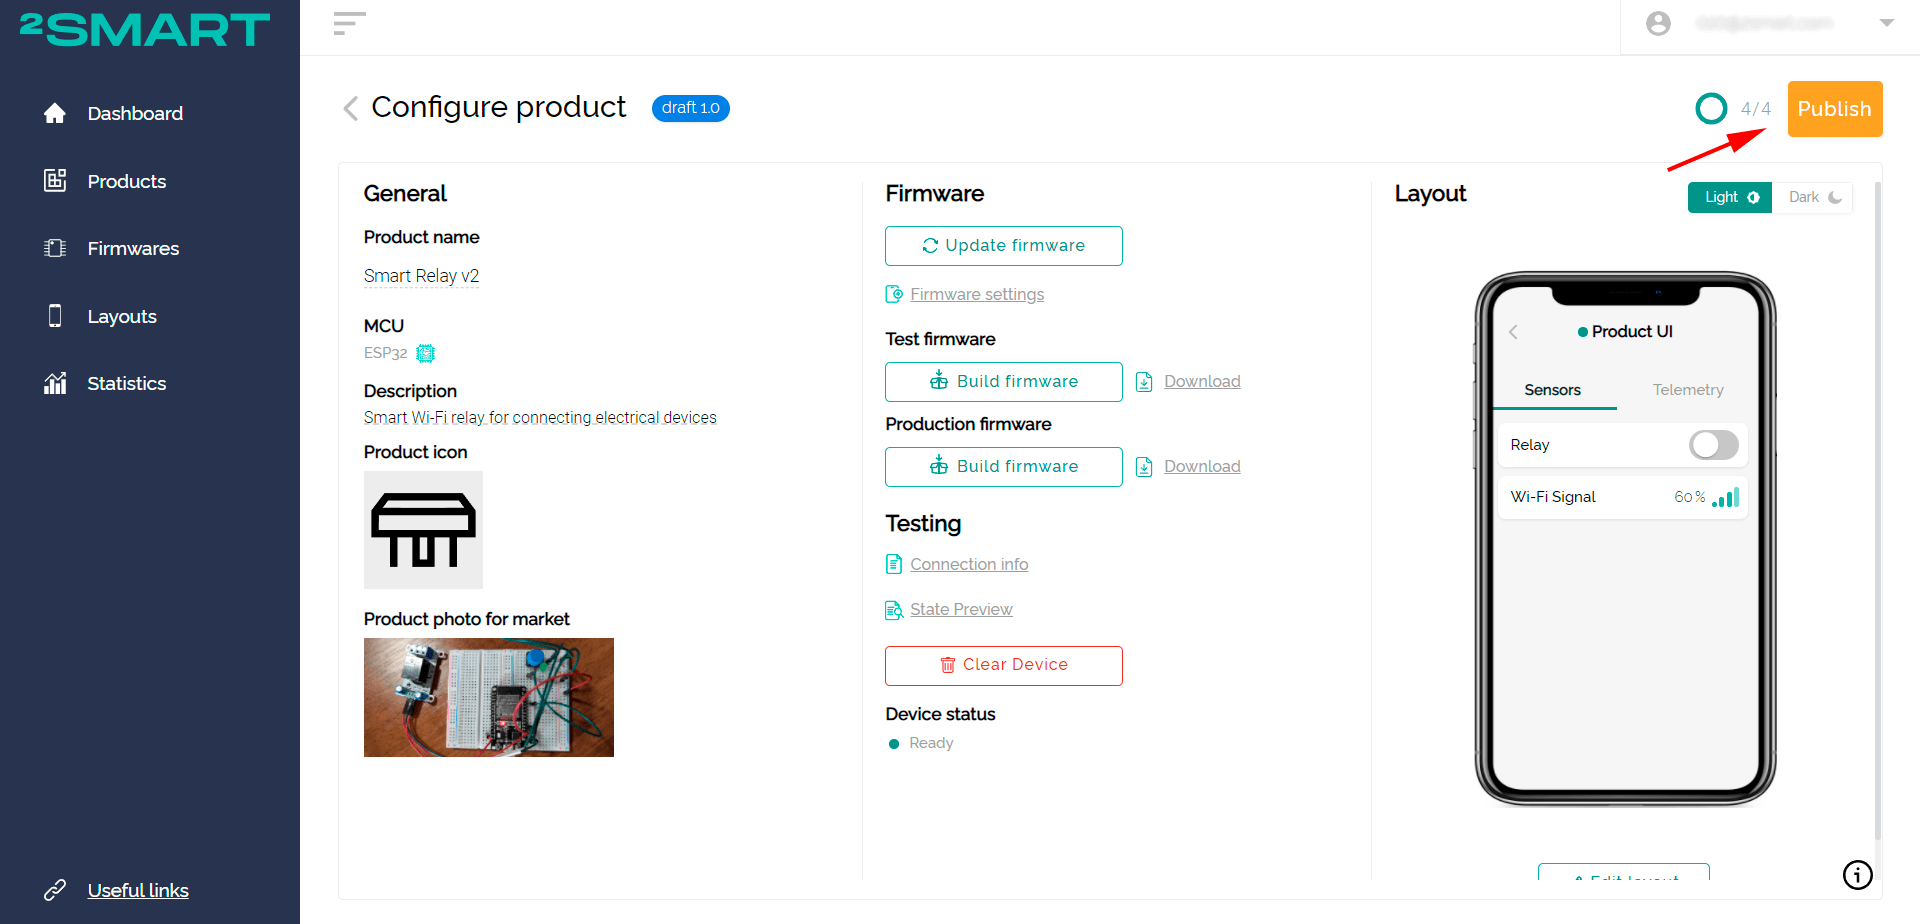
- To build the Production firmware, click the appropriate “Build firmware” button.

- Wait until the process is complete and click the “Download” link.
- Install the final version of the firmware on the device in the same way as you did with the test version.
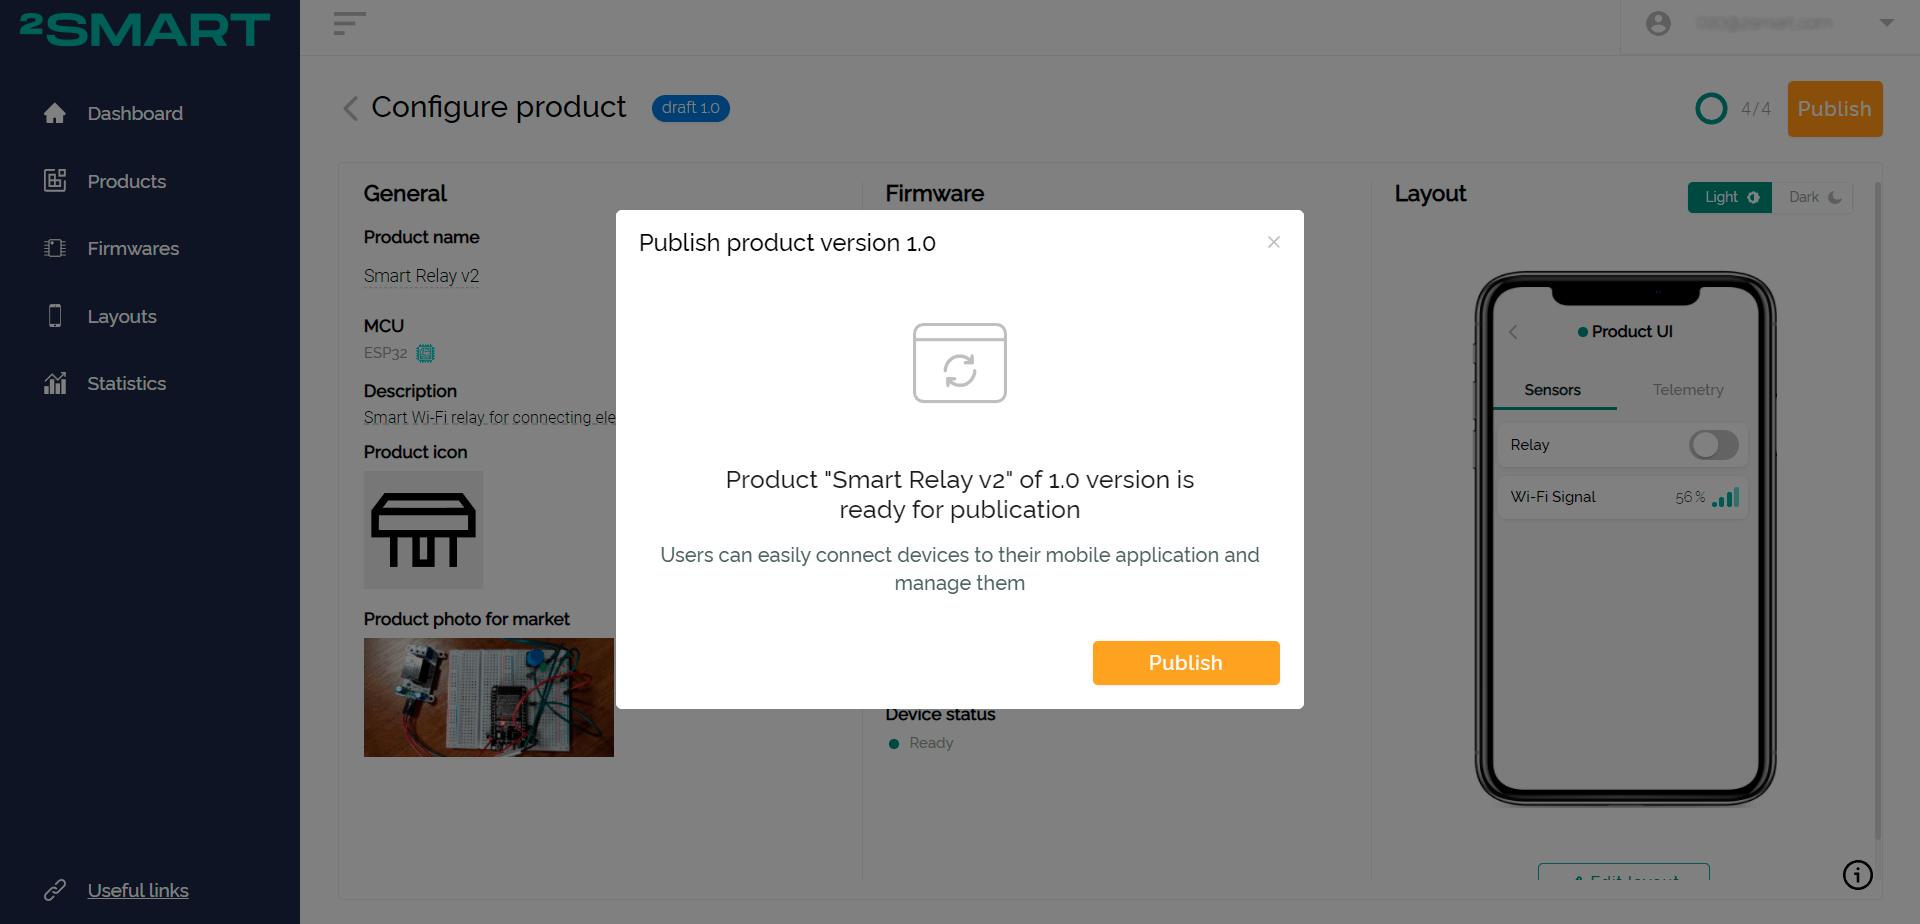
Attention! If the firmware is already written to the microcontroller, remove it by following the instructions in the ‘readme.md’ file or as described in the documentation. - After building the Production firmware, the “Publish” button for your product is activated. Click it to place your IoT device in the catalog of the 2Smart Cloud platform.
- Confirm your wish to publish a new product on the platform.
- After publication, a “Published” notification will appear, and the status of the product will change from “Draft” to “Production”.
- When a device has been published, you can add it to the 2Smart Cloud mobile app on your smartphone and start using the device.

Please note that the product will appear in the public catalog only after the platform administrators approve it. Before then, you can only add the device through the pairing procedure by selecting “Others” in the market.
Connecting a production device to the 2Smart Cloud application
Examine your device through the eyes of your customers and test the product in a real environment. For more information, see the instructions for the wizard.
Use the additional device control features that 2Smart Cloud users have: voice commands, a Telegram bot, and phone call control. Take the opportunity to share access to the device’s control with other users. You can find detailed instructions in the blog on our website.
What’s next
As you can see, the above method of creating a new device in 2Smart Cloud is more flexible than the wizard. We recommend it for experienced developers who have completed at least one product and are already familiar with the platform’s functionality.
Please note that you can always go back to an already published product to edit the firmware and application interface. For example, if users of your product start complaining about inconvenient control or insufficient functionality of the application, you can make the necessary changes in just a few minutes. They will automatically be visible to your customers after restarting the 2Smart Cloud app on their smartphone.
For more information on editing the product, see the tutorial.
You can also work with statistics on the usage of your devices by your users. There is another tutorial on how to do this.
You don’t have to be a significant manufacturer to join the 2Smart Cloud and create your IoT product! The platform is also open for DIY developers who make devices for themselves, as in our example with the smart relay. We also encourage novice inventors to discover how to build custom IoT hardware with the help of our free guides and tutorials.
FAQ
- How do I make my own IoT device?
While our platform suggests an easy way to build IoT devices, this process is generally a little more complex and prolonged. Usually, the way to create IoT hardware begins with generating the concept – that is, coming up with a helpful idea on how an imagined device can be used. Next, it is necessary to proceed with market research and develop an even better idea to build an open-source IoT device than your competitors have. You can proceed with user modeling, prototyping, and manufacturing the device at the next stage.
- What are the basic requirements to build an IoT device?
The main requirement of building an IoT device is to ensure seamless and secure data transfer, processing, and analysis, especially when making IoT devices and life-changing IoT innovations for the healthcare industry.
- How do I create a smart device?
So, here is how to create an IoT product. Building an IoT device implies building the hardware and creating the software to interconnect them further. With the help of our platform, for example, you can quickly build an application to integrate it with your smart device and launch it to the market. If you prefer to avoid the hassle of independent development, feel free to turn to 2Smart for custom IoT development services.
Links:
- 2Smart Cloud IoT platform – https://cloud.2smart.com/
- 2Smart Cloud documentation – https://github.com/2SmartCloud/2smart-cloud-docs
- 2Smart Cloud mobile app at AppStore – https://apps.apple.com/app/2smart-cloud/id1539188825
- 2Smart Cloud mobile app at Google Play – https://play.google.com/store/apps/details?id=com.smart.microcloud.app
- 2Smart Cloud blog – https://2smart.com/docs-resources
All articles about IoT device creation and support
- Learn your way around the IoT platform – create your first device and control it from your smartphone without an MCU
- How to create a Wi-Fi switch to control via a mobile app and Telegram bot
- How to build an IoT device using the 2Smart platform?
- How to create an IoT device on a printed circuit board and take it from prototype to finished product
- How to write SDK-based firmware for an IoT device
- How to update the firmware and mobile application of ready-made devices within 5 minutes
- Collection and analysis of statistics – a useful tool for product improvement
Don't forget to share this post!
Read Next


Let’s dive into your case
Share with us your business idea and expectations about the software or additional services.
