
Table of contents:
Recently, we shared in this blog how we integrated video surveillance functionality into the open-source monitoring and automation platform, 2Smart Standalone. Leveraging our existing expertise and knowledge, we conducted research, selected the appropriate multimedia transmission protocol, and created a bridge for video integration into the platform and a widget for streaming video within its interface. Initially viewing this as just the first step towards implementing video surveillance in 2Smart Standalone, we continued our efforts to extend beyond the functionality of remote video viewing alone. This article describes further R&D, through which we additionally introduced remote camera control functionality and its integration into automation processes.
Camera Preparation: Firmware Flashing and Configuration
While experimenting with integrating video surveillance functionality into the IoT based automation solution, 2Smart Standalone, among other devices, we utilized the Xiaomi Dafang PTZ 1080P camera. Exploring the existing options for flashing this camera, we discovered the Xiaomi DaFang Hacks project, which allows for flashing this and other camera models with custom firmware featuring expanded functionality compared to the factory firmware.
An important advantage of the project is that you don’t need to fully flash the camera, risking turning it into a “brick.” The camera boots with the custom firmware, which is installed on a microSD card. If anything goes wrong, you simply need to remove the card from the camera or clear it, and the camera will boot with the factory firmware, which is stored in its internal memory.
Let’s collaborate
We’re empower your business with our technology expertise
Memory Card Preparation
The recommended requirement for a microSD card to use with the Xiaomi DaFang Hacks project is a capacity of 512MB (we used a 16GB card). The card needs to be formatted using the FAT32 file system, which is a straightforward task for computers on any operating system, as built-in functionality usually exists for this purpose. We used Disk Utility on MacOS.
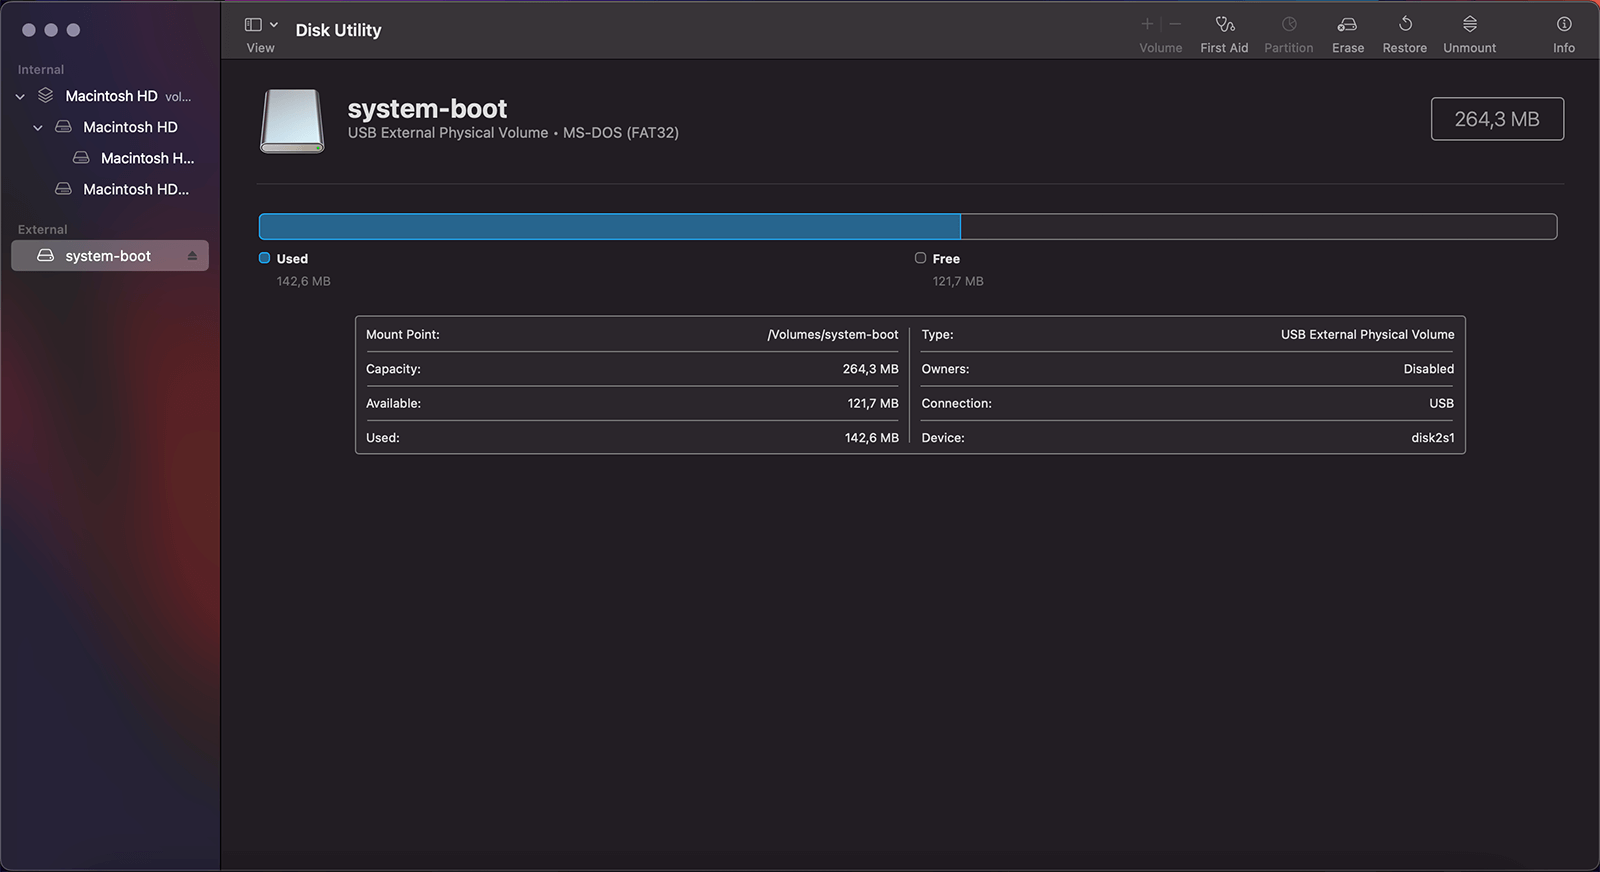
To format the card in Disk Utility, select the corresponding logical disk (in our case, it’s named system-boot) and click Erase. By default, the utility suggests formatting the card in FAT32.
Installation of the Bootloader
Once you have the memory card ready, you need to prepare the camera itself. Since the Xiaomi DaFang Hacks project allows for not reflashing the camera but rather loading custom firmware from an external card, the camera needs to “know” which option to use when booting up. This is where the bootloader comes in. Once it is installed, the external memory card becomes the boot disk. So, if it’s inserted into the camera and contains the firmware, the device will boot from it. If there’s no memory card in the slot, the camera will boot with the factory firmware.
Here’s what you need to do to install the bootloader:
- Download the binary file for your camera model from the Xiaomi DaFang Hacks project on GitHub.
- Rename the downloaded firmware file to demo.bin.
- Copy the demo.bin file to the memory card.
- Disconnect the camera from power.
- Insert the memory card into the camera.
- Press and hold the Setup button.
- Power on the camera and continue holding the Setup button for about 10 seconds.
- Release the button and wait for the camera to boot.
- When the camera begins to boot, turn off its power.
- Remove the memory card from the camera and power it on again to ensure that the bootloader installation was successful.
- The camera’s LED should shine blue for 5 seconds, after which the camera will start up. If this stage is successful, it means that the bootloader installation was successful.
Firmware Installation on microSD and Configuration
After preparing the camera, you can start it using the firmware installed on the microSD card. Accordingly, now you need to prepare the firmware and install it on the memory card.
- Download the project – https://github.com/EliasKotlyar/Xiaomi-Dafang-Hacks
- Copy all files from the “firmware_mod” folder to the microSD card.
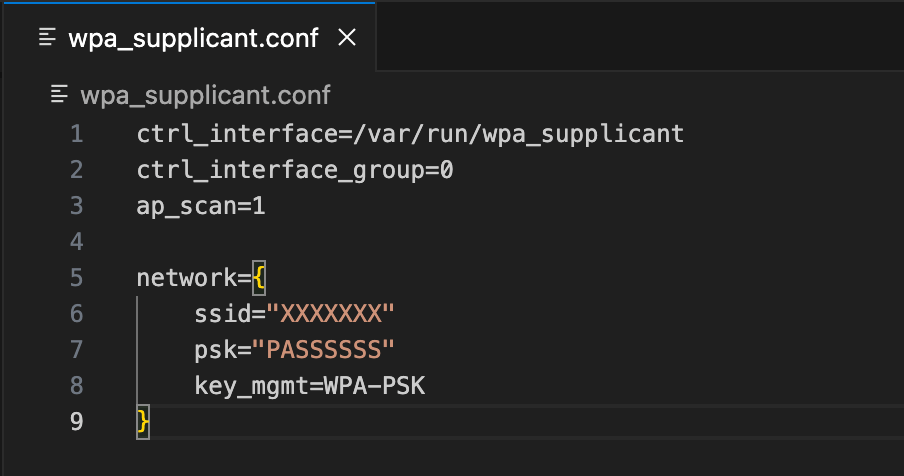
- Set up the Wi-Fi credentials. To do this, use the example file “wpa_supplicant.conf.dist” from the “config” folder, copy it to “wpa_supplicant.conf”, and enter your SSID and psk.

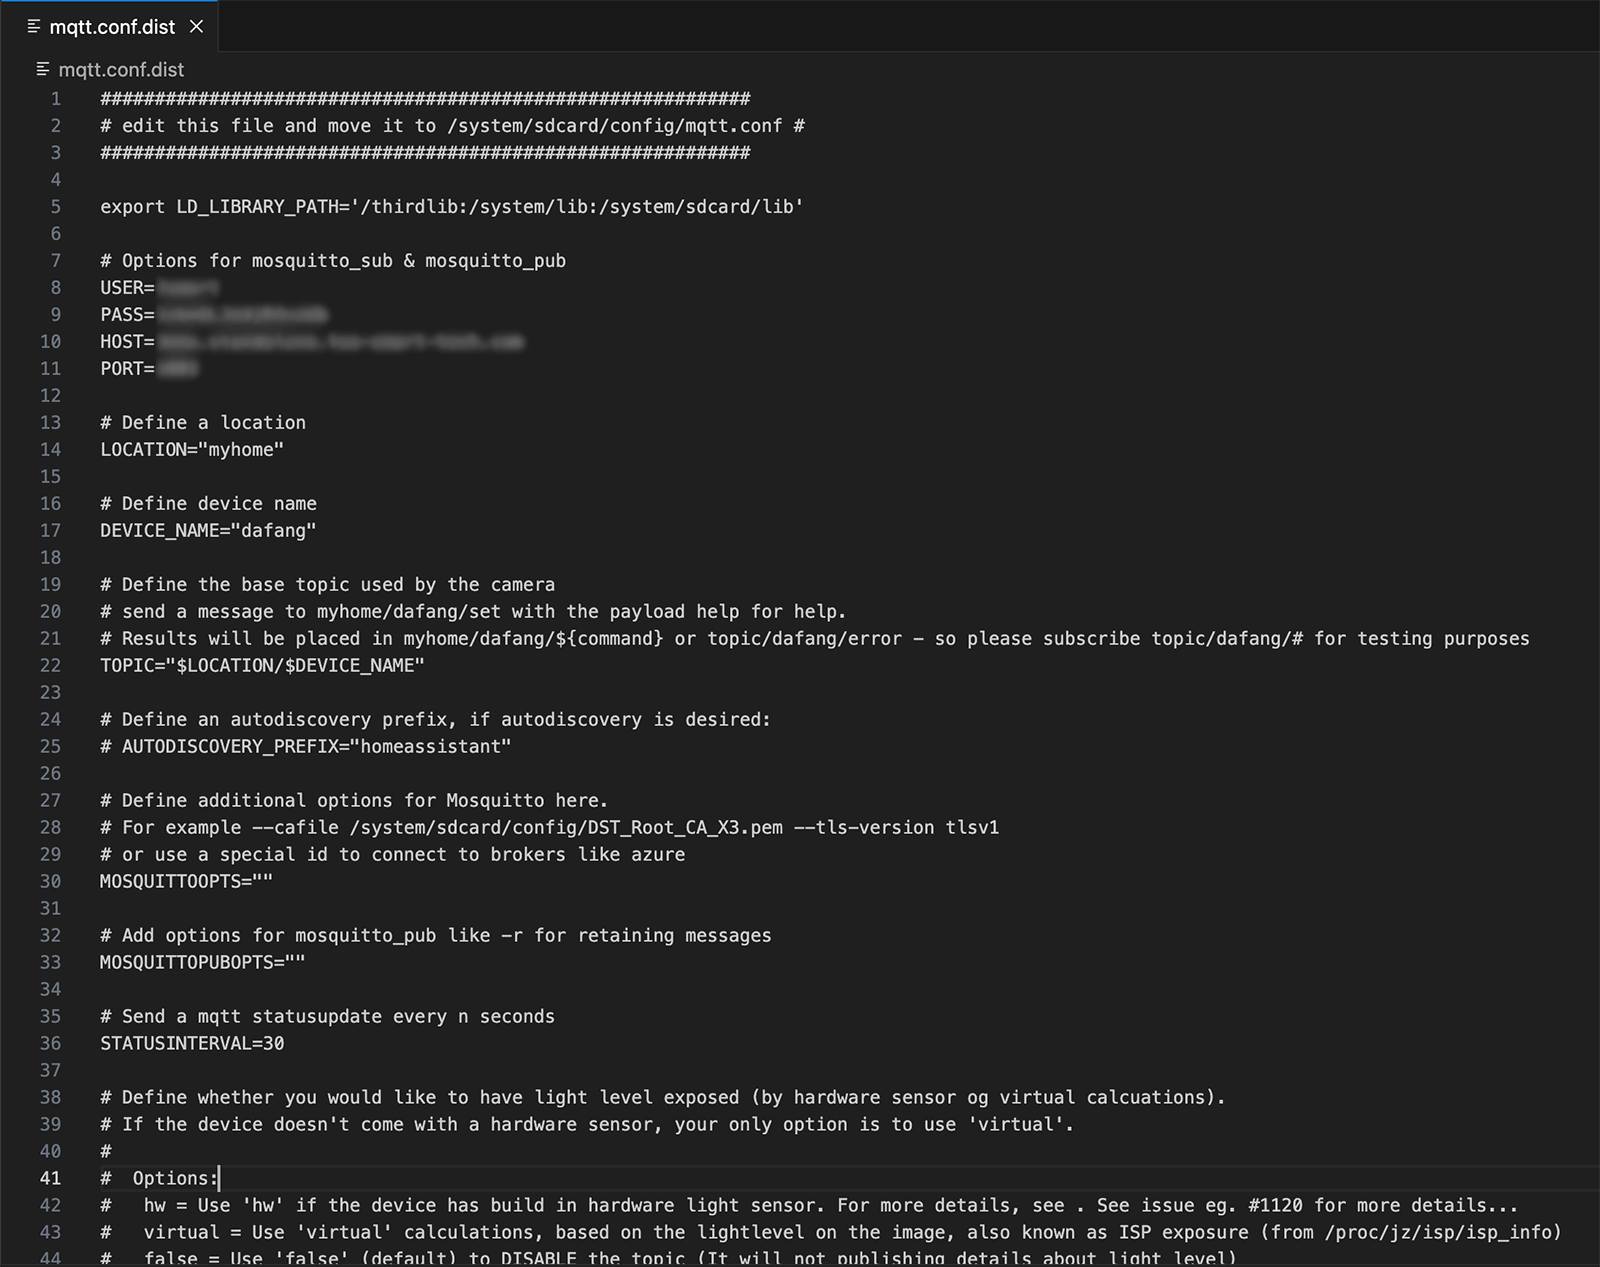
- Configure the connection to the MQTT broker for the 2Smart Standalone automation platform:
- Copy the contents of the “mqtt.conf.dist” file to the “mqtt.conf” file.
- Edit the three parameters: host, login, and password.

- Configure the motion config:
- Copy the contents of the “motion.conf.dist” file to the “motion.conf” file.
- Edit the following parameters:
publish_mqtt_message=true
motion_timeout=10
motion_detection=on
- Insert the microSD card into the camera and turn it on.
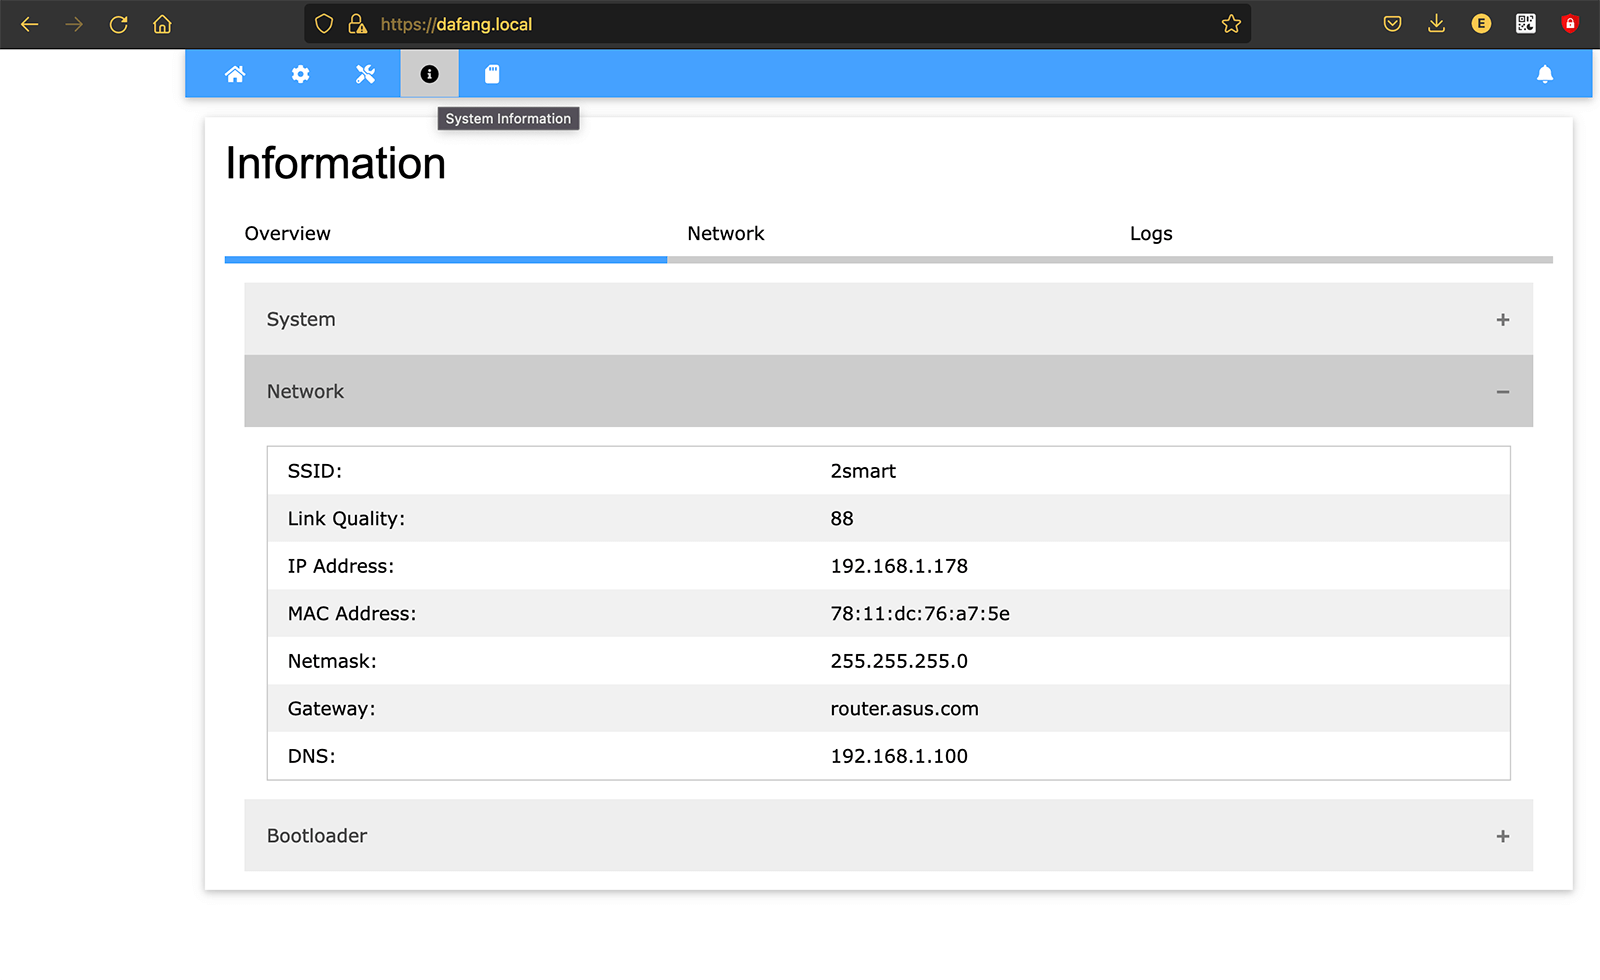
If everything has been done correctly, the camera should be accessible within your Wi-Fi network at https://dafang.local (you can ignore the certificate warning as the camera uses self-signed certificates). To access the camera’s web admin interface, use the following credentials:
- Login: root
- Pass: ismart12
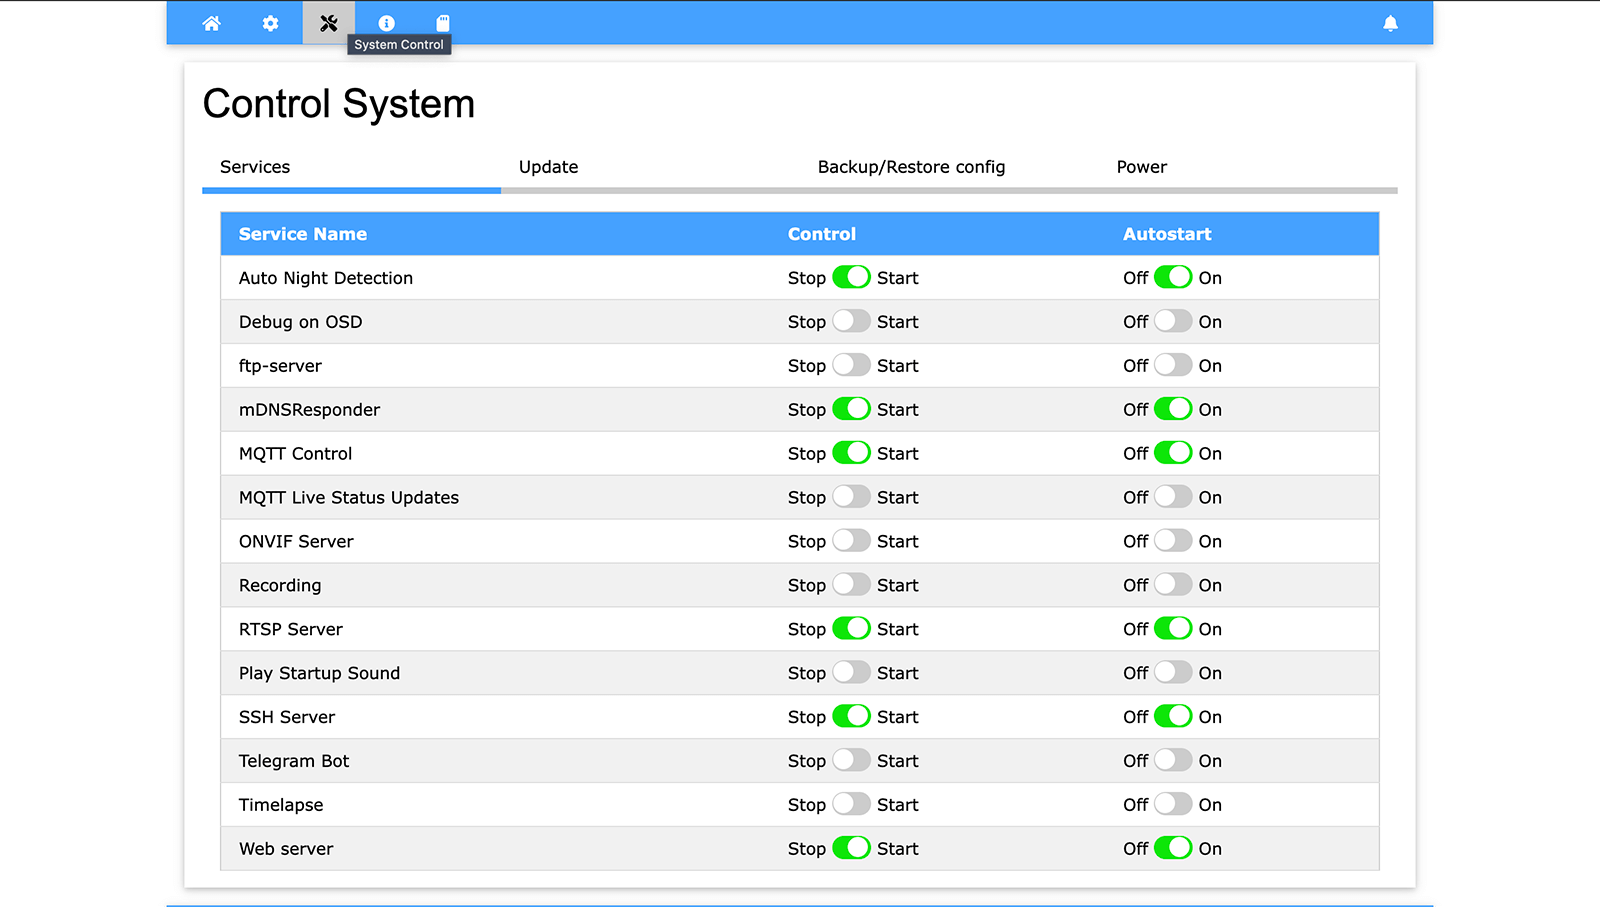
In the camera’s web admin interface, navigate to the “Service Control” page and enable the “MQTT Control” option, as shown in the screenshot.
After doing this, the camera should connect to the MQTT broker for 2Smart Standalone.
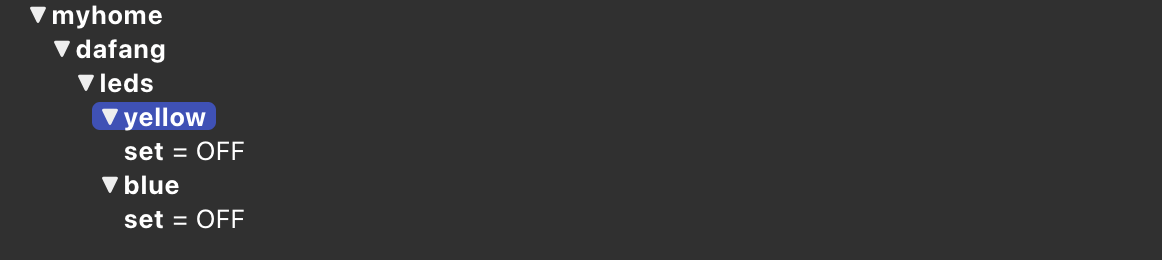
By default, the camera publishes the status of two LEDs in the topic “myhome/dafang” (if parameters LOCATION or DEVICE_NAME were changed in “mqtt.conf”, the topic structure may differ).
At this stage, the camera configuration is complete.
Let’s collaborate
We’re empower your business with our technology expertise
Configuration of 2Smart Standalone
Setting up Remote Camera Control
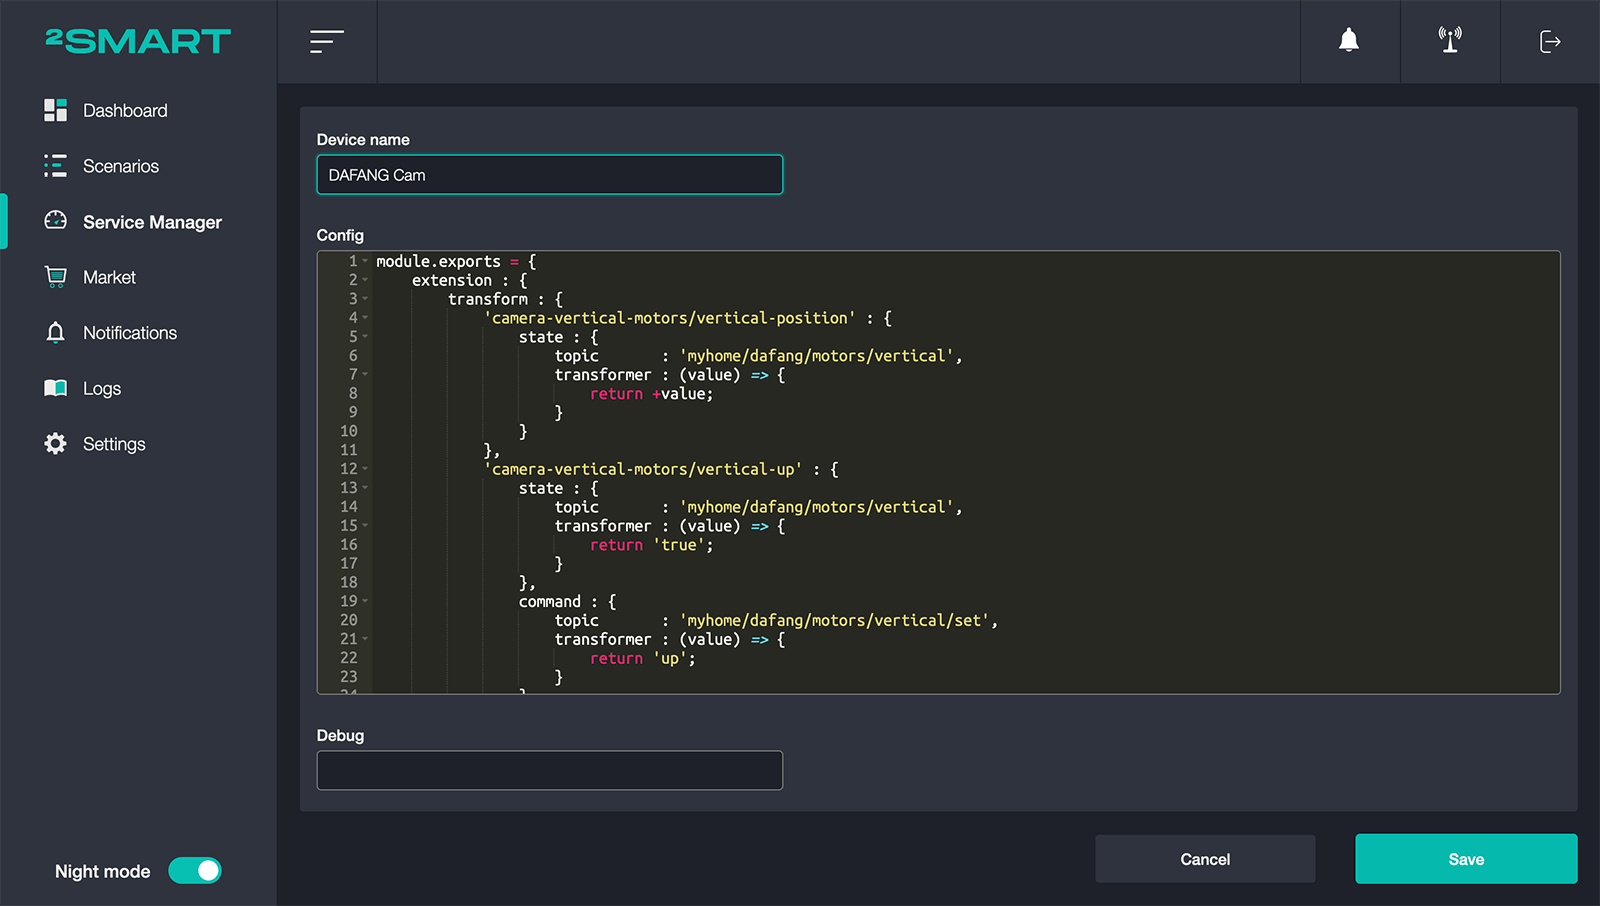
To use and control the camera using the open-source monitoring and automation platform, 2Smart Standalone, you first need to install the MQTT Adapter bridge from the built-in add-on market and configure it.
When configuring the bridge, you can use the example configuration that we used in this experiment.
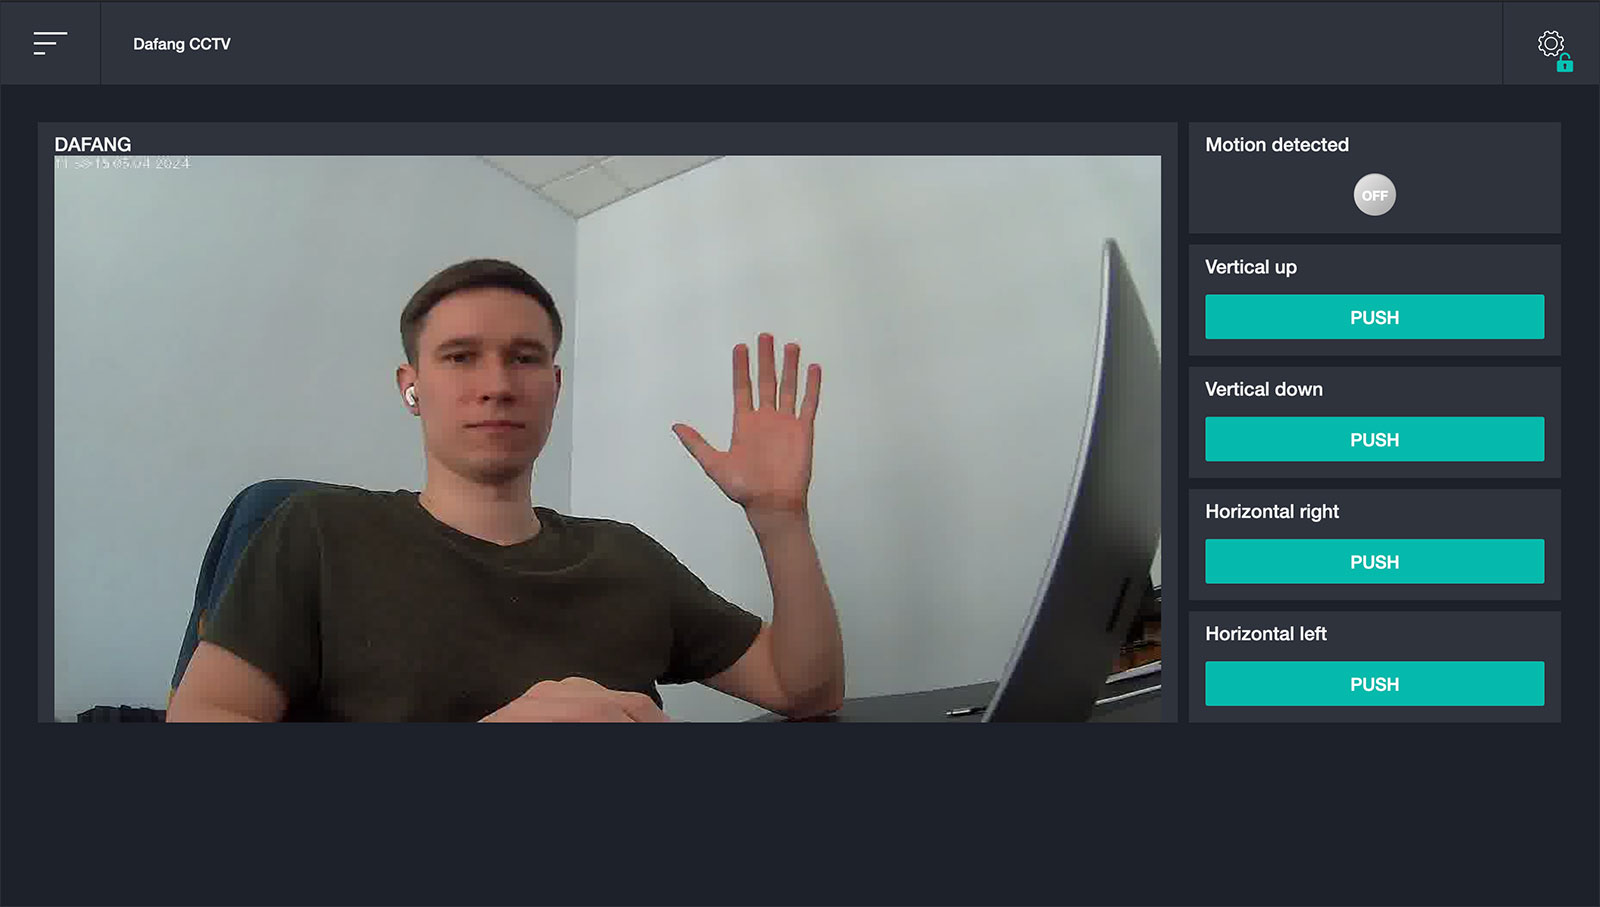
As a result, the dashboard of your platform instance will display a device widget like the following:

This widget allows you to move the camera vertically and horizontally, turn the LEDs on/off, and track motion. If this functionality is working, you can use it remotely by either deploying the 2Smart Standalone platform in the cloud or setting up integration with the 2Smart Cloud mobile application.
Video Streaming Configuration
Considering that we’ve already implemented the integration of the surveillance camera’s video stream into the 2Smart Standalone platform previously, this is a straightforward task at this stage. You’ll find detailed instructions in the article about video surveillance integration. Here are the main steps you need to take:
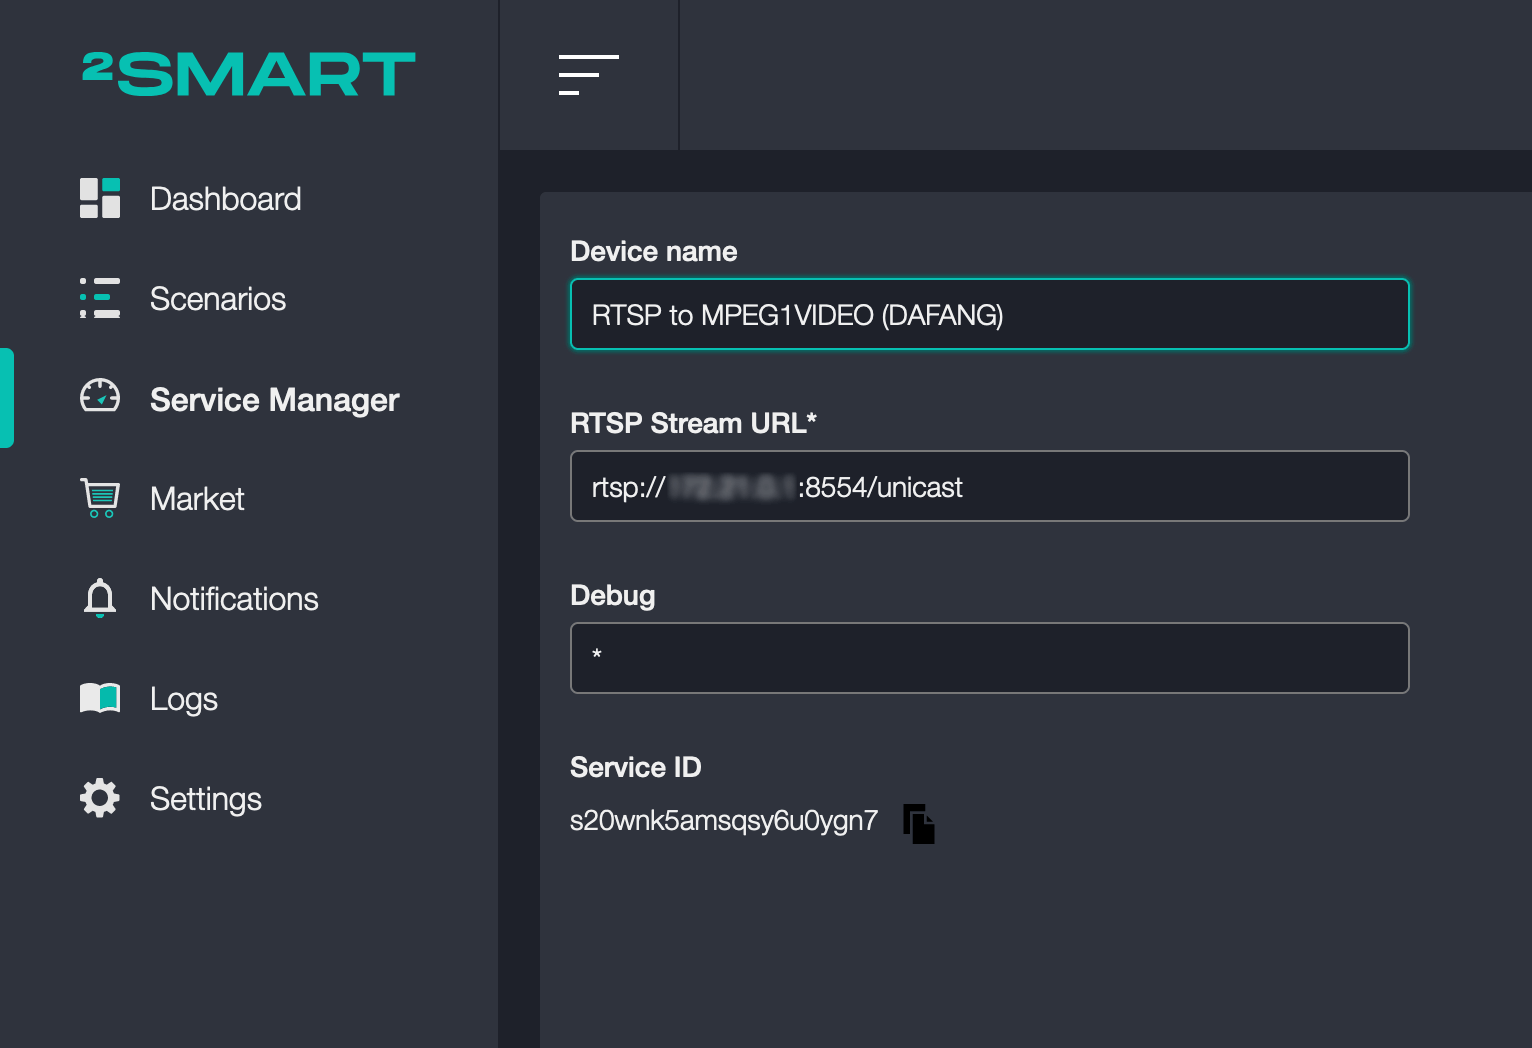
- Create an “RTSP to MPEG1VIDEO” bridge and specify the link to the camera’s RTSP stream in its settings. Note that you need the actual IP address of the camera within the network! The link “dafang.local” won’t work; you need to find out the IP address and configure the link as follows:
rtsp://<ip>:8554/unicast


- Create a new dashboard in the platform (or use an existing one) and add widgets for video viewing and camera control. We used the following widgets:
- RTSP-MPEG for video viewing.
- Four push button widgets for camera positioning.
- LED widget for motion indication.

Possible Automations Using Surveillance Camera
After successfully connecting the surveillance camera to the monitoring and automation platform, you can come up with any automations you like. Here are a few possible examples:
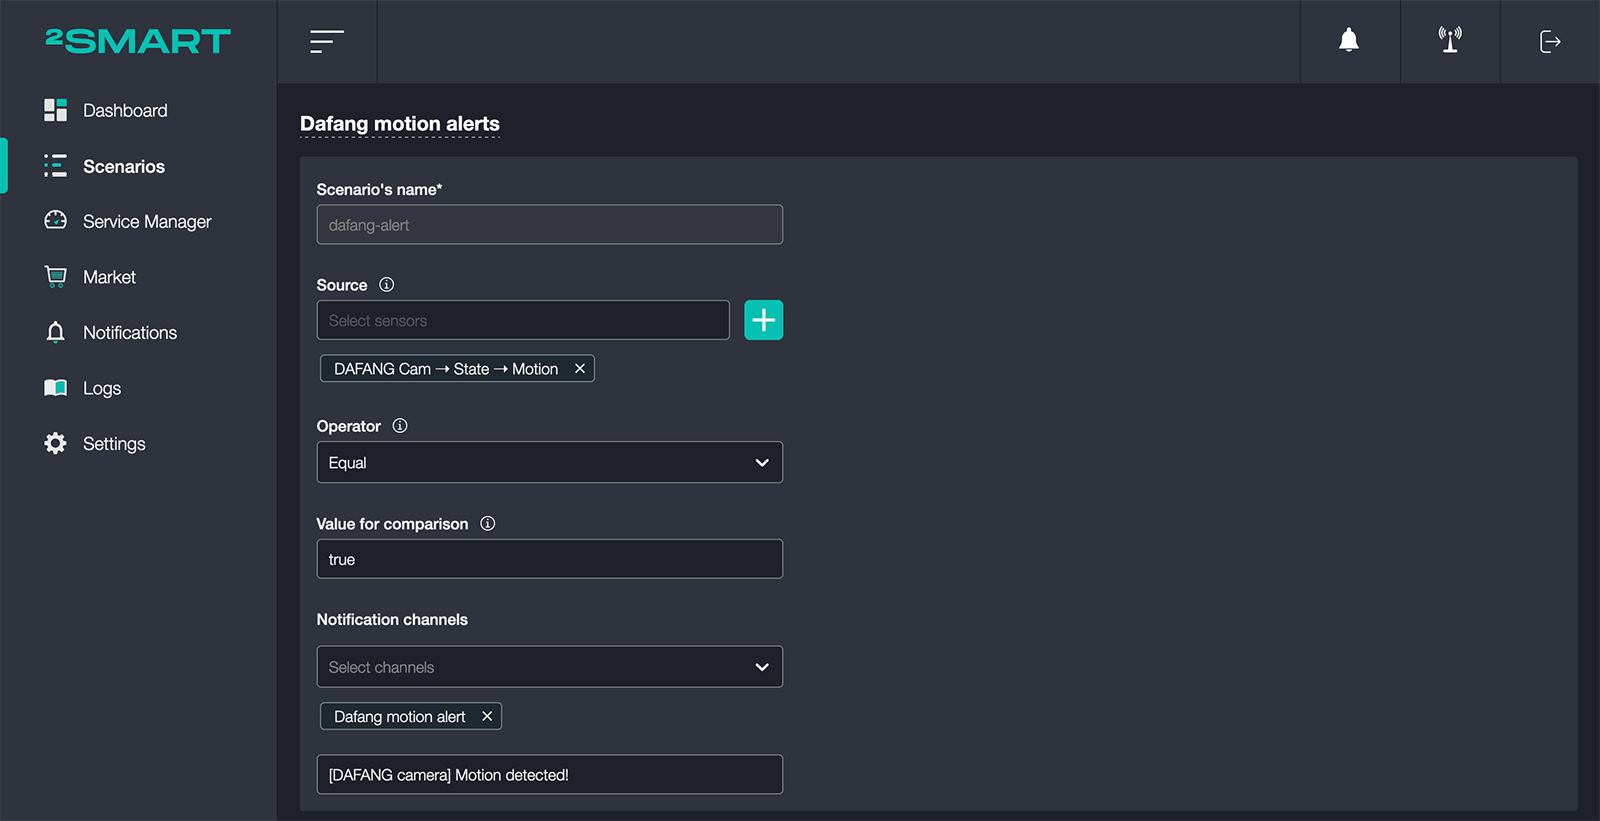
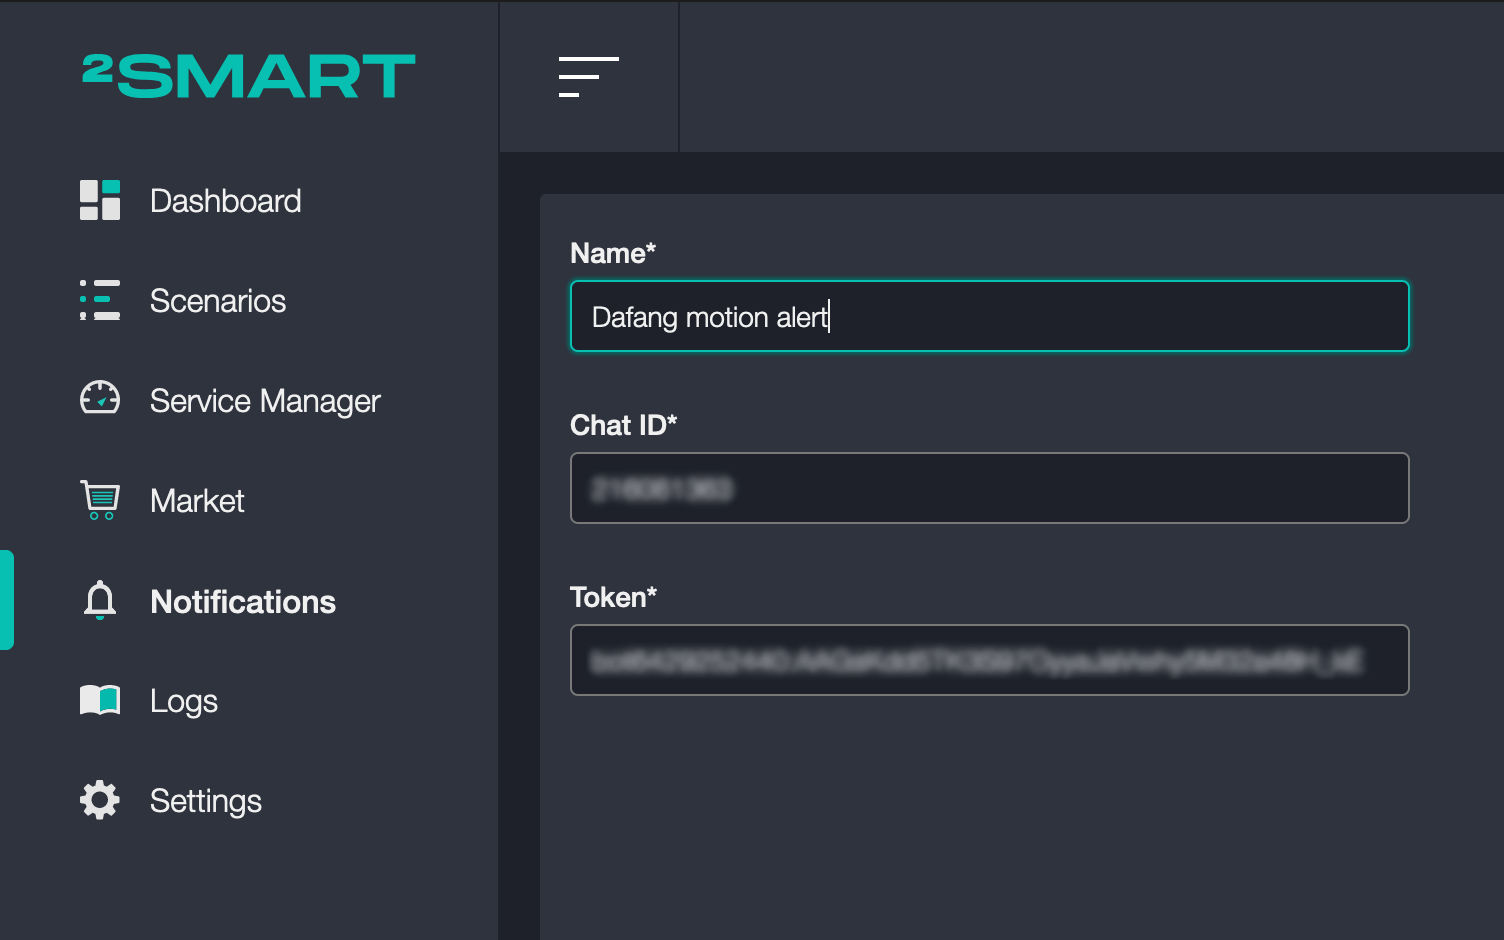
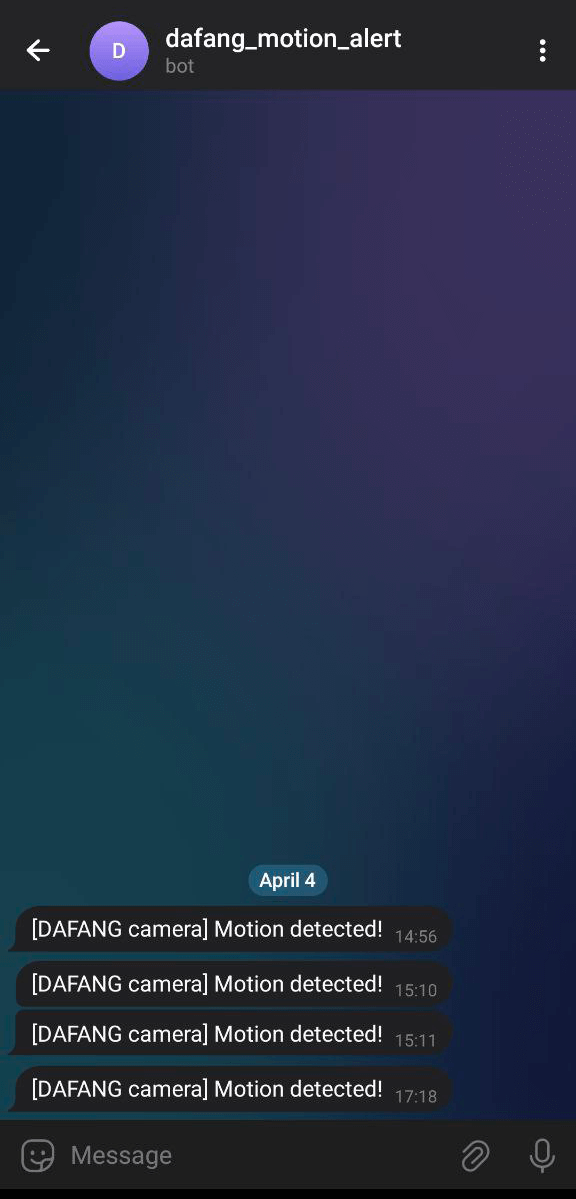
- Notifications via Slack or Telegram messenger about motion sensor activation on the camera. Use the 2Smart Standalone project wiki to set up notifications and send them via Telegram Bot or Slack webhook.


- Audio alerts, turning on lights, or activating any other devices upon motion detection.
- Camera positioning based on a schedule – for example, during the daytime, the camera faces the window, and at nighttime, it faces the front door.
Conclusions
Integrating video surveillance functionality into the 2Smart Standalone monitoring and automation platform is a significant step in expanding the capabilities of this system. Starting with remote video viewing, we have expanded the functionality by adding remote camera control and integration into automation processes.
Using custom firmware for Xiaomi Dafang PTZ 1080P cameras allowed us to significantly enhance control and monitoring capabilities. The process of preparing and installing the firmware proved to be relatively simple and safe due to a well-designed methodology.
After successfully installing the firmware and configuring the camera, we focused on integrating it with the 2Smart Standalone platform. Installing the MQTT Adapter bridge and configuring video streaming allowed us to create a comprehensive solution for monitoring and controlling the camera from our system.
Frequently Asked Questions
What are the benefits of using custom firmware for a surveillance camera?
Custom firmware expands the functionality of the camera, allowing it to be used in various scenarios such as remote control, integration with other smart devices, and automation creation. It also provides greater flexibility and control over the device.
What technical skills are required to install custom firmware on a camera?
Installing custom firmware requires basic computer skills and an understanding of the device flashing process. It’s important to follow instructions carefully and be prepared for any potential technical challenges.
Can I revert to the factory firmware if something goes wrong?
Yes, in this case, the process of using custom firmware allows for reverting to the factory firmware at any time. The camera boots from an external memory card, while the factory firmware remains intact in the internal memory. This minimizes the risk of damaging the device – if something goes wrong, you simply need to start the camera in the usual way.
How complex is the process of preparing and installing the camera for use with the 2Smart Standalone platform?
Preparing and installing the camera with custom firmware is relatively simple and safe. Users just need to follow the steps to download the firmware onto the memory card and install it on the camera, and then configure the appropriate settings.
What are the network and equipment requirements for using the camera with the 2Smart Standalone platform?
To use the camera with the platform, you need a Wi-Fi network and a device capable of connecting to this network. You also need a compatible microSD card to install the custom firmware.
The minimum requirements for a computer to install your 2Smart Standalone platform instance depend on the operating system used, as outlined in the project’s wiki.
Can I integrate the camera with other smart home systems or third-party platforms?
Yes, the Xiaomi Dafang PTZ 1080P camera with custom firmware supports integration with various smart home systems and monitoring platforms, including 2Smart Standalone. This allows for the creation of complex automation scenarios and expands the capabilities of your system.
How can I ensure the security of data transmission and storage from the camera?
To ensure the security of data from the camera, it is recommended to use secure Wi-Fi network connections, set up password access to the camera, and encrypt data on the microSD card. It is also important to regularly update the camera firmware to close vulnerabilities and ensure security.
Don't forget to share this post!
Read Next


Let’s dive into your case
Share with us your business idea and expectations about the software or additional services.
