
Table of contents:
In one of our recent blog articles, we discussed ways to connect the Modbus network to the 2Smart Standalone automation platform using a Teltonika gateway. The primary method involved utilizing the Modbus Bridge integrated into the automation platform. Employing the bridge poses no challenges in the local deployment of the automation software. However, when opting for cloud deployment of the platform, users may have queries regarding connecting to the local IP and port. This article focuses on how to leverage the OpenVPN connectivity feature embedded in the Teltonika gateway admin panel. This enables users to utilize the cloud instance of the 2Smart Standalone automation platform for interacting with devices operating on the Modbus protocol.
How to connect the Modbus network to the cloud instance of the automation platform using OpenVPN
The functionality of the Teltonika TRB245 gateway, which we employed to connect Modbus devices to the open-source automation platform 2Smart Standalone, includes the capability to utilize OpenVPN. In other words, the gateway, thanks to this option, can act as a VPN client. This makes it possible to configure access to the gateway from the cloud-deployed automation software.
Deployment of OpenVPN and cloud instance of 2Smart automation platform
In this experiment on connecting the Modbus network to the cloud instance of the 2Smart Standalone automation platform using the Teltonika gateway, we utilized the server capabilities of DigitalOcean.
In the marketplace of this platform, there is a droplet with a deployed and pre-configured OpenVPN Access Server. We recommend using this option as it is simpler compared to manually installing OpenVPN on a clean Ubuntu droplet.
If you prefer to use a service other than DigitalOcean, there may also be pre-configured OpenVPN servers available. If not, you can opt for the self-deployment option.
To install the 2Smart Standalone automation platform in the cloud, use the following script: https://standalone.2smart.com/get2smart. Run it on the same droplet where OpenVPN is deployed.
OpenVPN server settings
Let’s start with configuring the OpenVPN server deployed in the cloud. Navigate to the “Configuration” – “VPN Settings” section.

- Configure the subnet mask for the static IP. If you are unsure about the values, copy the address from the “Dynamic IP” block, and OpenVPN will suggest alternative options. In this example, the range of static IP addresses looks like 172.27.208.0/20.
- In the “Routing” section, select the option “Yes, using NAT.”
- Enter the subnet mask for the Docker network in 2Smart Standalone (see below for how to find it).
The subnet mask is needed so that the Docker network can access the IP addresses of clients connected via VPN. Failure to do this would result in Docker being unable to see the IP addresses of clients, and the bridge would not function.
To obtain the subnet mask, open the console of your DigitalOcean droplet in your account or connect to the droplet from your local console using SSH, then run the following command:
$ docker inspect 2smart_app-network | grep Subnet
In our case, the obtained result looked like this:
"Subnet": "172.18.0.0/16",
We entered this subnet mask into the corresponding field in the OpenVPN settings.
To continue with the settings, go to the “User management” – “User Profiles” menu.

Here, it is necessary to create a profile (in this example, its name is “teltonika”) so that a VPN client config is generated for it to connect to the OpenVPN server. Download the resulting configuration file from the server – it will be needed later to configure the Teltonika gateway to connect to the server.
To continue with the settings, go to the “User management” – “User Permissions” menu.
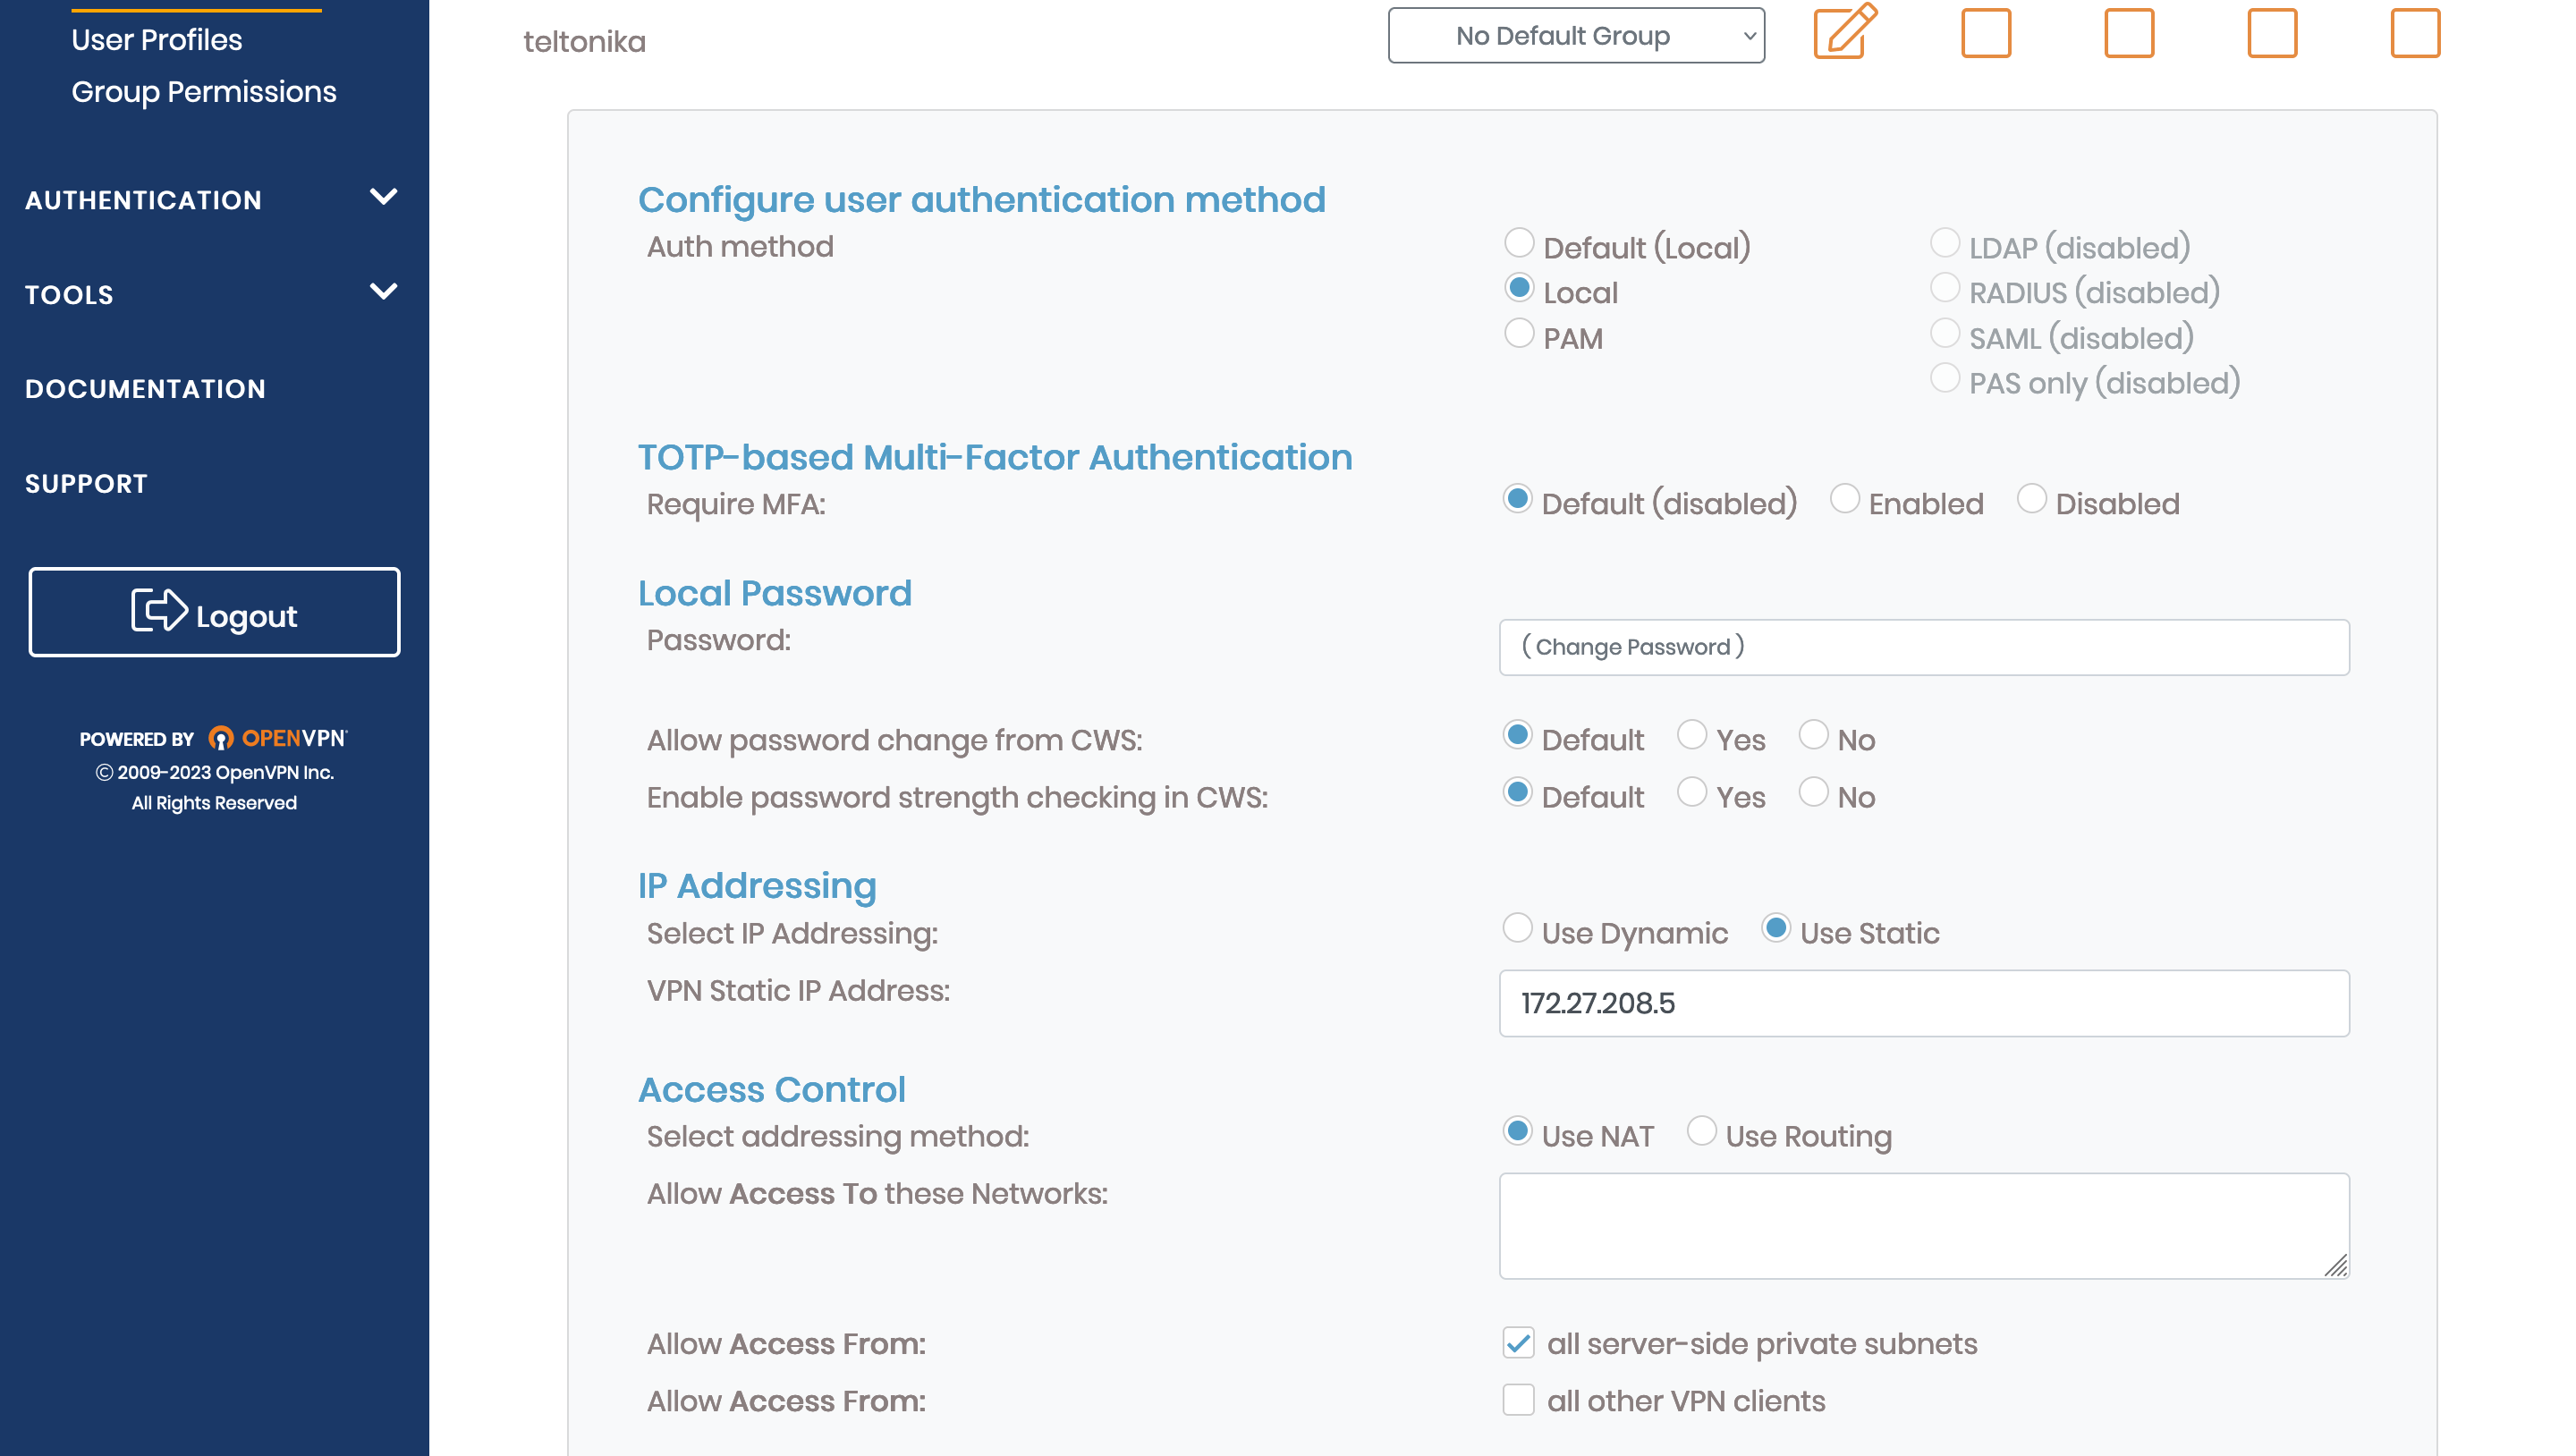
On this page, you need to specify credentials for authentication and a configuration for this client.
- In the “Configure user authentication method” section, select “Local.”
- In the “IP Addressing” section, choose “Use Static” and provide a static IP address (in this example, the address 172.27.208.5 is used, corresponding to the static IP range configured earlier in “VPN Settings”).
- In the “Access Control” section, select “Use NAT.”
Configuring the OpenVPN client in the Teltonika gateway admin panel
Navigate to the “Services” – “VPN” – “OpenVPN” section.
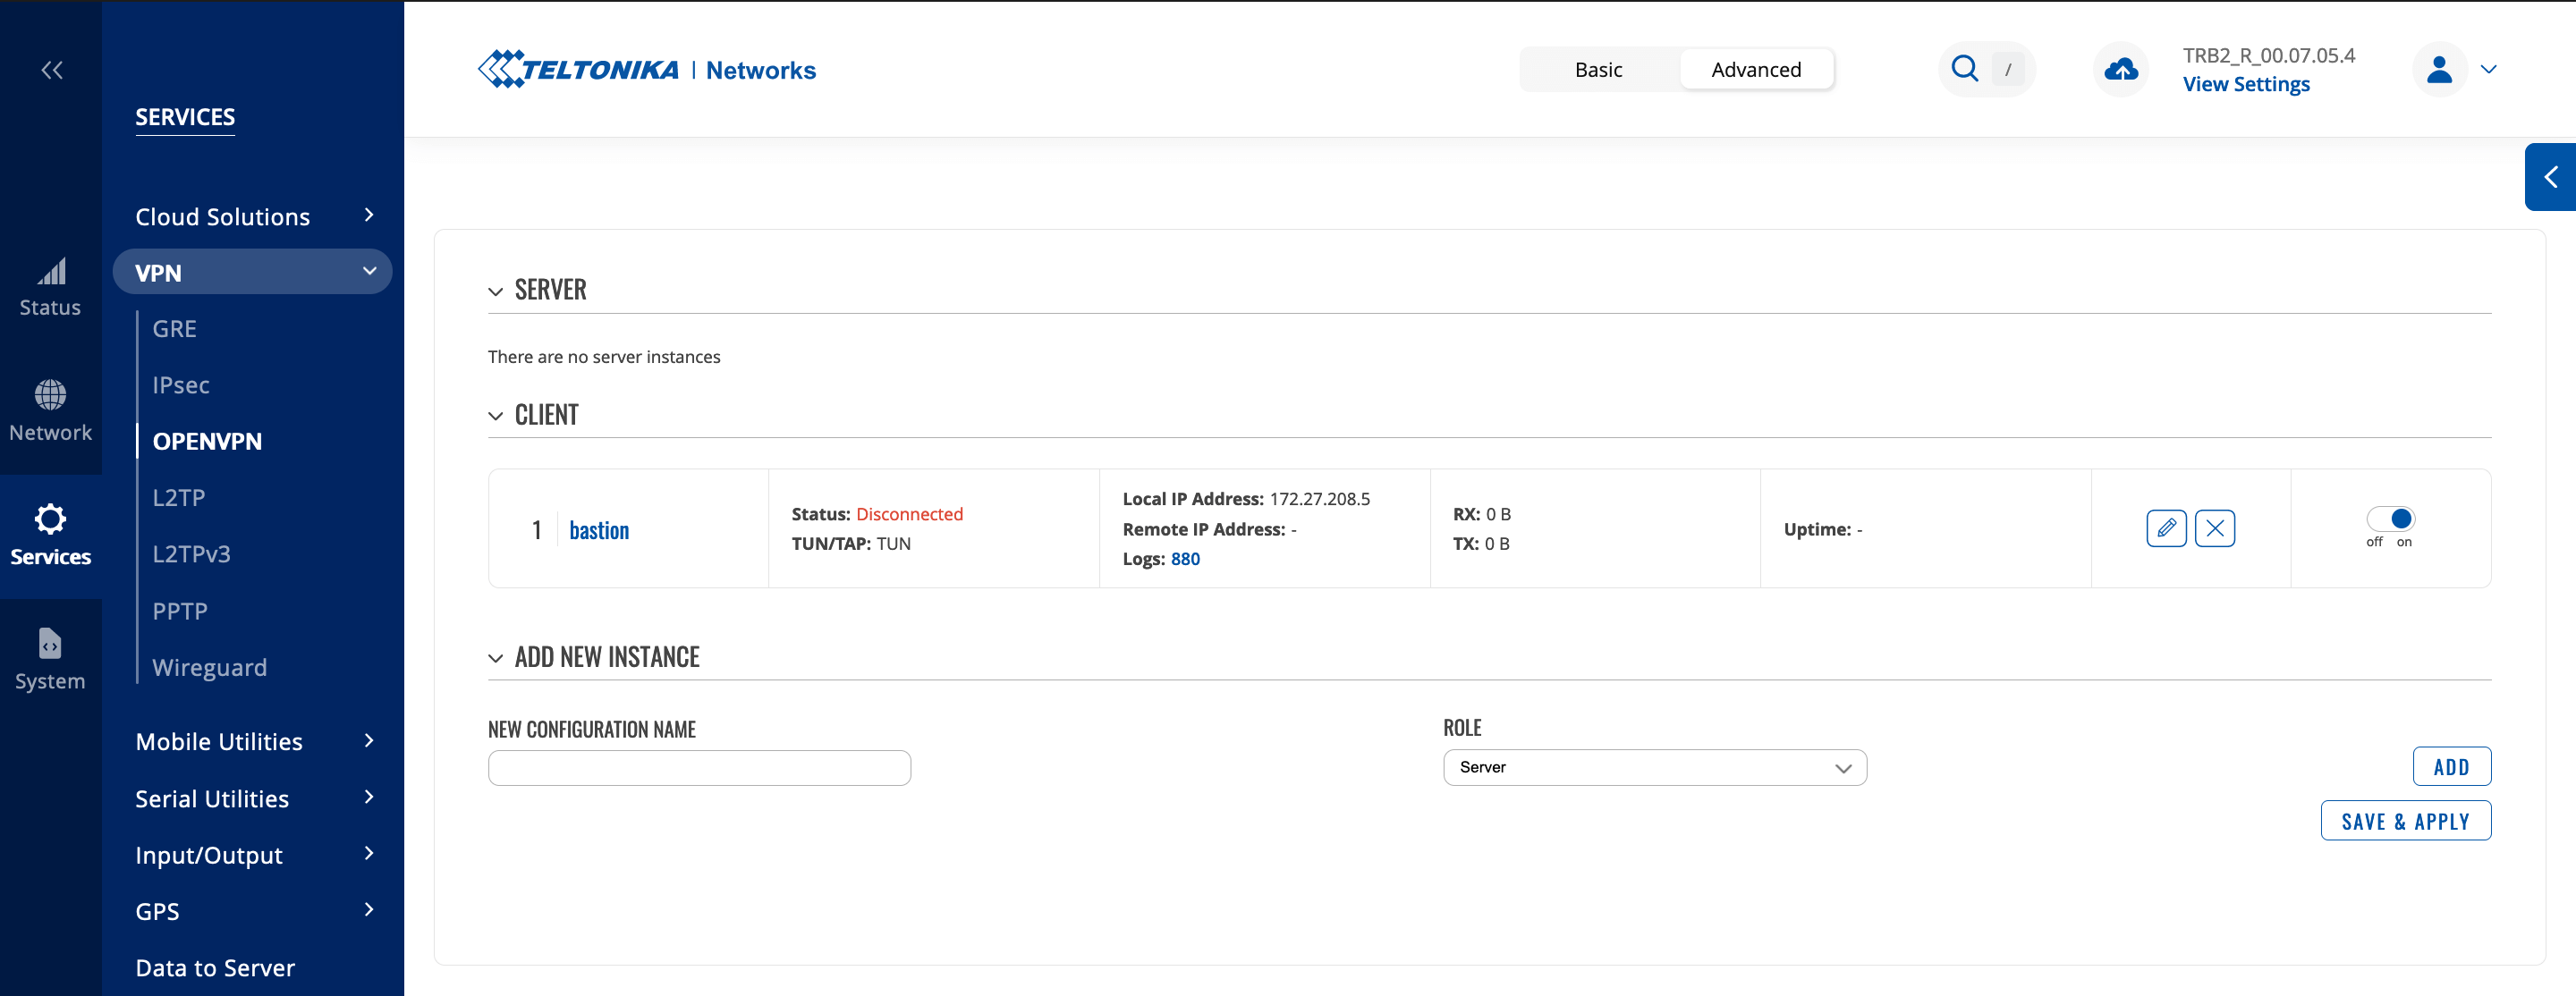
Create a new client and pay attention to the following settings:
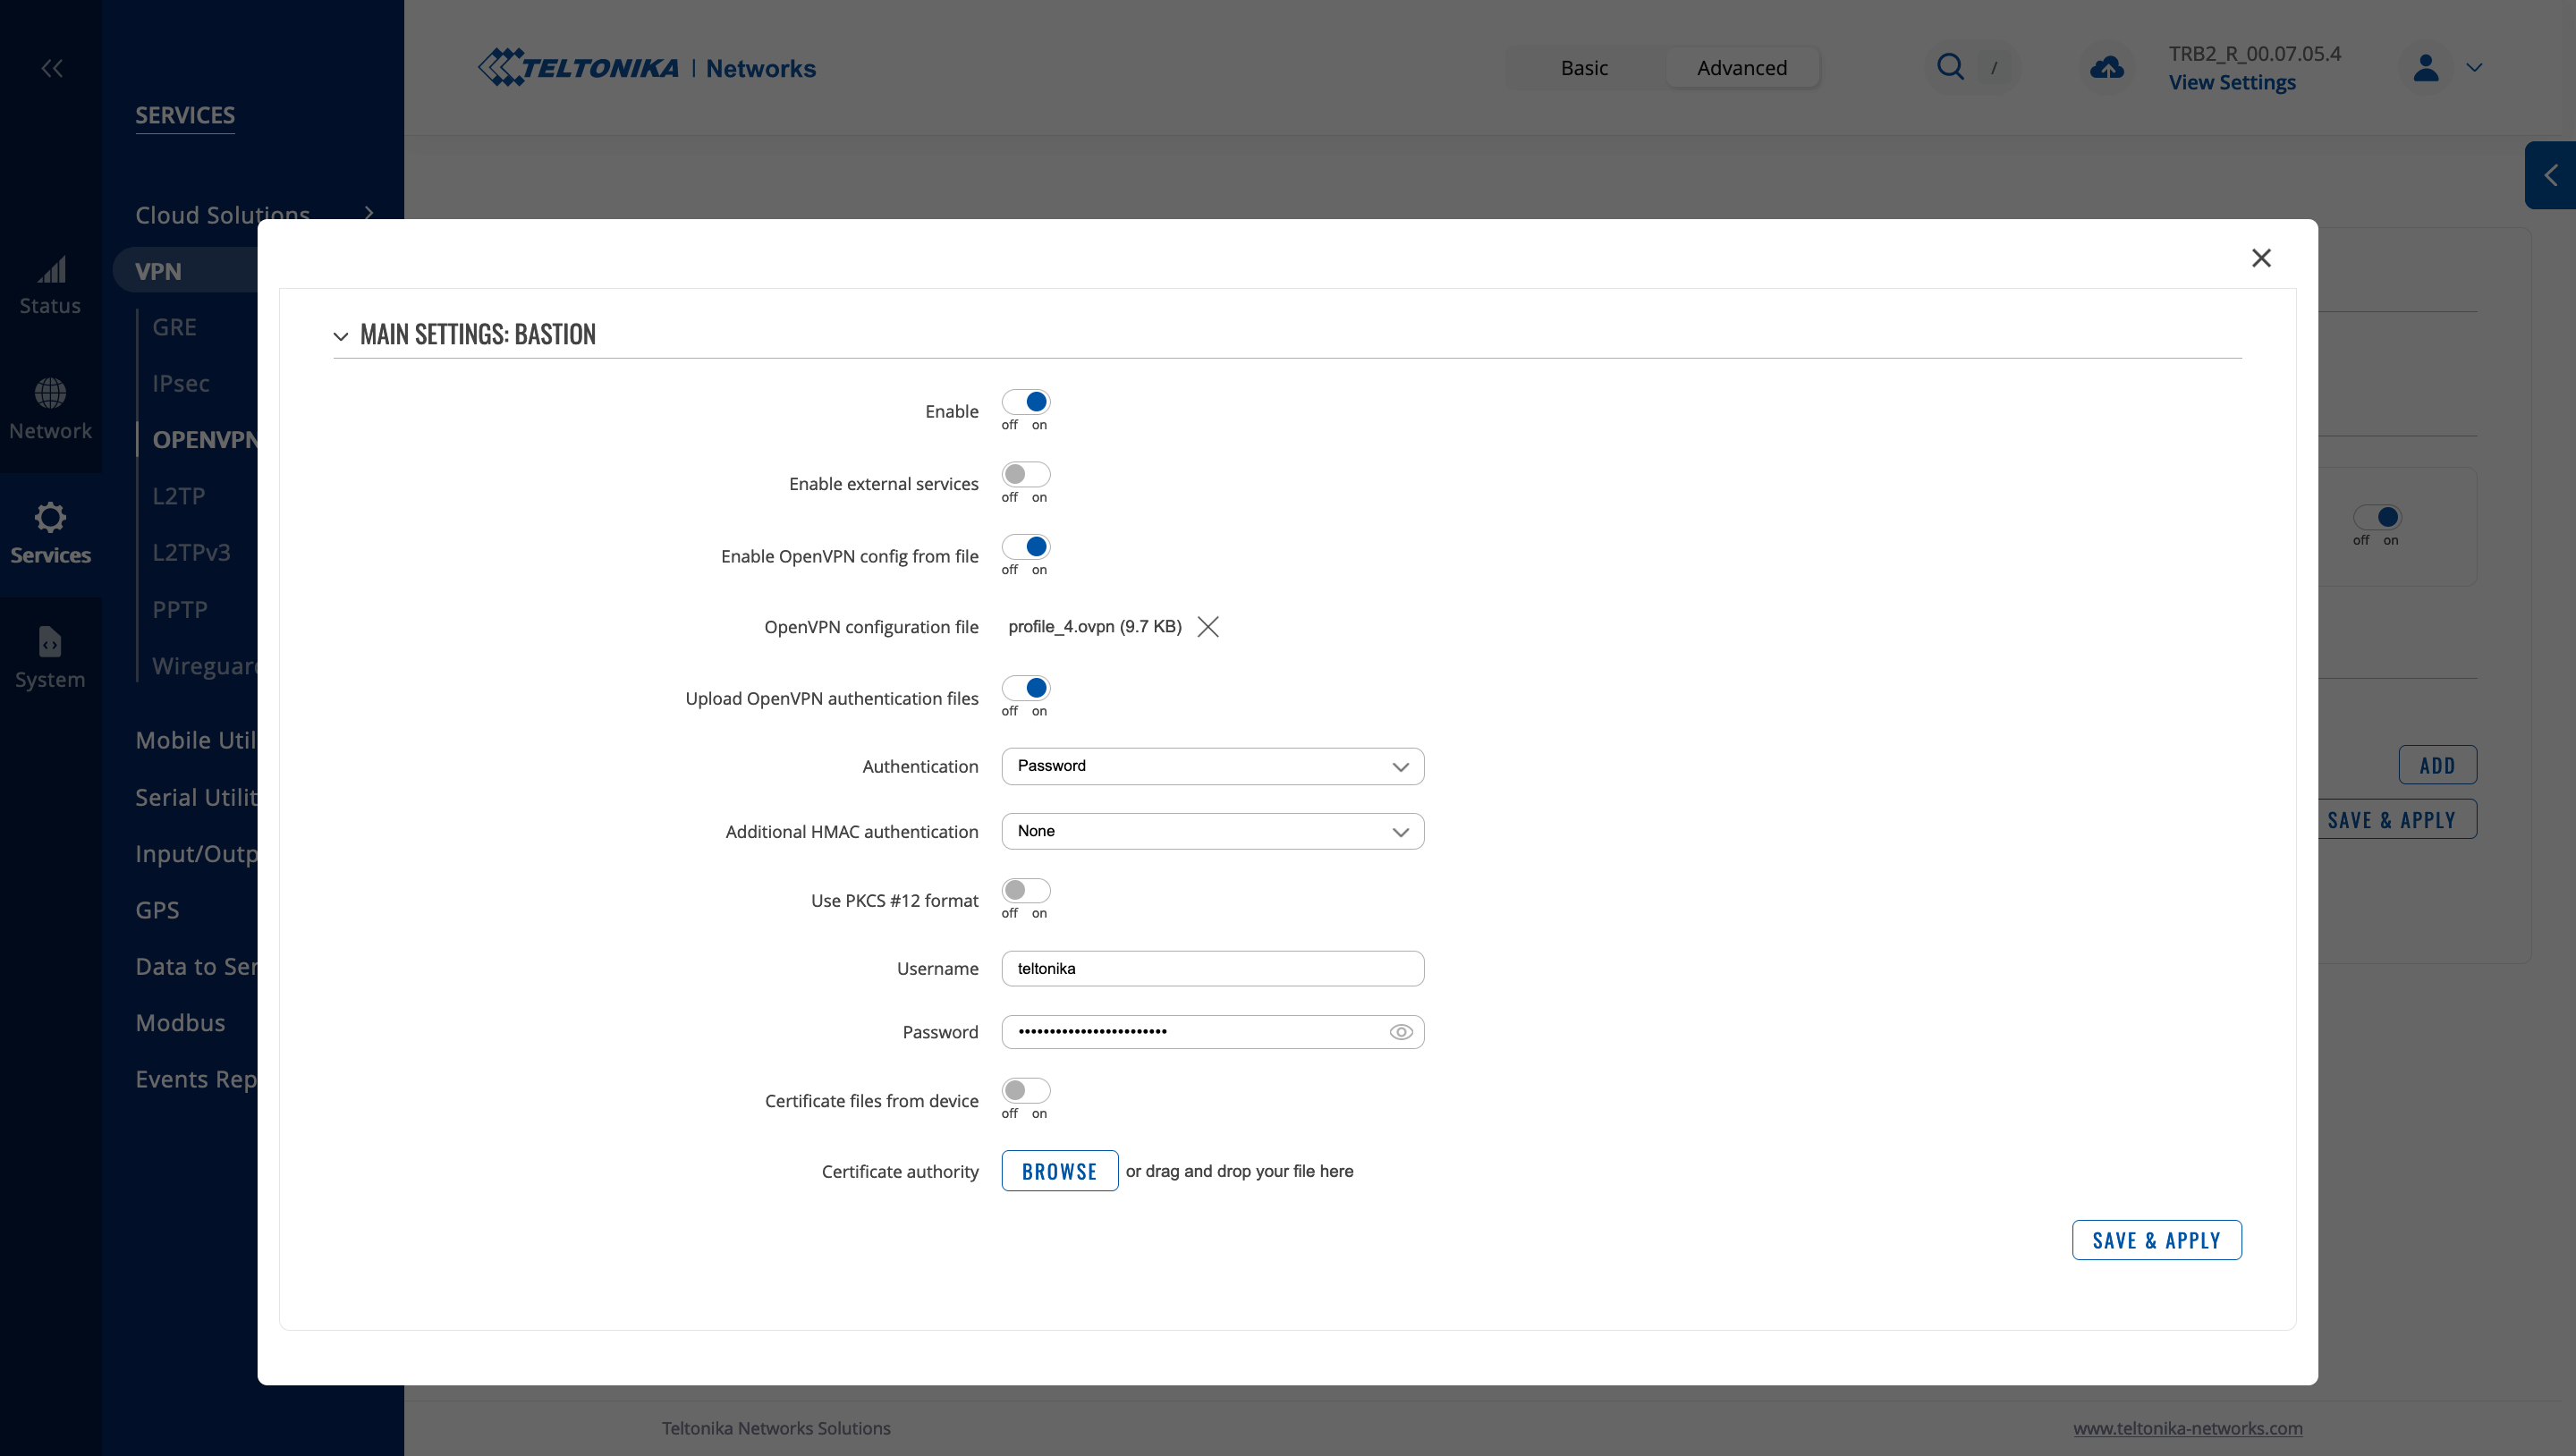
- Activate the “Enable OpenVPN config from file” option.
- Upload the profile file previously configured in the OpenVPN server settings.
- In the “Authentication” section, choose “Password.”
- Provide the username and password (credentials you entered earlier in the OpenVPN server settings).
- Save the settings by clicking “Save and apply.”
Let’s collaborate
We’re empower your business with our technology expertise
Configuring the TCP gateway in the Teltonika admin panel and in the automation software
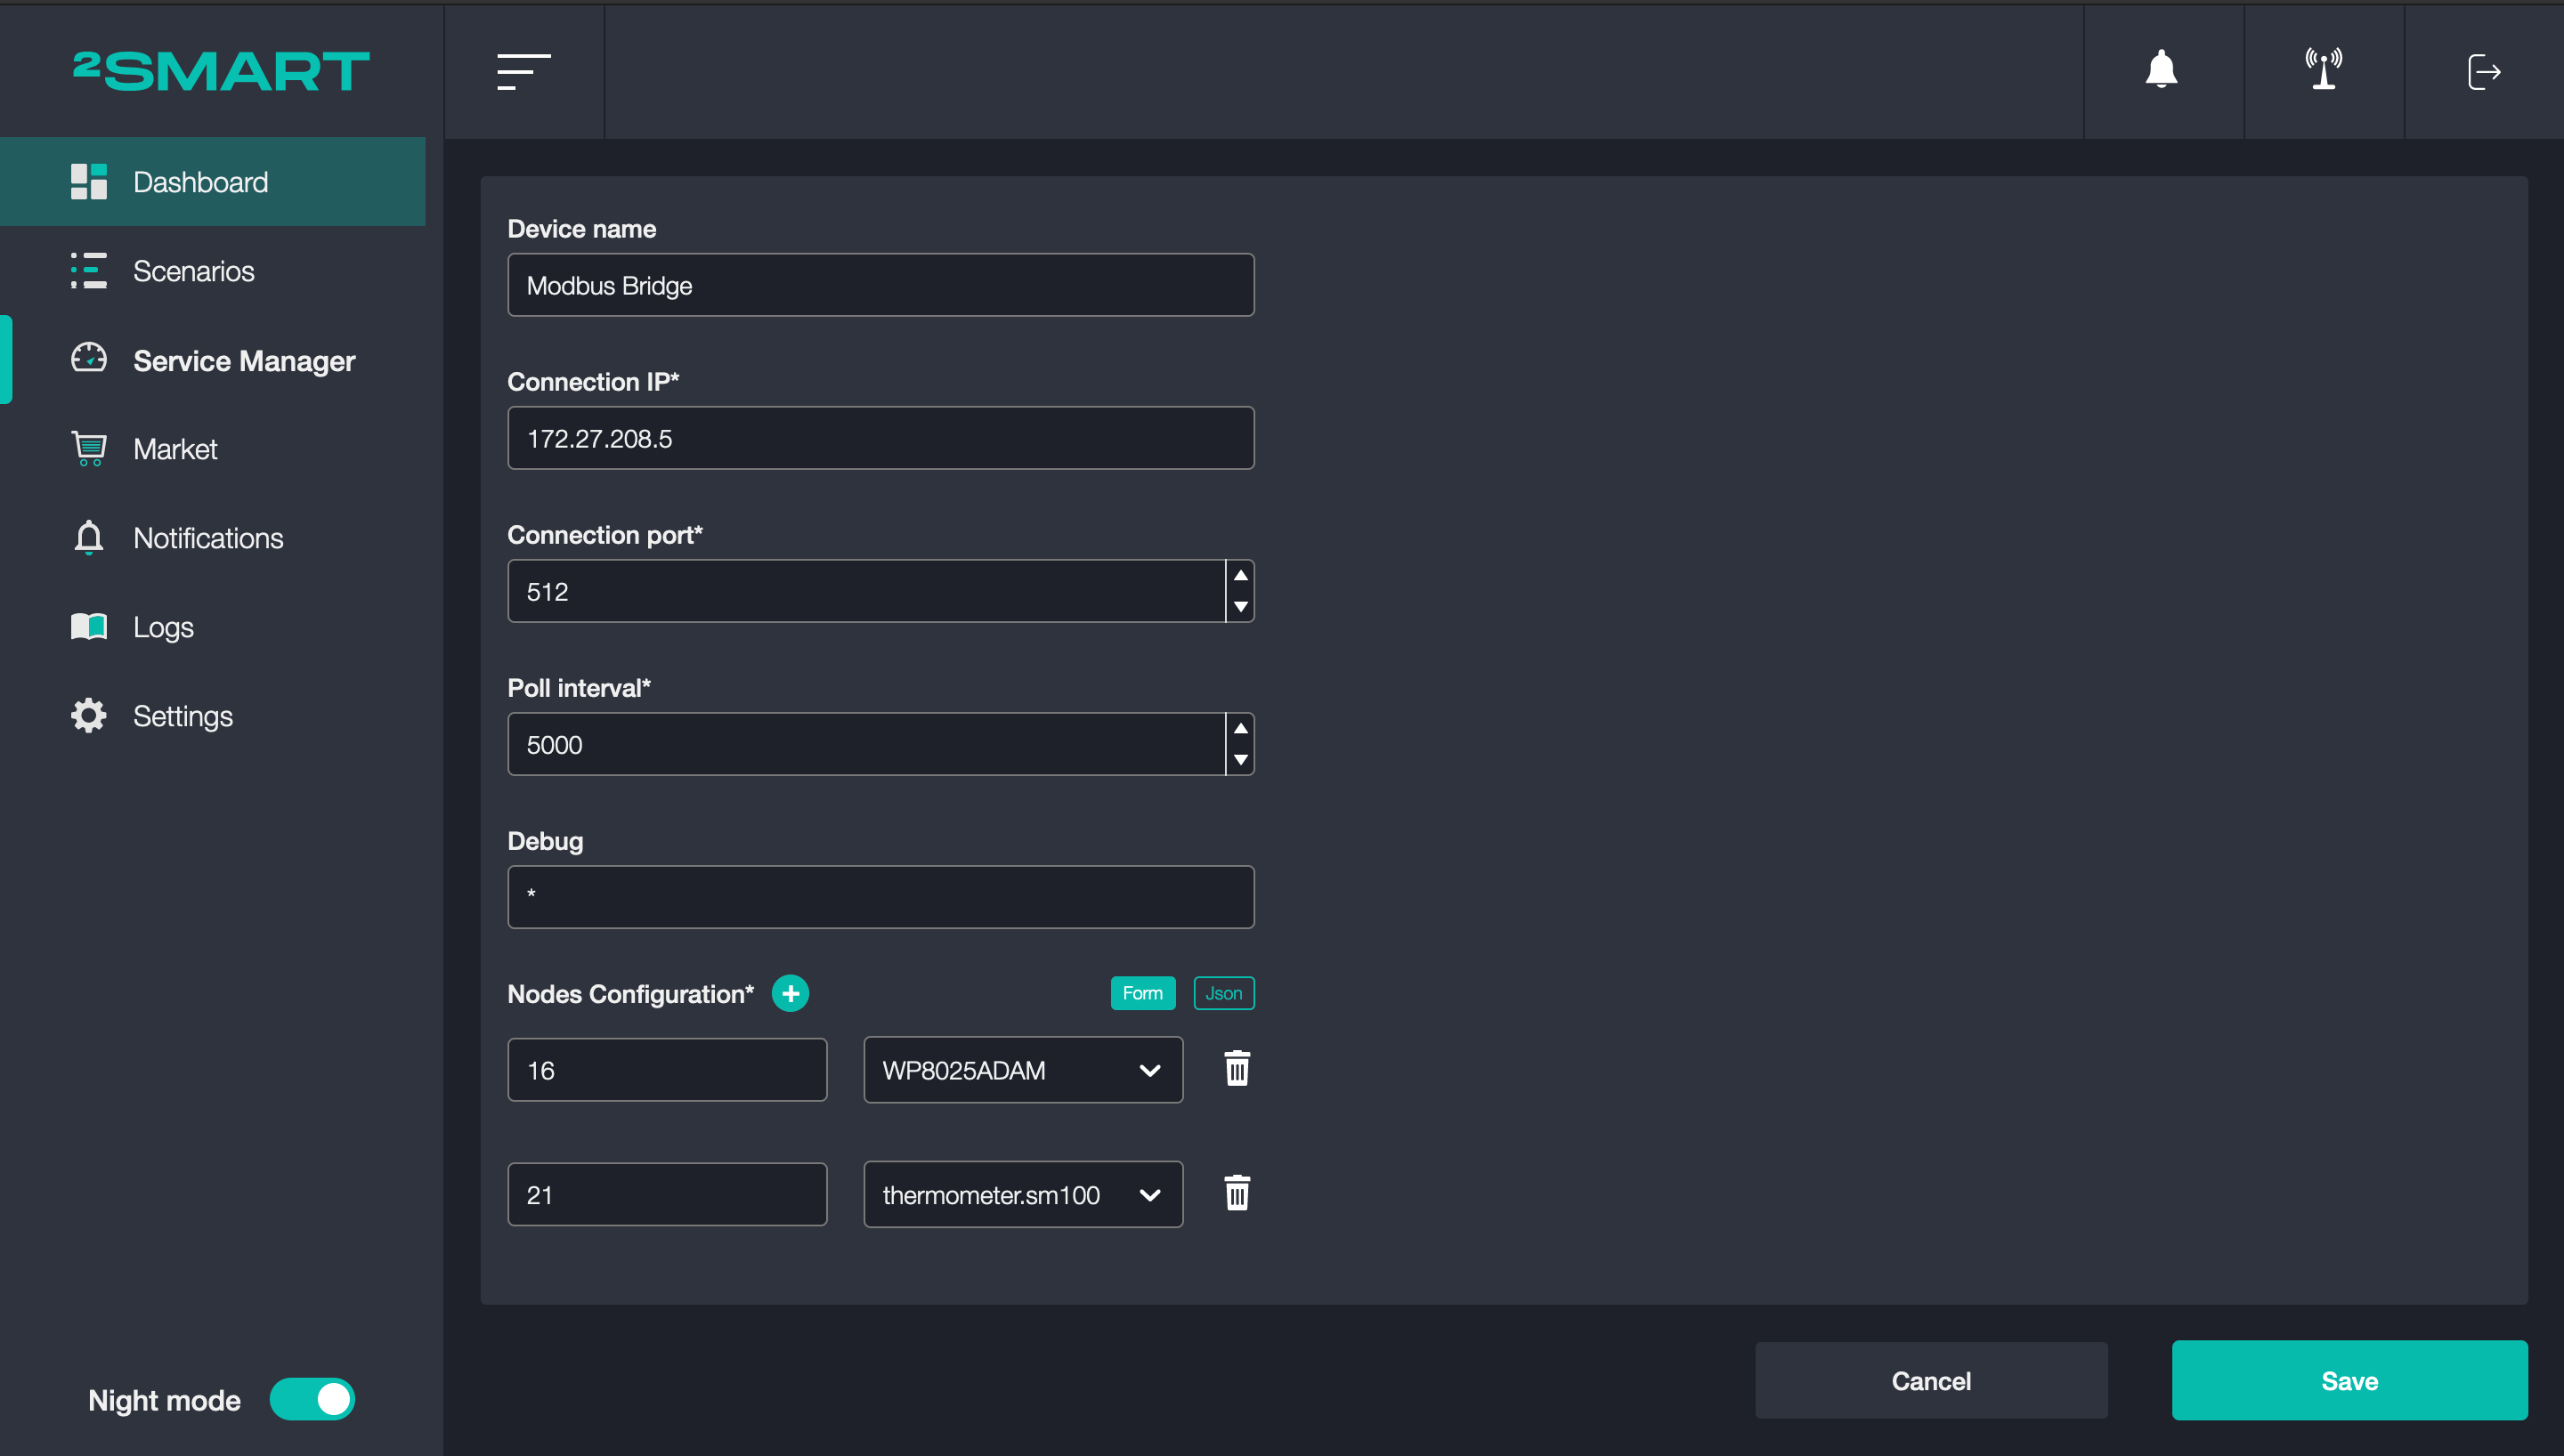
Go to the admin panel section “Services” – “Modbus” – “Modbus TCP over Serial Gateway” and enter the necessary settings.

More detailed information about these settings is described in the previous article about connecting the Modbus network to the 2Smart Standalone using the Teltonika gateway. When using the cloud instance of the automation platform, they remain the same as in the case of its local deployment.
In the Modbus bridge settings in the automation platform’s admin panel (details are also described in the previous article), enter the same local IP that you specified when configuring the OpenVPN server profile (in this case – 172.27.208.5).
After successfully configuring the bridge, you will see the Modbus device card on the 2Smart Standalone platform dashboard and will be able to control it using its cloud instance.

Conclusions
In most cases, we recommend users of the open-source automation platform 2Smart Standalone to deploy it locally. The platform has moderate server configuration requirements and can be installed even on a budget mini-PC.
However, if you prefer cloud-based deployment of the automation software (including for experimental purposes when acquiring a local server is impractical), you can overcome associated complexities by using a VPN. In this example, the Teltonika gateway for connecting Modbus devices has built-in functionality to work with OpenVPN, making this task solvable.
If you have any questions about configuring the Modbus bus connection and the cloud instance of the 2Smart Standalone automation platform via OpenVPN, you can ask them in the 2Smart Cloud Discussion Telegram chat. If you are interested in commercial usage of 2Smart Standalone, book a demonstration of its capabilities with our experts: contact@2smart.com.
Don't forget to share this post!
Read Next


Let’s dive into your case
Share with us your business idea and expectations about the software or additional services.
