
Table of contents:
The 2Smart Standalone, an enterprise-grade open-source automation platform designed for both industrial and home use, does not constrain users to specific Internet of Things (IoT) protocols for connected devices. Thanks to its architecture, this automation platform is ready to adapt to emerging protocols, requiring only the development of the corresponding software bridge when needed. This article delves into the real-world management of Modbus devices connected to the 2Smart Standalone automation platform using the Teltonika TRB245 gateway.
The Equipment We Used
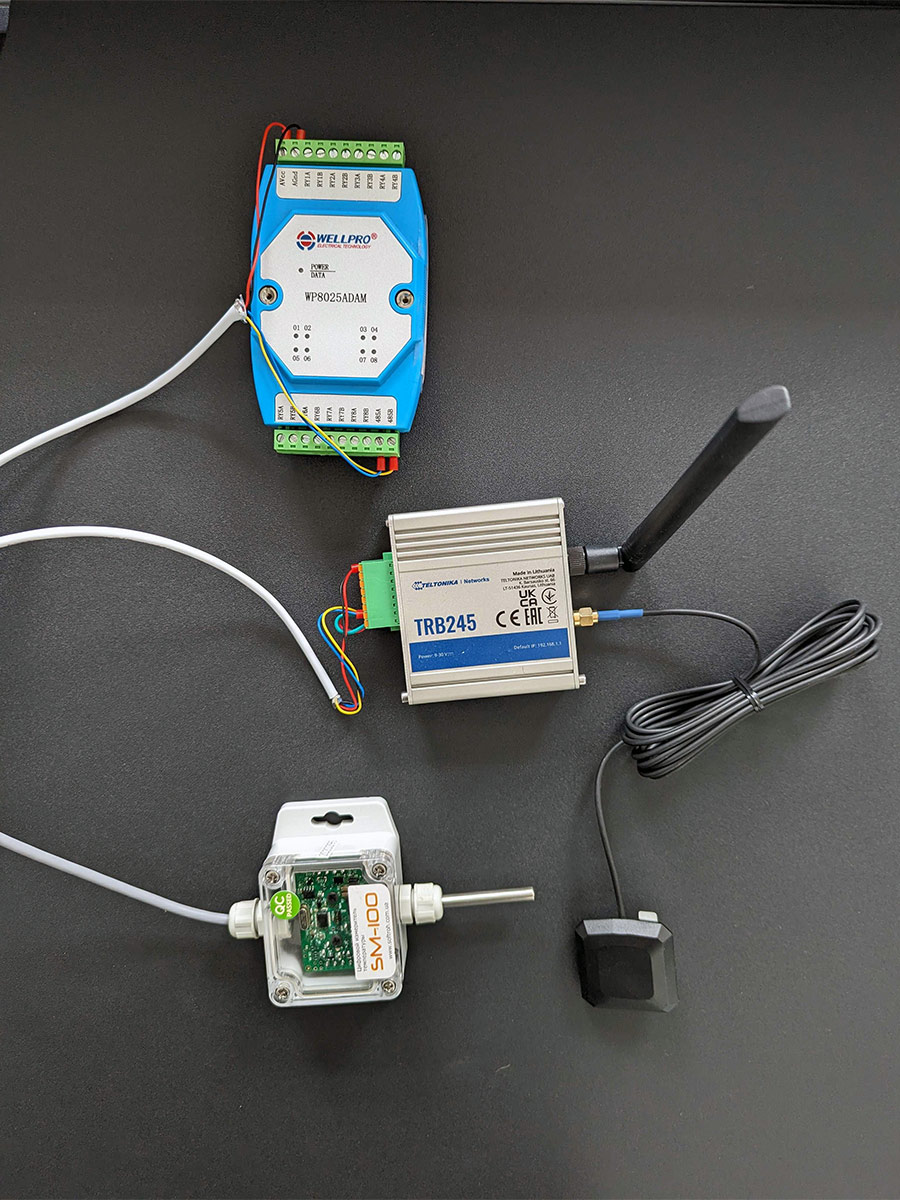
To test the interaction between the Teltonika M2M gateway and the open-source automation platform 2Smart Standalone, we configured the Modbus bus with the following characteristics:
- The Teltonika TRB245 gateway serves as the server in the bus.
- A temperature sensor and an 8-output relay act as clients in the bus.
The gateway, or bus server, is connected to the local network via an Ethernet cable. Consequently, the gateway has its own IP address in the network, enabling connection through one of the methods described below.
The Ways We Connected Modbus Devices Using the Teltonika TRB245 Gateway
As the Teltonika gateway we utilized supports the MQTT protocol and can communicate with any MQTT broker, such interaction stands as one of the methods to connect Modbus devices to the 2Smart Standalone.
Simultaneously, it’s crucial to remember that this automation platform supports Modbus devices through a ready-made software bridge. This method of connection is the primary one, so let’s delve into it first.
Connecting Devices Using Modbus Bridge
Embedded within the automation platform’s catalog of extensions and addons is the Modbus Bridge, allowing users to swiftly configure communication with the Modbus gateway and the devices connected to it. Utilizing this bridge is the standard method for connecting devices operating under this protocol.
In this connection scenario, the gateway is linked to the automation platform using the Modbus TCP protocol, meaning data transmission occurs over the TCP/IP network. As mentioned earlier, the gateway possesses its own static IP address within the local network. This IP address is precisely what is used to connect the platform to the Modbus TCP Master.
When connecting to the TCP Master, the automation platform, through the Modbus Bridge, sends requests to the gateway, which then redirects them to the connected devices. Upon receiving responses from the devices, the gateway forwards them to the platform’s bridge. This enables both the retrieval of sensor data and the transmission of control commands.
Here is how the Modbus Bridge configuration window looks in 2Smart Standalone:
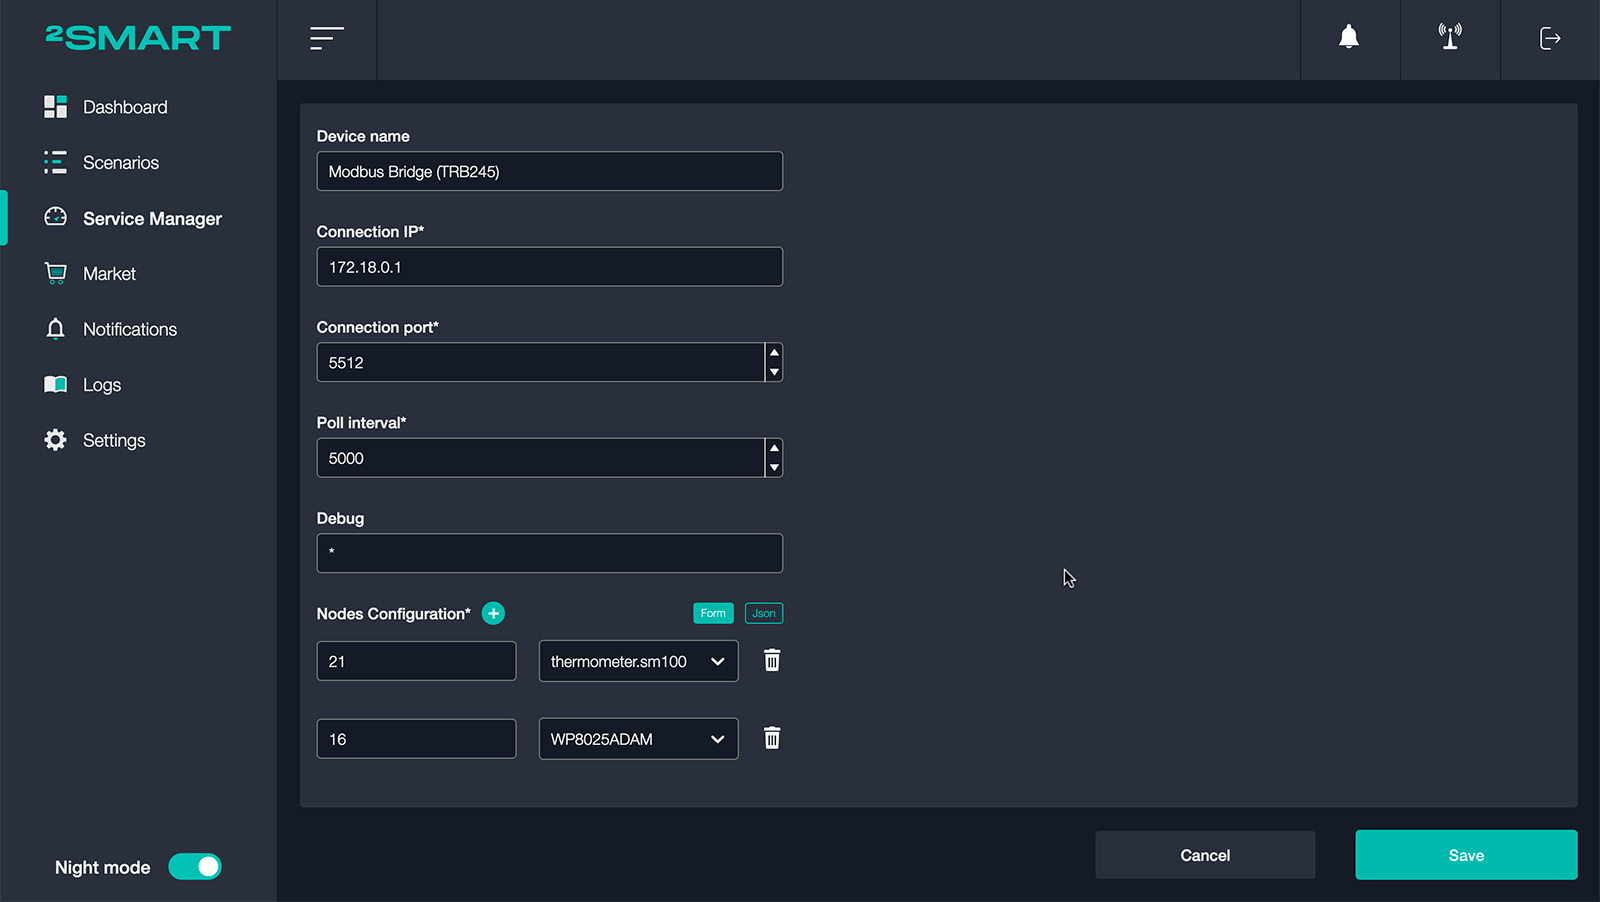
In addition to specifying the Connection IP, the user inputs the Connection port and provides the name and address for each device. To name a device, it must be selected from the drop-down list. The device’s address is entered manually, usually found in the device’s manual or on its packaging.
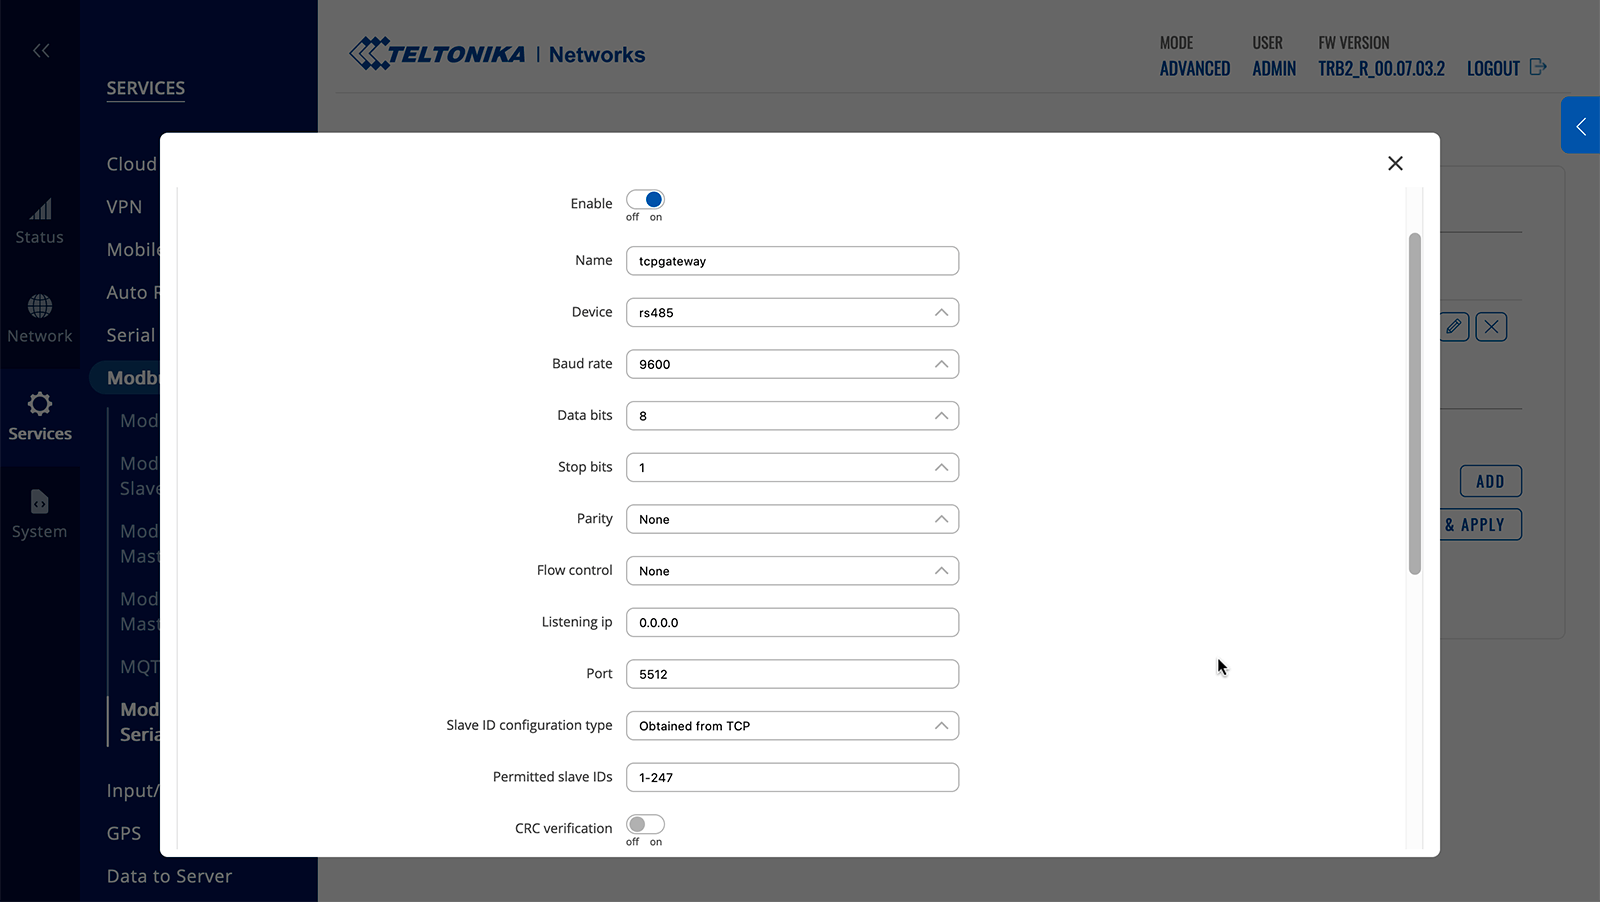
Some settings also need to be configured in the built-in admin panel of the Teltonika TRB245 gateway. To do this, access the admin panel and navigate to the following menu item: “Services” – “Modbus” – “Modbus TCP over Serial Gateway.”
On the page that appears, the user needs to create a new instance and, in the gateway settings window, do the following:
- Leave most of the default settings unchanged.
- Ensure that the “Listening IP” field has the value “0.0.0.0.”
- Verify that the “Port” field has the same value as the “Connection port” field in the Modbus Bridge settings window of the automation platform.
- Ensure that the “Save ID configuration type” field has the option “Obtained from TCP” selected.
Upon completing the configuration, a new card appears on the automation platform’s dashboard, displaying the current status of the sensors. In this case, it shows the temperature sensor readings and the state of each of the eight relay outputs. Since the relay outputs are controllable devices, users can not only view their status but also toggle their state directly from the dashboard using open-source automation software.
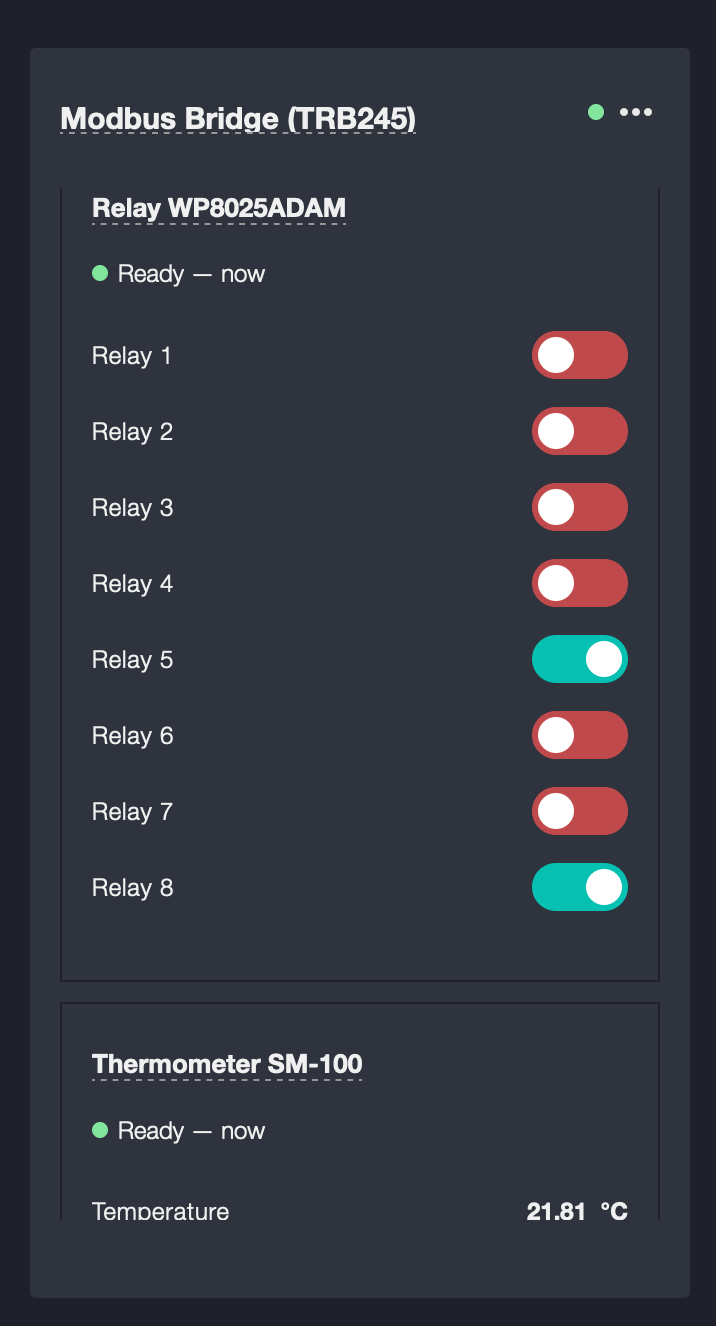
By connecting Modbus devices using the Teltonika TRB245 gateway in this manner, users can incorporate them into their automation scenarios. In this case, based on the temperature sensor readings, users can configure the activation and deactivation of heating or cooling systems, fans, and more.
The key advantage of using Modbus Bridge is that users of the 2Smart Standalone automation platform can quickly integrate Modbus devices. This process is accomplished solely through the platform’s user interface, eliminating the need for any configuration in code. Thus, even users unfamiliar with programming languages can successfully handle the connection process.
The main drawback of Modbus Bridge is that it supports only a limited list of Modbus devices. Users select the device model from a dropdown list in the bridge interface. Therefore, before acquiring a new device, users need to check compatibility with this list.
This limitation can be overcome if users of the open-source automation platform possess programming skills. In such cases, they can independently write a custom configuration for any Modbus device and propose it to the platform developers. Once the configuration is released, it becomes available to all users of the platform.
Let’s collaborate
We’re empower your business with our technology expertise
Connecting Devices Using MQTT Adapter
In the case of using Teltonika TRB245 or any other similar gateway with MQTT support, you can consider this option as an alternative way to connect Modbus devices. While not an ideal solution, we’ll discuss its limitations below. Nevertheless, in certain situations, it may be appropriate if your Modbus device is not on the supported list and you prefer not to write a custom configuration.
Due to limitations in our automation platform, you can utilize the MQTT Adapter only in one of two modes: read-only or write-only.
Read-only Mode
The read-only mode is more promising. Here are the settings required for this mode in the Teltonika gateway admin panel:
- Disable the “Modbus TCP over Serial Gateway” mode if it is in use.
- Enable the “Modbus Serial Master” mode in the same menu (“Services” – “Modbus”).
- Add devices connected to the gateway and configure their settings (the exact configuration depends on the device).
- Navigate to the “Services” – “Data to Server” menu, configure and activate the data transmission to the MQTT broker of the automation platform.
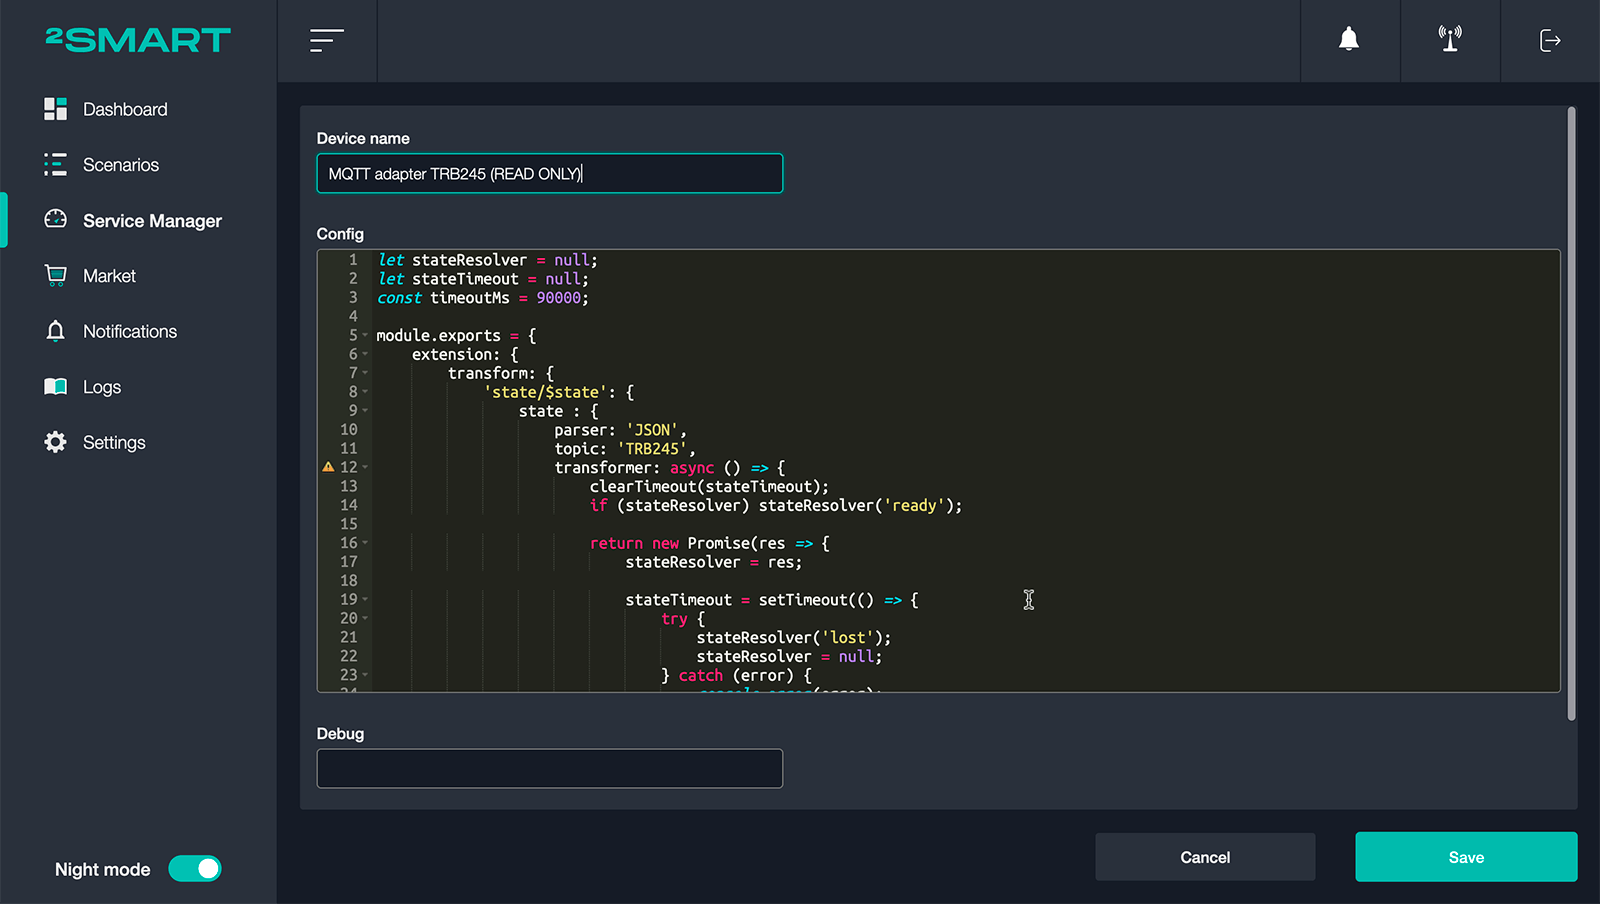
In the automation platform interface, you need to launch the MQTT Adapter bridge and write the configuration for handling values received from each sensor.
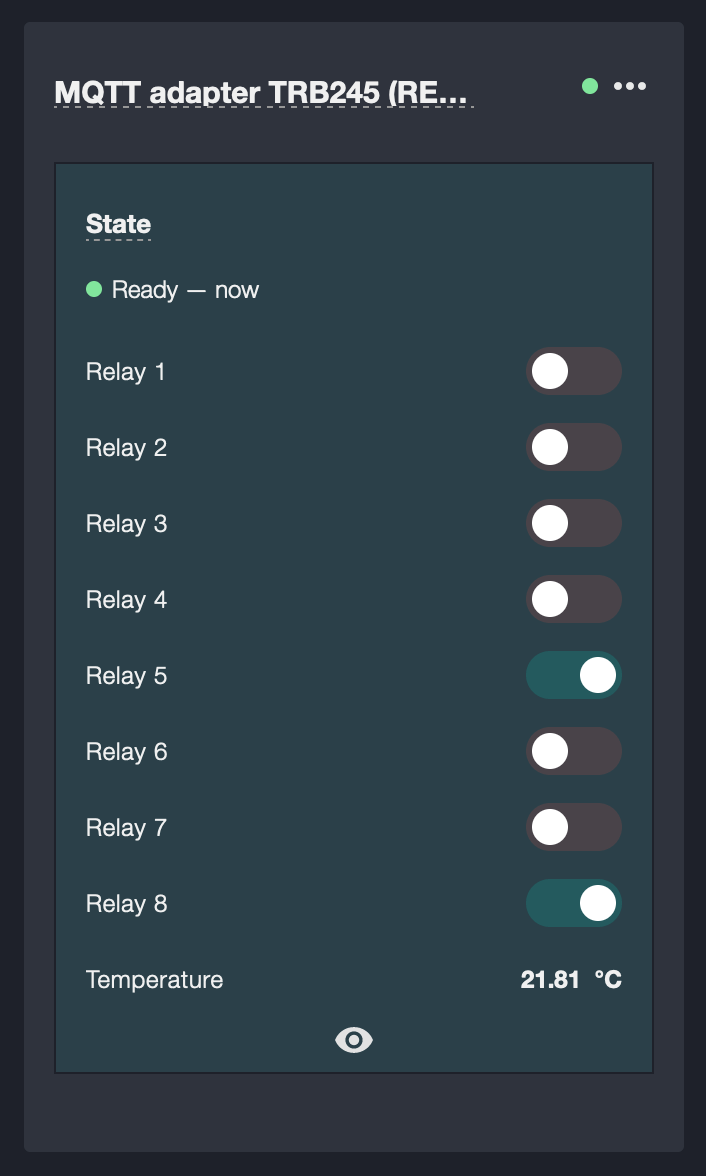
After completing the configuration, a new device card will appear on the automation platform dashboard, displaying the current readings of all sensors. In our case, this includes temperature sensor readings and the state of each of the eight relay outputs. However, the user won’t be able to manually control these relay outputs or use them in automation scenarios. This connection method is practical mainly for sensors and may not be suitable for controllable devices.
The only advantage of connecting Modbus devices to the automation platform using this method is that the user is not limited in the choice of devices.
Disadvantages include:
- Inability to control devices.
- The requirement for correct configuration of each connected sensor in the gateway admin panel according to Modbus protocol standards.
- The need to write a configuration for handling values from each sensor on the automation platform’s side.
To write the aforementioned configuration, the user needs to be familiar with the JSON syntax and possess programming skills in JavaScript. Additionally, it’s necessary to study the documentation for each device to correctly handle sensor values. For instance, the SM-100 temperature sensor we used in our example transmits temperature in hundredths, so we had to divide the sensor readings by hundred (2800 => 28℃).
Write-only Mode
As for the write-only mode, its configuration is possible in this setup, but it is practically useless. In this mode, the Teltonika gateway acts as an MQTT gateway, and the automation platform sends messages to it. However, since the MQTT Adapter of the platform cannot query an external gateway to retrieve data, the Teltonika device acts as a black box for it. The user is unaware of sensor readings; in our case, they cannot see temperature sensor readings and cannot reliably know which outputs are on or off.
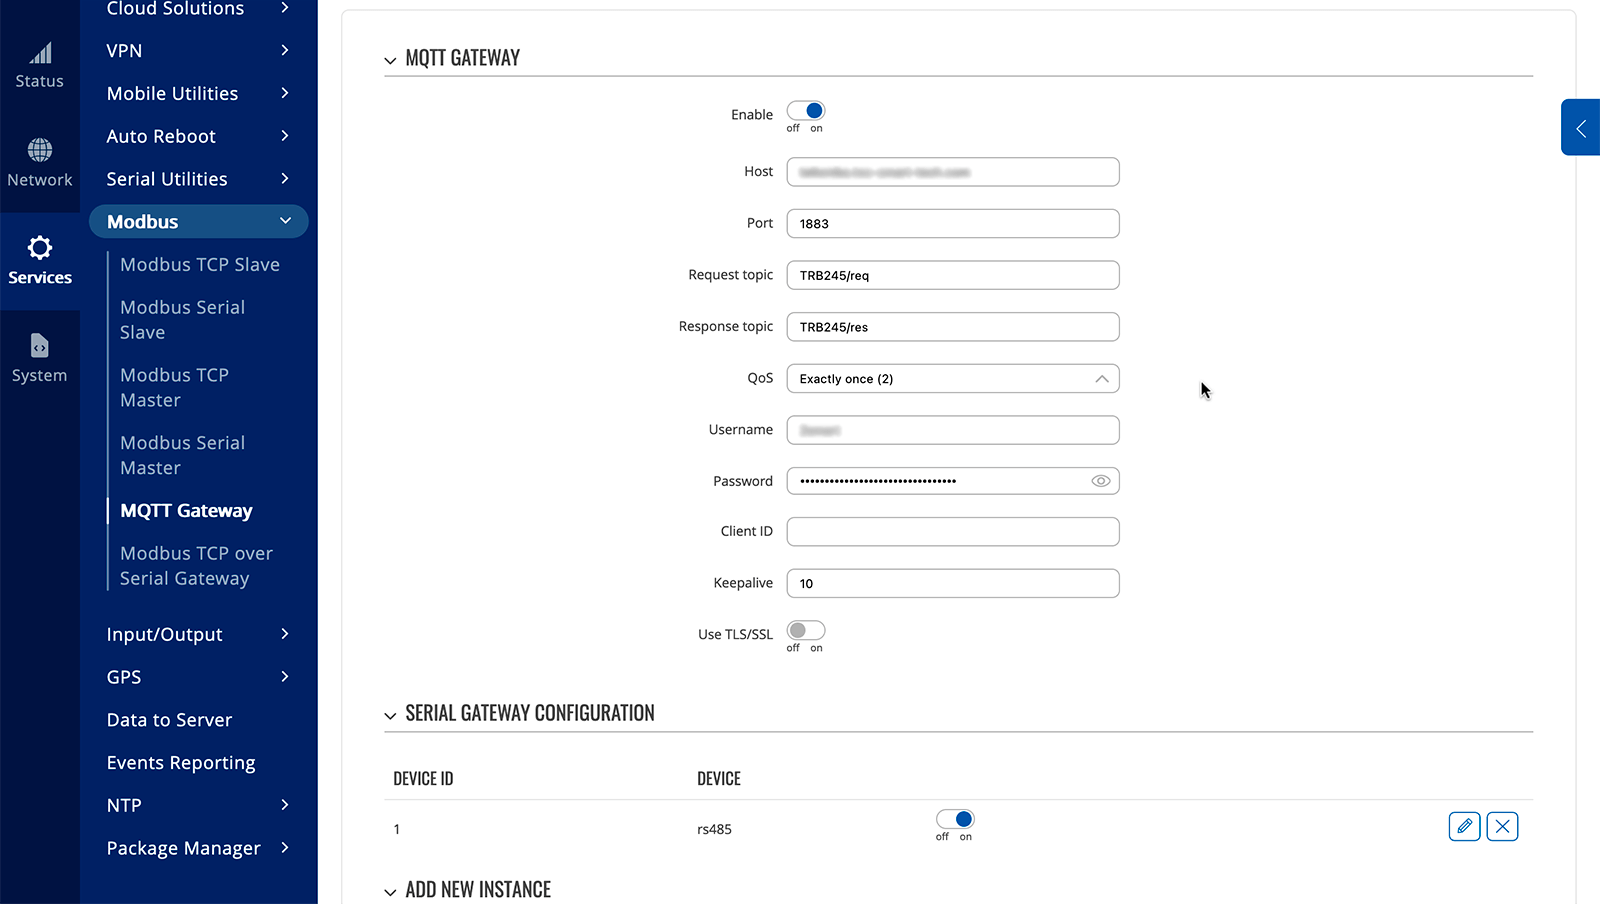
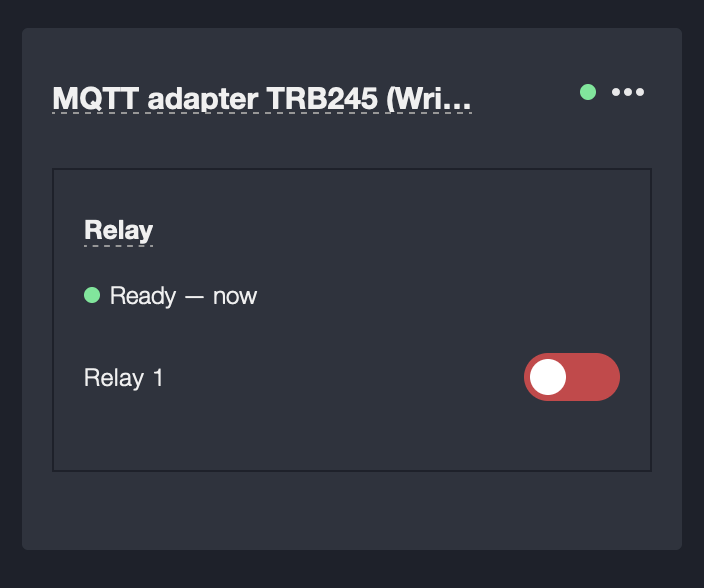
To configure this mode, in the Teltonika gateway admin panel, you need to disable the “Data to Server” or “Modbus Serial Master” mode if either of them was activated. After that, you need to go to the “Services” – “Modbus” – “MQTT Gateway” section, activate it, and make the necessary settings. Then, you must write the configuration for the MQTT adapter, after which a device card will appear on the platform’s dashboard.
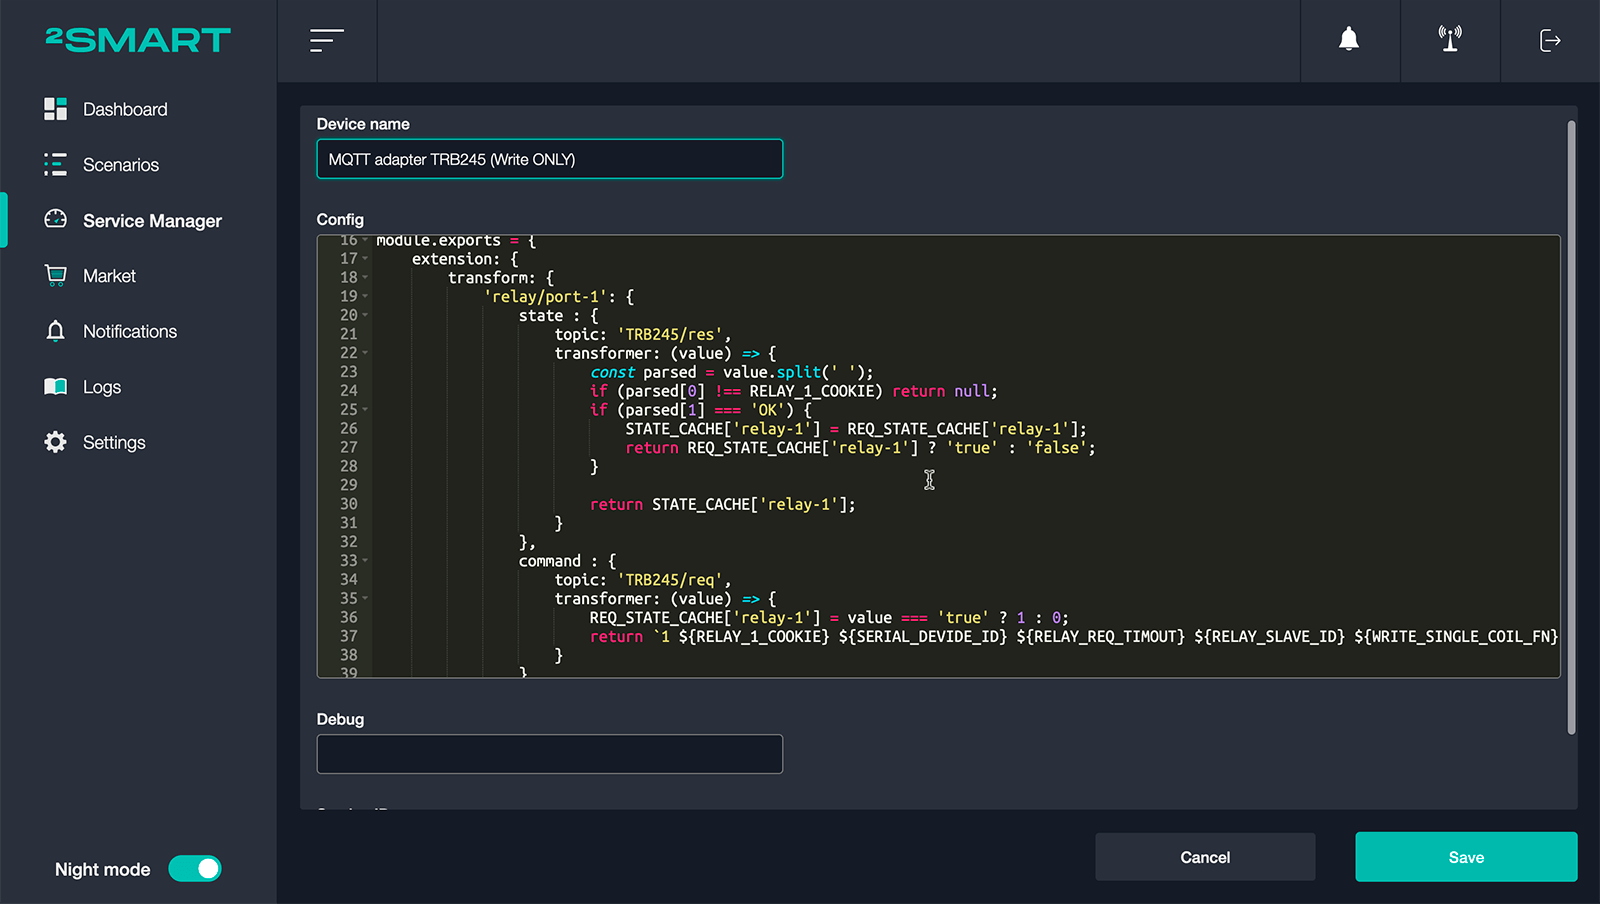
In this example, for demonstration purposes, we wrote the configuration only for the first relay output. The “off” state on the card has no relation to reality; it is merely the default sensor state.
The only action a user can take is to control the device by sending commands to turn it on or off. The state of the relay output will change, but it cannot be monitored in the automation platform interface. Therefore, in this mode, it is either impossible or very difficult to set up any automation scenarios.
Wrapping Up
After conducting an experiment on connecting Modbus devices to the open-source automation platform 2Smart Standalone using the Teltonika TRB245 gateway, we have identified three possible methods of communication between the platform and devices. Apart from the standard approach of interacting with Modbus devices using a specialized bridge, there are two communication options via the MQTT protocol.
Both usage scenarios of MQTT provided in the Teltonika gateway’s administrative panel proved less than ideal due to constraints in the current configuration of the automation platform. In one mode, users can receive sensor readings but cannot control them, making it suitable only for monitoring various parameters like temperature, humidity, pressure, etc. In the other mode, they can send control commands but are unaware of the actual sensor state, rendering it practically useless in real-world applications.
In practice, we recommend using the Modbus software bridge, which has demonstrated excellent performance in this experiment. Its only limitation is the finite list of devices it can interact with. Therefore, we advise platform users to cross-check this list before purchasing a new Modbus device. Alternatively, they should be prepared to independently write a configuration for the bridge to connect an unsupported device and await its publication after approval by the platform developers.
Don't forget to share this post!
Read Next


Let’s dive into your case
Share with us your business idea and expectations about the software or additional services.
